Behringer ULTRA-DI DI100 Quick Start Guide - Page 16
ULTRA-DI DI100 Controls - ultra di
 |
View all Behringer ULTRA-DI DI100 manuals
Add to My Manuals
Save this manual to your list of manuals |
Page 16 highlights
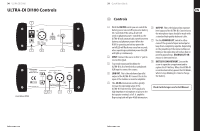
30 ULTRA-DI DI100 ULTRA-DI DI100 Controls (1) (7) (6) (8) Front & Rear DI100 (5)(2) (3) (4) 31 Quick Start Guide (EN) Controls (1) With the ON/OFF switch you can switch the battery power on and off to preserve battery life. Switched off the ultra-di will still work on phantom power. Switched on, the ULTRA-DI will automatically switch between battery and phantom power. When the DI100 is operating on battery power the on/off LED will flash once every few seconds, when operating on phantom power the LED will light up continuously. (2) INPUT. Connect the source to this 1/4" jack to receive the signal. (3) To provide maximum flexibility the ULTRA-DI is also fitted with an unbalanced XLR input to connect the source. (4) LINK OUT. This is the unbalanced parallel output of the ULTRA-DI. Connect this to the input of the backline or monitor amplifier. (5) The -20 dB attenuation switches greatly increase the operating range of the ULTRA-DI. From the low-level signals of a high impedance microphone or guitar to the hot speaker terminals of a P. A. amplifier. Depressing both will give 40 dB attenuation. (6) OUTPUT. This is the balanced microphone level output of the ULTRA-DI. Connection to the microphone input should be made with a standard high quality balanced cable. (7) Use the GROUND LIFT switch to either connect the ground of input and output or keep them completely separate. Depending on the grounding of the connected devices linking or disconnecting will reduce hum or prevent ground loops. GROUND LIFT ON means no interconnection. (8) BATTERY COMPARTMENT. Loosen the screw to open the compartment and to replace the 9 V battery. When the ULTRA-DI is switched on battery power the LED blinks, when it stops blinking it is time to change the battery. Check Out behringer.com for Full Manual
-
 1
1 -
2
-
3
-
4
-
5
-
6
-
7
-
8
-
9
-
10
-
 11
11 -
 12
12 -
 13
13 -
 14
14 -
 15
15 -
 16
16 -
 17
17 -
 18
18 -
 19
19 -
 20
20 -
 21
21 -
22
-
23
 |
 |
