BenQ BenQ GL2460HM Monitor User Manual
BenQ BenQ GL2460HM Monitor Manual
 |
View all BenQ BenQ GL2460HM Monitor manuals
Add to My Manuals
Save this manual to your list of manuals |
BenQ BenQ GL2460HM Monitor manual content summary:
- BenQ BenQ GL2460HM Monitor | User Manual - Page 1
GL2460 / GL2460HM LCD Monitor User Manual - BenQ BenQ GL2460HM Monitor | User Manual - Page 2
BenQ Corporation to notify any person of such revision or changes. Power Safety Please follow these safety instructions for best performance, and long life for your monitor liquid of any kind into this product. Servicing Do not attempt to service this product yourself, as opening or removing covers - BenQ BenQ GL2460HM Monitor | User Manual - Page 3
further to incorporate life cycle design in the aspects of material selection, manufacturing, packaging, transportation, using and disposal of the products. BenQ ecoFACTS label lists key eco-friendly design highlights of each product, hoping to ensure that consumers make informed green choices at - BenQ BenQ GL2460HM Monitor | User Manual - Page 4
monitor wall mounting kit 14 Getting the most from your BenQ monitor 15 How to install the monitor on a new computer 16 How to upgrade the monitor 24 Navigating the main menu ...25 Display menu ...26 Picture menu ...28 Picture Advanced menu ...30 Audio menu ...33 System menu ...34 Troubleshooting - BenQ BenQ GL2460HM Monitor | User Manual - Page 5
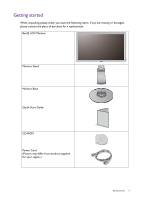
unpacking please check you have the following items. If any are missing or damaged, please contact the place of purchase for a replacement. BenQ LCD Monitor Monitor Stand Monitor Base Quick Start Guide CD-ROM Power Cord (Picture may differ from product supplied for your region.) Getting started 5 - BenQ BenQ GL2460HM Monitor | User Manual - Page 6
separately. • Consider keeping the box and packaging in storage for use in the future when you may need to transport the monitor. The fitted foam packing is ideal for protecting the monitor during transport. Always keep the product and accessories out of reach of small children. 6 Getting started - BenQ BenQ GL2460HM Monitor | User Manual - Page 7
Getting to know your monitor Front view Back view 1 2 1. Control buttons 2. Power button 3. Release button 4. Input and output ports (vary by model, see • Above diagram may vary depending on the model. • Picture may differ from product supplied for your region. Getting to know your monitor 7 - BenQ BenQ GL2460HM Monitor | User Manual - Page 8
1. AC power input jack 2. Audio Line In 1 23 4 5 6 Models with dual inputs 3. Headphone jack 4. HDMI socket 5. DVI-D socket 6. D-Sub socket 1 56 8 Getting to know your monitor - BenQ BenQ GL2460HM Monitor | User Manual - Page 9
. Do not plug-in or turn-on the power to the monitor until instructed to do so. • The following illustrations are for your reference monitor stand to the monitor base as illustrated until it locks in place. If the screen size is 27 inches, follow the illustration on the right to attach the monitor - BenQ BenQ GL2460HM Monitor | User Manual - Page 10
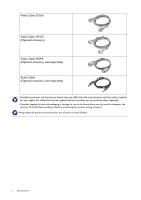
plug of the D-Sub cable (at the end without the ferrite filter) to the monitor video socket. Connect the other end of the cable (at the end with the plug of the DVI-D cable (at the end without the ferrite filter) to the monitor video socket. Connect the other end of the cable (at the end with the - BenQ BenQ GL2460HM Monitor | User Manual - Page 11
the plug of the HDMI cable to the HDMI port on the monitor. Connect the other end of the cable to the HDMI port of models with speakers). Connect the audio cable between the socket on the rear of the monitor (Line In) and your computer audio outlet. You may connect headphones to the headphone jack - BenQ BenQ GL2460HM Monitor | User Manual - Page 12
product supplied for your region. Turn on the monitor by pressing the power button on the monitor. Turn on the computer too, and follow the instructions in Getting the most from your BenQ monitor on page 15 to install the monitor software. To extend the service life of the product, we recommend that - BenQ BenQ GL2460HM Monitor | User Manual - Page 13
from the stand arm. If the screen size is 27 inches, follow the illustration on the right to detach the monitor base. Release the thumbscrew on the bottom of the monitor base and detach the monitor base as illustrated. 3. Remove the monitor stand. Insert a pointed object such as a screwdriver to the - BenQ BenQ GL2460HM Monitor | User Manual - Page 14
stable to support the weight of the monitor. • Turn off the monitor and the power before disconnecting the cables from the LCD monitor. 1. Remove the monitor stand. the hole. Then pull the monitor stand backward away from the monitor. 2. Follow the instruction manuals of the wall mount bracket you - BenQ BenQ GL2460HM Monitor | User Manual - Page 15
the most from your BenQ monitor To gain the most benefit from your new BenQ LCD monitor, you should install the custom BenQ LCD Monitor driver software as provided on the BenQ LCD Monitor CD-ROM. The circumstances under which you connect and install your BenQ LCD Monitor will determine which process - BenQ BenQ GL2460HM Monitor | User Manual - Page 16
wizard has selected the correct name of your monitor and click Next. 6. Click Finish. 7. Restart the computer. To find the suitable driver files for the purchased model, refer to the following table. Driver files GL2460 Suitable models GL2460 / GL2460HM 16 Getting the most from your BenQ monitor - BenQ BenQ GL2460HM Monitor | User Manual - Page 17
on an existing computer This instruction details the procedure for manually updating the existing monitor driver software on your Microsoft Windows computer. It is currently tested as compatible for Windows 8 and Windows 7 Operating System (OS). The BenQ LCD Monitor driver for your model may well - BenQ BenQ GL2460HM Monitor | User Manual - Page 18
bar. Go to Settings, Control Panel, Devices and Printers and right-click the name of your monitor from the menu Monitor, and then the Properties button. 5. Click the Driver tab and the Update Driver button. 6. Insert the BenQ LCD Monitor CD-ROM into a CD drive on the computer. 7. In the Update Driver - BenQ BenQ GL2460HM Monitor | User Manual - Page 19
menu. 3. Click the Hardware tab. 4. Click Generic PnP Monitor, and then the Properties button. 5. Click the Driver tab and the Update Driver button. 6. Insert the BenQ LCD Monitor CD-ROM into a CD drive on the computer. 7. In the Update Driver Software window, select the option Browse my computer - BenQ BenQ GL2460HM Monitor | User Manual - Page 20
How to adjust your monitor The control panel 1 2 No. Name 1. Control keys 2. Power key Description Accesses the functions or menu items displayed on the screen, right next to each key. Turns the power on or off. 20 How to adjust your monitor - BenQ BenQ GL2460HM Monitor | User Manual - Page 21
menu operation All OSD (On Screen Display) menus can be accessed by the control keys. You can use the OSD menu to adjust all the settings on your monitor. 1 2 Picture Mode Input Volume Menu Exit 4 3 Picture Mode Input Volume Menu Exit 1. Press any of the control keys. 2. The hot key menu is - BenQ BenQ GL2460HM Monitor | User Manual - Page 22
main menu Function Custom Key 2 • By default, the key is the hot key for Input. To change the default settings, see Customizing the hot keys on page 23. • For Down/Decrease adjustment. Custom Key 3 • By default, the , press and hold any key for 10 seconds. 22 How to adjust your monitor - BenQ BenQ GL2460HM Monitor | User Manual - Page 23
on your computer is set to the native resolution of the monitor when you use the Auto Adjustment function. If you wish, you can always adjust the screen geometric settings manually using geometry menu items. To assist you in this endeavour, BenQ has provided a screen test image utility which you - BenQ BenQ GL2460HM Monitor | User Manual - Page 24
Your monitor features a picture mode that is suitable for reading e-books and documents. 1. Press any of the control keys to bring up the hot key menu, and press Menu to access the main menu. 2. Go to Picture Advanced and Picture Mode. 3. Select Reading. The setting will take effect immediately. 24 - BenQ BenQ GL2460HM Monitor | User Manual - Page 25
Navigating the main menu You can use the OSD (On Screen Display) menu to adjust all the settings on your monitor. Press any of the control keys to bring up the hot key menu, and press Menu to access the main menu. See Basic menu operation - BenQ BenQ GL2460HM Monitor | User Manual - Page 26
exit the menu, select . or to select a menu item. to make selection. Item Function Auto Adjustment Optimizes and adjusts the screen settings automatically for you. Range Input H. Position V. Position Not applicable to a digital input signal. Use this to change the input to that appropriate - BenQ BenQ GL2460HM Monitor | User Manual - Page 27
Item Pixel Clock Phase Function Adjusts the pixel clock frequency timing to synchronize with the analog input video signal. See also: Picture optimization on page 23. Range 0 to 100 Not applicable to a digital input signal. Adjusts the pixel clock phase timing to synchronize with the analog input - BenQ BenQ GL2460HM Monitor | User Manual - Page 28
Picture menu Available menu options may vary depending on the input sources, functions and settings. Menu options that are not available will become grayed out. And keys that are not available will be disabled and the corresponding OSD icons will - BenQ BenQ GL2460HM Monitor | User Manual - Page 29
primary colors can be altered to change the color tint of the image. Go to the succeeding R (red), G (green), and B (blue) menus to change the settings. Decreasing one or more of the colors will reduce their respective influence on the color tint of the image. (e.g. if you reduce the Blue level - BenQ BenQ GL2460HM Monitor | User Manual - Page 30
may vary depending on the input sources, functions and settings. Menu options that are not available will become grayed To exit the menu, select . Item Function Picture Mode Select a picture mode that best suits the type of images shown on the screen. Standard For basic PC application. Movie - BenQ BenQ GL2460HM Monitor | User Manual - Page 31
of the display as possible. Determines the color space (RGB or YUV) based on the detected video signal. You might need to manually set the Color Format if colors shown on the monitor screen do not display properly. If the input source is HDMI, color format is not selectable. In other words, Color - BenQ BenQ GL2460HM Monitor | User Manual - Page 32
Item HDMI RGB PC Range (for models with HDMI inputs) Function Determines the range of color scales. Select an option that matches the RGB range setting on the connected HDMI device. Range • RGB (0 ~ 255) • RGB (16 ~ 235) 32 Navigating the main menu - BenQ BenQ GL2460HM Monitor | User Manual - Page 33
options may vary depending on the input sources, functions and settings. Menu options that are not available will become grayed out. more than 2 audio sources) Allow users to select the audio source or let the monitor detect it automatically. Range 0 ~ 100 • ON • OFF • PC Audio • HDMI Audio • Auto - BenQ BenQ GL2460HM Monitor | User Manual - Page 34
that are not available will be disabled and the corresponding OSD icons will disappear. Mode: Standard Display Picture Picture Advanced Audio System OSD Settings Custom Key 1 Custom Key 2 Custom Key 3 DDC/CI HDMI Auto Switch Auto Power Off Resolution Notice Language Display Time OSD Lock 5 Sec - BenQ BenQ GL2460HM Monitor | User Manual - Page 35
SiCG/BiH/CRO • Română • Nederlands Svenska • Português Display Adjusts the display time of the OSD menu. Time OSD Lock Prevents all the monitor settings from being accidentally changed. When this function is activated, the OSD controls and hotkey operations will be disabled. • 5 Sec. • 10 Sec - BenQ BenQ GL2460HM Monitor | User Manual - Page 36
notice of the recommended resolution when a new input source is detected by the monitor. • ON • OFF Information Displays the current monitor property settings. • Input • Current Resolution • Optimum Resolution (best with the monitor) • Model Name Reset All Resets all mode, color and geometry - BenQ BenQ GL2460HM Monitor | User Manual - Page 37
on these instructions. How do you use a VGA extension cable? Remove the extension cable for the test. Is monitor does not support, please change the setting to one of the supported mode. Please read the "Preset display modes" section from the link "Adjusting the Screen Resolution". Troubleshooting - BenQ BenQ GL2460HM Monitor | User Manual - Page 38
and monitor go If the LED is illuminated get necessary support. Is instructions instructions. You are running the monitor set a proper aspect ratio for the input sources. See Display Mode on page 31 for details. The image is displaced in one direction. Read the instructions these instructions. monitor - BenQ BenQ GL2460HM Monitor | User Manual - Page 39
Need more help? If your problems remain after checking this manual, please contact your place of purchase or e-mail us at: [email protected]. Troubleshooting 39
-
 1
1 -
 2
2 -
 3
3 -
 4
4 -
 5
5 -
 6
6 -
 7
7 -
8
-
9
-
10
-
11
-
12
-
13
-
14
-
15
-
16
-
17
-
18
-
19
-
20
-
21
-
22
-
23
-
24
-
25
-
26
-
27
-
28
-
29
-
30
-
31
-
32
-
33
-
34
-
35
-
36
-
37
-
38
-
39
 |
 |

GL2460 / GL2460HM
LCD Monitor
User Manual