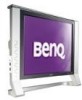
BenQ FP241VW User Manual
BenQ FP241VW - 24" LCD Monitor Manual
 |
UPC - 840046017903
View all BenQ FP241VW manuals
Add to My Manuals
Save this manual to your list of manuals |
BenQ FP241VW manual content summary:
- BenQ FP241VW | User Manual - Page 1
FP241VW 24" Wide-Screen LCD Monitor User Manual Welcome - BenQ FP241VW | User Manual - Page 2
changes from time to time in the contents hereof without obligation of BenQ Corporation to notify any person of such revision or changes. Please follow these safety instructions for best performance, and long life for your monitor Power Safety • The AC plug isolates this equipment from the AC supply - BenQ FP241VW | User Manual - Page 3
21 Picture optimization ...22 How to adjust your monitor 23 The control panel ...23 On Screen Display (OSD) menu structure 24 Hot key mode ...26 Main menu mode ...30 Troubleshooting ...43 Frequently asked questions (FAQ 43 Need more help? ...44 Supported PC Timings ...45 Specifications ...46 - BenQ FP241VW | User Manual - Page 4
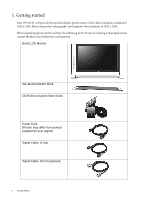
that your graphic card supports the resolution of 1920 x 1200. When unpacking please check you have the following items. If any are missing or damaged, please contact the place of purchase for a replacement. BenQ LCD Monitor Top-Mount Monitor Shelf CD-ROM and Quick Start Guide Power Cord (Picture - BenQ FP241VW | User Manual - Page 5
USB cable (optional) HDMI cable (optional) Consider keeping the box and packaging in storage for use in the future when you may need to transport the monitor. The fitted foam packing is ideal for protecting the monitor during transport. Getting started 5 - BenQ FP241VW | User Manual - Page 6
2. Getting to know your monitor Front view (1) 1. Top-mount monitor shelf The detachable shelf is space saving and stylishly designed, gaining extra desk space for you. You can put small stationery items or toy collectibles on the shelf to keep the desk roomy. The two - BenQ FP241VW | User Manual - Page 7
t / Brightness 4. u/ Contrast 5. MENU / EXIT 6. Mode 7. Game Mode 8. Input / Swap 9. PerfectMotion 10. i key For more information about these keys, please refer to The control panel on page 23. 1. Earphone socket Plug the earphone or headset into the earphone socket to receive the audio signal from - BenQ FP241VW | User Manual - Page 8
back of your LCD monitor has a VESA standard mount with 100mm pattern, allowing the installation of a wall mount bracket. See Using the monitor wall mounting kit on page 12 to learn more. Back view(2): locations of plugs & sockets 1. Power AC input connector 2. DVI-D input connector 3. HDMI input - BenQ FP241VW | User Manual - Page 9
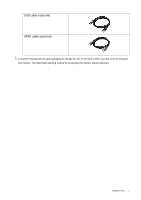
the power to the monitor until instructed to do so. 1. Unpack the monitor and place it on a stable surface. 2. Connect the PC video cable. Do not use between source video and digital LCD monitors or projectors. The digital video signals produce a superior quality picture than analog video signals. - BenQ FP241VW | User Manual - Page 10
, etc. The shelf can support objects with a total weight of up to 1kg, otherwise the shelf may be bent. Never place cans of beer, soda, glasses of water or anything wet near or on top of the shelf! If you have any need to shift the monitor around, please remove the top - BenQ FP241VW | User Manual - Page 11
on the computer too, and follow the instructions in Section 4: Getting the most from your BenQ monitor on page 14 to install the monitor software. Adjusting the monitor angle For comfortable viewing of images on the screen, you may tilt the monitor upward to 12 degrees and downward to -5 degrees - BenQ FP241VW | User Manual - Page 12
the it upward away from the monitor. Using the monitor wall mounting kit The back of your LCD monitor has a VESA standard mount with 100mm pattern, is stable to support the weight of the monitor. • Turn off the monitor and the power before disconnecting the cables from the LCD monitor. 1. Remove the - BenQ FP241VW | User Manual - Page 13
2. Follow the instruction manuals of the wall mount bracket you purchased to complete the installation. How to assemble your monitor hardware 13 - BenQ FP241VW | User Manual - Page 14
to do, is connect the monitor cables as instructed in How to install your monitor hardware of this User Manual, turn the computer and monitor on, then you're ready to Plug-and-Play with USB, Windows, and your BenQ LCD Monitor's USB hub. Windows XP and later comes with integrated USB support. It will - BenQ FP241VW | User Manual - Page 15
If you require a User Name and Password to login to your Windows computer, you must be logged on as an Administrator or as a member of the Administrators group in order to install the monitor driver software. Furthermore, if your computer is connected to a network which has security access - BenQ FP241VW | User Manual - Page 16
the instructions in How to assemble your monitor hardware on page 9. When Windows starts, it will automatically detect the new monitor and launch the Found New Hardware Wizard. Follow the prompts until it displays the option to Install Hardware Device drivers. 2. Insert the BenQ LCD Monitor CD - BenQ FP241VW | User Manual - Page 17
computer This instruction details the procedure for manually updating the existing monitor driver software on your Microsoft Windows computer. It is currently tested as compatible (and recommended only) for Windows XP and Windows Vista Operating System (OS). The BenQ LCD Monitor driver for your - BenQ FP241VW | User Manual - Page 18
Click 'Browse' and select Driver > Windows Vista > FP241VW from the CD, and click the Next button. This will copy and install the appropriate monitor driver files to your computer. 9. Click Close. You do not need to restart Windows Vista, as the BenQ LCD monitor drivers will operate immediately with - BenQ FP241VW | User Manual - Page 19
close the wizard and return you to the Monitor Properties window, now renamed BenQ FP241VW Properties. 11. Click Close, OK, and OK. This will close the Display Properties windows. You do not need to restart Windows XP, as the BenQ LCD monitor drivers will operate immediately with no further action - BenQ FP241VW | User Manual - Page 20
, you may need to replace and update the PC video card hardware to be able to support the native resolution of the monitor. 1. Open Display Properties and select the Settings tab. You can open Display Properties by right-clicking on the Windows desktop and selecting Properties from the pop-up menu - BenQ FP241VW | User Manual - Page 21
in the specification section of this User Manual: Supported PC Timings on page 45 You can choose 60, 70 and 75 Hertz, (but not 72Hz) for the native resolution of 1920 x 1200. 1. Double click the Display icon in Control Panel. 2. From the Display Properties window, select the Settings tab and click - BenQ FP241VW | User Manual - Page 22
an optimal display from an analog (D-Sub) input is to use the i key function. Press the i key to optimize the currently displayed image to the screen. When you connect a digital video output using a digital (DVI) cable to your monitor, the i key and the Auto Adjustment function will be disabled - BenQ FP241VW | User Manual - Page 23
8. How to adjust your monitor The control panel 1. "Power": Turn the power on or off. 2. "ENTER/PIP" key: Enter sub menus and select items. The key is also the hot key for activating the PIP (Picture-in-Picture) function and selecting a video input source for the PIP window. 3. t (Up) key: For Up/ - BenQ FP241VW | User Manual - Page 24
Action Game Racing Game ON OFF D-sub/Composite DVI/S-Video HDMI Component OFF Small Medium Large AUDIO Volume Mute ON OFF The Audio menu is only available when the HDMI cable is connected to the monitor and HDMI is set to be the input signal for the main window. 24 How to adjust your monitor - BenQ FP241VW | User Manual - Page 25
SYSTEM Input Display Mode OSD Settings DDC/CI Information Reset All D-sub DVI HDMI Component Composite S-Video Full Aspect 1: 1 Language H. Position V. Position Display Time OSD Lock YES NO YES NO English French 5 sec. 10 sec. 15 sec. 20 sec. 25 sec. 30 sec. ON OFF How to adjust your monitor 25 - BenQ FP241VW | User Manual - Page 26
other connectors, an HDMI connector can carry both video and audio signals via the same cable and transfer uncompressed digital audio and video for the highest image quality. It supports digital televisions (DTV), set-top boxes, DVD players, and DVD recorders, etc. 26 How to adjust your monitor - BenQ FP241VW | User Manual - Page 27
of the main window is from the computer graphic/PC video signals (D-sub, DVI, HDMI, or Component), you will cycle through the following messages indicating the video input sources for the PIP window. PIP off and Exit • If the input source of the main window is from the video signals (Composite or - BenQ FP241VW | User Manual - Page 28
select an input source for the main window or swap the input signals between the main window and the PIP window when the PIP function is activated. Video input sources include D-sub, DVI, HDMI, and Component, while the Video input sources include Composite and S-video. 28 How to adjust your monitor - BenQ FP241VW | User Manual - Page 29
video type (Computer Graphic/PC video or Video) for the main window. The cycle will be performed in a specific sequence. Keeping pressing the key will swap the current main window's signal source with the current PIP window dynamic contents, such as movies, games, etc. How to adjust your monitor 29 - BenQ FP241VW | User Manual - Page 30
Main menu mode You can use the OSD (On Screen Display) menu to adjust all the settings on your monitor. Press the MENU key to display the following main OSD menu. 1 the HDMI cable is connected to the monitor and HDMI is set to be the input signal for the main window. 30 How to adjust your monitor - BenQ FP241VW | User Manual - Page 31
for you. The i key is a 'hot-key' for this function. Operation Press the ENTER key to select this option and make adjustment. Range When you connect a digital video output using a digital (DVI) cable to your monitor, the i key and the Auto Adjustment function will be disabled. How to - BenQ FP241VW | User Manual - Page 32
applicable to a digital input signal. See also: Picture optimization on page 22 Adjusts the pixel clock phase timing to synchronize with the analog input video signal. Not applicable to a digital input signal. Press the t or u keys to adjust the value. 0 to 100 0 to 100 0 to 100 0 to 63 See also - BenQ FP241VW | User Manual - Page 33
to have softness effect on the display. Color - Press ENTER to enter the Color menu. Normal Allows video and still photographs to be viewed with natural coloring. This is the factory default color. Bluish Applies a white color. Range 0 to 100 0 to 100 1 to 5 How to adjust your monitor 33 - BenQ FP241VW | User Manual - Page 34
to select Red, Green, or Blue. Then use the t or u keys to make the color adjustments. Press the t or u keys to change the settings. • Red (0 to 100) • Green adjust the value. • 0 to 100 The function is not available for use when the input source is D-Sub or DVI-D. 34 How to adjust your monitor - BenQ FP241VW | User Manual - Page 35
or u keys to make adjustments or selections. 5. To return to the previous type of images shown on the screen. • Standard - for basic PC application. • Movie - for viewing videos. • Dynamics - for viewing landscape-specific videos cannot turn off 'PerfectMotion' or manually set its value. See also PerfectMotion on - BenQ FP241VW | User Manual - Page 36
windows; the left window demonstrates images of Standard mode, while the right window manually set its value. *BenQ's PerfectMotion technology is introduced to well prevent you from ghosting or motion blur effects while viewing fast moving objects on your LCD monitor. The solution to such a problem - BenQ FP241VW | User Manual - Page 37
to change the input to that appropriate to your video cable connection type. See also PIP hot key on page 26 Adjusts the size of the PIP window. Adjusts the horizontal position of the PIP window. Adjusts the vertical position of the PIP window. Operation Press the t or u keys to change the settings - BenQ FP241VW | User Manual - Page 38
in the images displayed in the PIP window. Press the t key to increase the contrast and press the u key to decrease the contrast. 0 to 100 Press the t key to improve the crispness of the display and press the u key to have softness effect on the display. 1 to 5 38 How to adjust your monitor - BenQ FP241VW | User Manual - Page 39
the previous menu, press the MENU key. The Audio menu is only available when the HDMI cable is connected to the monitor and HDMI is set to be the input signal for the main window. Item Volume Mute Function Adjusts the level of volume. Mutes the audio input. Operation Press the t key to increase - BenQ FP241VW | User Manual - Page 40
for the main window. Use this to change the input to that appropriate to your video cable connection type. Operation Press the t or u keys to change the settings. See also Input /Swap hot key on page 28 Range • Composite • S-video • D-sub • DVI • HDMI • Component 40 How to adjust your monitor - BenQ FP241VW | User Manual - Page 41
Display Mode Adjusts the screen image to fit into the size you prefer when the input video images may have different native aspect ratios. Czech/ Traditional Chinese • Hungarian/ Simplified Chinese • Serbo-Croatian • Romanian • Dutch • Russian • Swedish • Portuguese How to adjust your monitor 41 - BenQ FP241VW | User Manual - Page 42
t or u keys to adjust the value. OSD Lock Prevents all the monitor settings from being accidentally changed. Data Channel/Command Interface, which was developed by Video Electronics Standards Association (VESA). DDC/CI capability allows monitor controls to be sent via the software for remote - BenQ FP241VW | User Manual - Page 43
9. Troubleshooting Frequently asked questions (FAQ) The image is blurred: Read the How to adjust the screen resolution on page 20 section, and then select the correct resolution, refresh rate and make adjustments based on these instructions. How do you use a VGA extension cable? Remove the extension - BenQ FP241VW | User Manual - Page 44
rate and make adjustments based on these instructions. The image is displaced in one direction: Read the How to adjust the screen resolution Need more help? If your problems remain after checking this manual, please contact your place of purchase or e-mail us at: [email protected] 44 Troubleshooting - BenQ FP241VW | User Manual - Page 45
Supported PC 25.18 35.00 67.00 30.24 37.86 72.80 31.50 37.50 VESA VESA VESA VESA VESA Macintosh VESA VESA VESA Macintosh VESA Macintosh SUN 66 SUN VESA VESA IBMI VESA SPARC2 VESA VESA manually changing the phase setting and the pixel frequency from the "Display" menu. • To extend the service - BenQ FP241VW | User Manual - Page 46
, display mode, DDC/CI* VESA DPMS, EPA < 95 Watt (without USB port) < 2 Watt Input signals Synchronization Temperature (operating) Air humidity (operating) Certifications 46 Specifications RGB analog 0.7 Vpp/75 Ohm positive, DVI-D, Composite, Component, S-Video, HDMI TTL separate signal connection - BenQ FP241VW | User Manual - Page 47
panel may generally be 30 to 40 ms while the "Response Time" is 12 ms. *MPRT: Motion Picture Response Time. *BenQ's PerfectMotion technology is introduced to well prevent you from ghosting or motion blur effects while viewing fast moving objects on your LCD monitor. The solution to such a problem
-
 1
1 -
 2
2 -
 3
3 -
 4
4 -
 5
5 -
 6
6 -
 7
7 -
8
-
9
-
10
-
11
-
12
-
13
-
14
-
15
-
16
-
17
-
18
-
19
-
20
-
21
-
22
-
23
-
24
-
25
-
26
-
27
-
28
-
29
-
30
-
31
-
32
-
33
-
34
-
35
-
36
-
37
-
38
-
39
-
40
-
41
-
42
-
43
-
44
-
45
-
46
-
47
 |
 |

Welcome
FP241VW
24" Wide-Screen LCD Monitor
User Manual