BenQ FP71G User Manual - Page 7
Connect the video cable., Connect the power cable to the monitor.
 |
UPC - 840046010713
View all BenQ FP71G manuals
Add to My Manuals
Save this manual to your list of manuals |
Page 7 highlights
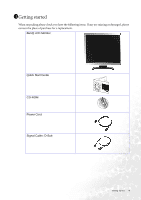
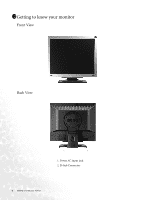
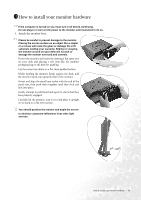
2. Connect the video cable. Connect the plug of the D-Sub cable (at the end without the ferrite filter) to the monitor D-Sub socket. Connect the other plug of the D-Sub cable (at the end with the ferrite filter) to the computer video D-Sub socket. Tighten all finger screws to prevent the plugs from accidently falling out during use. 3. Connect the power cable to the monitor. Plug one end of the power cord into the socket labelled 'POWER IN' on the rear of the monitor. Do not connect the other end to a power point just yet. 4. Route the cables via the loose bracket. Release the cable retaining clip by squeezing the clip inwards as illustrated. Position the cables together and reinsert the clip over them to retain the cables neatly in place behind the monitor stand. 7 How to install your monitor hardware
-
 1
1 -
 2
2 -
 3
3 -
 4
4 -
 5
5 -
 6
6 -
 7
7 -
 8
8 -
 9
9 -
 10
10 -
 11
11 -
 12
12 -
13
-
14
-
15
-
16
-
17
-
18
-
19
-
20
-
21
-
22
-
23
-
24
-
25
-
26
-
27
-
28
-
29
-
30
-
31
-
32
-
33
-
34
 |
 |
