BenQ FP93GS User Manual - Page 11
To attach the rear cover, Push the other two tabs on the right side of the rear - manual
 |
View all BenQ FP93GS manuals
Add to My Manuals
Save this manual to your list of manuals |
Page 11 highlights
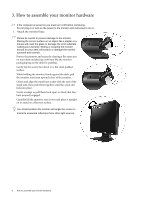
3. Remove the rear cover. Slide the rear cover back toward you to remove it. The screw plate at the back of the monitor could be revealed. 4. Follow the instruction manuals of the wall mount bracket you purchased to complete the installation. To attach the rear cover: 1. Tilt the rear cover forward and insert the two tabs on the front edge into the recesses of the screw plate. No tools are required. 2. Position the two tabs on left side of the rear cover to fit into the grooves in the screw plate. 3. Push the other two tabs on the right side of the rear cover inward so that they could snap into the aligned grooves. There will be a clicking sound as the rear cover is perfectly attached. How to assemble your monitor hardware 11
-
 1
1 -
2
-
3
-
4
-
5
-
 6
6 -
 7
7 -
 8
8 -
 9
9 -
 10
10 -
 11
11 -
 12
12 -
 13
13 -
 14
14 -
 15
15 -
 16
16 -
17
-
18
-
19
-
20
-
21
-
22
-
23
-
24
-
25
-
26
-
27
-
28
-
29
-
30
-
31
-
32
-
33
-
34
-
35
-
36
-
37
-
38
-
39
 |
 |

11
How to assemble your monitor hardware
To attach the rear cover:
3.
Remove the rear cover.
Slide the rear cover back toward you to remove it. The screw
plate at the back of the monitor could be revealed.
4.
Follow the instruction manuals of the wall mount
bracket you purchased to complete the installation.
1.
Tilt the rear cover forward and insert the two tabs on
the front edge into the recesses of the screw plate.
No tools are required.
2.
Position the two tabs on left side of the rear cover to
fit into the grooves in the screw plate.
3.
Push the other two tabs on the right side of the rear
cover inward so that they could snap into the aligned
grooves.
There will be a clicking sound as the rear cover is
perfectly attached.