BenQ FP94VW User Manual
BenQ FP94VW Manual
 |
View all BenQ FP94VW manuals
Add to My Manuals
Save this manual to your list of manuals |
BenQ FP94VW manual content summary:
- BenQ FP94VW | User Manual - Page 1
FP94VW 19" Wide-Screen LCD Monitor User Manual Welcome - BenQ FP94VW | User Manual - Page 2
changes from time to time in the contents hereof without obligation of BenQ Corporation to notify any person of such revision or changes. Please follow these safety instructions for best performance, and long life for your monitor Power Safety • The AC plug isolates this equipment from the AC supply - BenQ FP94VW | User Manual - Page 3
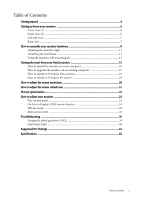
13 Getting the most from your BenQ monitor 15 How to install the monitor on a new computer 16 How to upgrade the monitor on an existing computer 17 How to install on Windows Vista systems 18 How to install on Windows XP system 19 How to adjust the screen resolution 20 How to adjust the screen - BenQ FP94VW | User Manual - Page 4
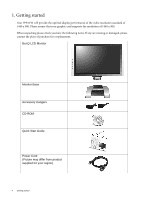
that your graphic card supports the resolution of 1440 x 900. When unpacking please check you have the following items. If any are missing or damaged, please contact the place of purchase for a replacement. BenQ LCD Monitor Monitor Base Accessory Hangers CD-ROM Quick Start Guide Power Cord (Picture - BenQ FP94VW | User Manual - Page 5
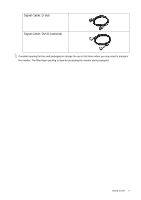
Signal Cable: D-Sub Signal Cable: DVI-D (optional) Consider keeping the box and packaging in storage for use in the future when you may need to transport the monitor. The fitted foam packing is ideal for protecting the monitor during transport. Getting started 5 - BenQ FP94VW | User Manual - Page 6
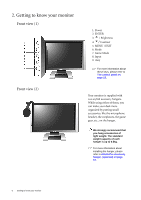
5. MENU / EXIT 6. Mode 7. Game Mode 8. Input 9. i key For more information about these keys, please refer to The control panel on page 23. Your monitor is supplied with two stylish accessory hangers. While using either of them, you can make your desk more organized by putting small accessories, like - BenQ FP94VW | User Manual - Page 7
or headset into the earphone socket to receive the audio signal from HDMI input. See Audio menu on page 35 for information about audio controls. 1. Rear cover: VESA mount inside The back of your LCD monitor has a VESA standard mount with 100mm pattern, allowing the installation of a wall mount - BenQ FP94VW | User Manual - Page 8
until instructed to do so. 1. Attach the monitor base. Please be careful to prevent damage to the monitor. Placing the screen surface on an object like a stapler or a mouse will crack the glass or damage the LCD substrate voiding your warranty. Sliding or scraping the monitor around on your desk - BenQ FP94VW | User Manual - Page 9
end to the DVI-D port on your computer. (optional) The DVI-D format is used for direct digital connection between source video and digital LCD monitors or projectors. The digital video signals produce a superior quality picture than analog video signals. Connect the plug of the D-Sub cable (at the - BenQ FP94VW | User Manual - Page 10
the clip inwards as illustrated. Position the cables together and reinsert the clip over them to retain the cables neatly in place behind the monitor stand. 5. Attach the accessory hanger. (optional) Fit the tenon joints of the preferred accessory hanger to the mortises at the rear side of the - BenQ FP94VW | User Manual - Page 11
on the computer too, and follow the instructions in Section 4: Getting the most from your BenQ monitor on page 15 to install the monitor software. Adjusting the monitor angle For comfortable viewing of images on the screen, you may tilt the monitor upward to 20 degrees and downward to -5 degrees - BenQ FP94VW | User Manual - Page 12
object like a stapler or a mouse will crack the glass or damage the LCD substrate voiding your warranty. Sliding or scraping the monitor around on your desk will scratch or damage the monitor surround and controls. Protect the monitor and screen by clearing a flat open area on your desk and placing - BenQ FP94VW | User Manual - Page 13
to support the weight of the monitor. • Turn off the monitor and the power before disconnecting the cables from the LCD monitor. 1. Remove the monitor base. Lay the screen face down on a clean and well-padded surface. Detach the monitor base as instructed in "Getting the most from your BenQ monitor - BenQ FP94VW | User Manual - Page 14
removing the rear cover, you shall see the screw plate at the rear of the monitor. 4. Follow the instruction manuals of the wall mount bracket you purchased to complete the installation. To attach the rare cover sounds as the rare cover is perfectly attached. 14 How to assemble your monitor hardware - BenQ FP94VW | User Manual - Page 15
To gain the most benefit from your new BenQ color LCD flat screen monitor, you should install the custom BenQ LCD Monitor driver software as provided on the BenQ LCD Monitor CD-ROM. The circumstances under which you connect and install your BenQ LCD Monitor will determine which process you need to - BenQ FP94VW | User Manual - Page 16
selecting and installing the BenQ LCD Monitor driver software on a new computer which has never had a monitor driver installed before. This instruction is only suitable for a computer which has never been used before, and for which the BenQ LCD Monitor is the first ever monitor to be connected to - BenQ FP94VW | User Manual - Page 17
computer This instruction details the procedure for manually updating the existing monitor driver software on your Microsoft Windows computer. It is currently tested as compatible (and recommended only) for Windows XP and Windows Vista Operating System (OS). The BenQ LCD Monitor driver for your - BenQ FP94VW | User Manual - Page 18
Click 'Browse' and select Driver > Windows Vista > FP94VW from the CD, and click the Next button. This will copy and install the appropriate monitor driver files to your computer. 9. Click Close. You do not need to restart Windows Vista, as the BenQ LCD monitor drivers will operate immediately with - BenQ FP94VW | User Manual - Page 19
window, now renamed BenQ FP94VW Properties. 11. Click Close, OK, and OK. This will close the Display Properties windows. You do not need to restart Windows XP, as the BenQ LCD monitor drivers will operate immediately with no further action required by you. Getting the most from your BenQ monitor 19 - BenQ FP94VW | User Manual - Page 20
PC video card which supports this resolution. Software video drivers are often updated and available for new hardware video resolutions. If necessary, you may need to replace and update the PC video card hardware to be able to support the native resolution of the monitor. 1. Open Display Properties - BenQ FP94VW | User Manual - Page 21
set in your computer. There is a table with the factory modes in the specification section of this User Manual: Supported PC Timings on page 41 You can choose 60, 70 and 75 Hertz, (but not 72Hz) for the native resolution of 1440 x 900. 1. Double click the Display icon in Control Panel. 2. From the - BenQ FP94VW | User Manual - Page 22
computer is set to the native resolution of the monitor (1440 x 900) when you use the i key function. If you wish, you can always adjust the screen geometric settings manually using geometry menu items. To assist you in this endeavour, BenQ has provided a screen test image utility which you can use - BenQ FP94VW | User Manual - Page 23
8. How to adjust your monitor The control panel 1. "Power": Turn the power on or off. 2. "ENTER including Standard, Action Game, and Racing Game. 8. "Input" key: Manually switch the input signal between D-Sub, DVI, and HDMI. 9. "i key": Adjust vertical position, phase, horizontal position and pixel - BenQ FP94VW | User Manual - Page 24
Pixel Clock Phase Brightness Contrast Sharpness Color DynamicContrast Normal Bluish Reddish User Mode Reset Color ON OFF PICTURE ADVANCED Picture Mode Senseye Demo menu is only available when the HDMI cable is connected to the monitor and HDMI is set to be the input signal. 24 How to adjust your - BenQ FP94VW | User Manual - Page 25
SYSTEM Input OSD Settings DDC/CI Information Reset All D-sub DVI HDMI Language H. Position V. Position Display Time OSD Lock ON OFF YES NO English French German Italian Spanish Polish/Japanese Czech Portuguese 5 Sec. 10 Sec. 15 Sec. 20 Sec. 25 Sec. 30 Sec. ON OFF How to adjust your monitor 25 - BenQ FP94VW | User Manual - Page 26
Hot key mode The monitor keys perform as hot keys to provide direct access to particular volume, and press the MENU key to exit. The hotkey is only available when the HDMI cable is connected to the monitor and HDMI is set to be the input signal. Mode hot key Press the key continually to switch - BenQ FP94VW | User Manual - Page 27
setting will take effect immediately. See also Picture Mode on page 33. Press the Input key continually to select an input source connected to your monitor. To specify the input source, release the key when you see the message of the preferred input source, which will be lasting for around 3 seconds - BenQ FP94VW | User Manual - Page 28
mode You can use the OSD (On Screen Display) menu to adjust all the settings on your monitor. Press the MENU key to display the following main OSD menu. 1 2 3 4 5 There only available when the HDMI cable is connected to the monitor and HDMI is set to be the input signal. 28 How to adjust your - BenQ FP94VW | User Manual - Page 29
. Operation Press the ENTER key to select this option and make adjustment. Range When you connect a digital video output using a digital (DVI) cable to your monitor, the i key and the Auto Adjustment function will be disabled. How to adjust your - BenQ FP94VW | User Manual - Page 30
u keys to adjust the value. See also: Picture optimization on page 22 0 to 100 0 to 100 0 to 100 0 to 63 30 How to adjust your monitor - BenQ FP94VW | User Manual - Page 31
crispness of the display and press the u key to have softness effect on the display. Range 0 to 100 0 to 100 1 to 5 How to adjust your monitor 31 - BenQ FP94VW | User Manual - Page 32
warm tint to the image and is factory pre-set to the news print standard white color. User Mode Tailors the image color tint. The blend of the Red, Green and Blue primary colors • ON • OFF Activating DynamicContrast will disable Brightness and Contrast controls. 32 How to adjust your monitor - BenQ FP94VW | User Manual - Page 33
Standard - for basic PC application. • Movie - for viewing videos. • Dynamics - for viewing landscape-specific videos. • Photo - for viewing still images. • Action Game - for playing action games. • Racing • Movie • Dynamics • Photo • Action Game • Racing Game How to adjust your monitor 33 - BenQ FP94VW | User Manual - Page 34
, while the right window presents the images under the specified mode. Improves the gray level response time of the LCD panel. Press the t or ukeys to change the settings. Press the t or ukeys to change the settings. signal source: • Full • 16:9 Aspect • 4:3 Aspect 34 How to adjust your monitor - BenQ FP94VW | User Manual - Page 35
adjustments or selections. 5. To return to the previous menu, press the MENU key. The Audio menu is only available when the HDMI cable is connected to the monitor and HDMI is set to be the input signal. Item Volume Mute Function Adjusts the level of volume. Mutes the audio input. Operation Press - BenQ FP94VW | User Manual - Page 36
to change the input to that appropriate to your video cable connection type. Operation Press the t or u keys to change the settings. Range • D-sub • DVI • HDMI See also Input hot key on page 27. OSD Settings - Press ENTER to enter the OSD Settings menu. 36 How to adjust your - BenQ FP94VW | User Manual - Page 37
-Croatian • Romanian • Dutch • Russian • Swedish • Portuguese 0 to 100 0 to 100 • 5 Sec. • 10 Sec. • 15 Sec. • 20 Sec. • 25 Sec. • 30 Sec. How to adjust your monitor 37 - BenQ FP94VW | User Manual - Page 38
the settings. • ON • OFF • ON • OFF • YES • NO *DDC/CI, short for Display Data Channel/Command Interface, which was developed by Video Electronics Standards Association (VESA). DDC/CI capability allows monitor controls to be sent via the software for remote diagnostics. 38 How to adjust your - BenQ FP94VW | User Manual - Page 39
9. Troubleshooting Frequently asked questions (FAQ) The image is blurred: Read the How to adjust the screen resolution on page 20 section, and then select the correct resolution, refresh rate and make adjustments based on these instructions. How do you use a VGA extension cable? Remove the extension - BenQ FP94VW | User Manual - Page 40
the screen resolution on page 20 section and then select the correct resolution, refresh rate and make adjustments based on these instructions. The image ? If your problems remain after checking this manual, please contact your place of purchase or e-mail us at: [email protected] 40 Troubleshooting - BenQ FP94VW | User Manual - Page 41
Supported PC Timings Resolution 72.19 50. VESA VESA VESA VESA VESA Macintosh VESA VESA VESA VESA Macintosh VESA Macintosh SUN 66 SUN VESA VESA VESA VESA VESA IBMI VESA SPARC2 VESA VESA VESA manually changing the phase setting and the pixel frequency from the "Display" menu. • To extend the service - BenQ FP94VW | User Manual - Page 42
11. Specifications Model Display type Viewable diagonal Native (maximum) resolution Colors Contrast / Brightness Dynamic contrast ratio Response time* Viewing angle (left/right, up/down) Line frequency FP94VW 19.0", active, TFT 480 mm 1,440 x 900 16.7 million 800:1 / 300 cd/m2 2000:1 (typical) 5 - BenQ FP94VW | User Manual - Page 43
down/up) Dimensions (H x Time quoted for many LCD monitors is specific to transitions from black to LCD panel may generally be 30 to 40 ms while the "Response Time" is 12 ms. BenQ VESA). DDC/CI capability allows monitor controls to be sent via the software for remote diagnostics. Specifications 43
-
 1
1 -
 2
2 -
 3
3 -
 4
4 -
 5
5 -
 6
6 -
 7
7 -
8
-
9
-
10
-
11
-
12
-
13
-
14
-
15
-
16
-
17
-
18
-
19
-
20
-
21
-
22
-
23
-
24
-
25
-
26
-
27
-
28
-
29
-
30
-
31
-
32
-
33
-
34
-
35
-
36
-
37
-
38
-
39
-
40
-
41
-
42
-
43
 |
 |

Welcome
FP94VW
19" Wide-Screen LCD Monitor
User Manual