BenQ G2200WT User Manual
BenQ G2200WT Manual
 |
View all BenQ G2200WT manuals
Add to My Manuals
Save this manual to your list of manuals |
BenQ G2200WT manual content summary:
- BenQ G2200WT | User Manual - Page 1
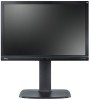
G2200WT 22" Wide-Screen LCD Monitor User Manual Welcome - BenQ G2200WT | User Manual - Page 2
, optical, chemical, manual or otherwise, without the prior written permission of BenQ Corporation. Disclaimer BenQ Corporation makes no representations or warranties, either expressed or implied, with respect to the contents hereof and specifically disclaims any warranties, merchantability or - BenQ G2200WT | User Manual - Page 3
an existing computer 13 How to install on Windows Vista systems 14 How to install on Windows XP system 15 Picture optimization ...16 How to adjust your monitor 17 The control panel ...17 Hot key mode ...18 Main menu mode ...19 Troubleshooting ...28 Frequently asked questions (FAQ 28 Need more - BenQ G2200WT | User Manual - Page 4
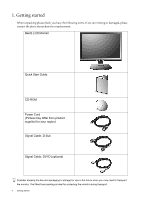
please check you have the following items. If any are missing or damaged, please contact the place of purchase for a replacement. BenQ LCD Monitor Quick Start Guide CD-ROM Power Cord (Picture may differ from product supplied for your region) Signal Cable: D-Sub Signal Cable: DVI-D (optional - BenQ G2200WT | User Manual - Page 5
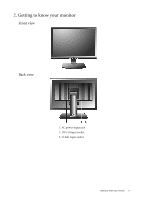
2. Getting to know your monitor Front view Back view 1. AC power input jack 2. DVI-D input socket 3. D-Sub input socket Getting to know your monitor 5 - BenQ G2200WT | User Manual - Page 6
plug-in or turn-on the power to the monitor until instructed to do so. 1. Unpack the monitor and place it on a stable surface. 2. Connect used for direct digital connection between source video and digital LCD monitors or projectors. The digital video signals produce a superior quality picture than - BenQ G2200WT | User Manual - Page 7
may differ from product supplied for your region. Turn on the monitor by pressing the power button on the front of the monitor. Turn on the computer too, and follow the instructions in Section 4: Getting the most from your BenQ monitor on page 11 to install the monitor software. How to assemble your - BenQ G2200WT | User Manual - Page 8
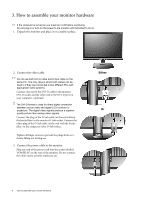
monitor (optional) 1. Fully extend the monitor and tilt it. Gently lift the display up and extend the stand to the maximum extended position. The stand should be vertically extended to allow the monitor to rotate from landscape to portrait mode. Then tilt the monitor. 8 How to assemble your monitor - BenQ G2200WT | User Manual - Page 9
degrees clockwise as illustrated. To avoid the edge of the LCD display hitting the monitor base surface while it is being rotated, do tilt and extend the monitor to the highest position before you start to rotate the display. 3. Adjust the monitor to the desired viewing angle. How to assemble your - BenQ G2200WT | User Manual - Page 10
Viewing angle adjustment You may position the screen to the desired angle with -2° to +20° monitor tilt, 90° (left and right total) monitor swivel, and 130 mm monitor height. 10 How to assemble your monitor hardware - BenQ G2200WT | User Manual - Page 11
The circumstances under which you connect and install your BenQ LCD Monitor will determine which process you need to follow to successfully install the BenQ LCD Monitor driver software. These circumstances relate to which version of Microsoft Windows you are using, and whether you are connecting the - BenQ G2200WT | User Manual - Page 12
the instructions in How to assemble your monitor hardware on page 6. When Windows starts, it will automatically detect the new monitor and launch the Found New Hardware Wizard. Follow the prompts until it displays the option to Install Hardware Device drivers. 2. Insert the BenQ LCD Monitor CD - BenQ G2200WT | User Manual - Page 13
on an existing computer This instruction details the procedure for manually updating the existing monitor driver software on your Microsoft Windows computer. It is currently tested as compatible for Windows XP and Windows Vista Operating System (OS). The BenQ LCD Monitor driver for your model may - BenQ G2200WT | User Manual - Page 14
the correct folder name of your monitor from provided driver list, and click Next. This will copy and install the appropriate monitor driver files to your computer. 10. Click Close. You do not need to restart Windows Vista, as the BenQ LCD monitor drivers will operate immediately with no further - BenQ G2200WT | User Manual - Page 15
Follow the wizard instructions noting the steps below: 6. Insert the BenQ LCD Monitor CD-ROM into a CD drive on the computer you attached the monitor to. 7. Check the option 'Install from a list or specific location' and click Next. 8. Check the option 'Search for the best driver in these locations - BenQ G2200WT | User Manual - Page 16
on your computer is set to the native resolution of the monitor when you use the AUTO key function. If you wish, you can always adjust the screen geometric settings manually using geometry menu items. To assist you in this endeavour, BenQ has provided a screen test image utility which you can use to - BenQ G2200WT | User Manual - Page 17
6. How to adjust your monitor The control panel 1. "AUTO": Adjust vertical position, phase, horizontal position and pixel clock automatically. 2. "MENU" key: Activate OSD main menu will disappear after a few seconds of no key activity. See Hot key mode on page 18. How to adjust your monitor 17 - BenQ G2200WT | User Manual - Page 18
Mode hot key Press the W key continually to switch between the 5 modes for the main window, including Standard, Movie, Dynamics, Photo, and sRGB. The setting will take effect immediately. that may be connected to your monitor. The setting will take effect immediately. See also Input on page 26. 18 - BenQ G2200WT | User Manual - Page 19
menu mode You can use the OSD (On Screen Display) menu to adjust all the settings on your monitor. Press the MENU key to display the following main OSD menu. 1 2 3 4 There are 4 on page 20 • Picture menu on page 22 • Picture Advanced menu on page 24 • System menu on page 26 How to adjust your - BenQ G2200WT | User Manual - Page 20
. Operation Press the ENTER key to select this option and make adjustment. Range When you connect a digital video output using a digital (DVI) cable to your monitor, the AUTO key and the Auto Adjustment function will be disabled. 20 How to adjust your - BenQ G2200WT | User Manual - Page 21
W or X keys to adjust the value. See also: Picture optimization on page 16. 0 to 100 0 to 100 0 to 100 0 to 63 How to adjust your monitor 21 - BenQ G2200WT | User Manual - Page 22
W key to improve the crispness of the display and press the X key to have softness effect on the display. Range 0 to 100 0 to 100 1 to 5 22 How to adjust your monitor - BenQ G2200WT | User Manual - Page 23
. • Red (0 to 100) • Green (0 to 100) • Blue (0 to 100) • YES • NO • ON • OFF Activating DynamicContrast will disable Brightness and Contrast controls. How to adjust your monitor 23 - BenQ G2200WT | User Manual - Page 24
Standard - for basic PC application. • Movie - for viewing videos. • Dynamics - for viewing landscape-specific videos and playing games. • Photo - for viewing still images. • sRGB - for better color matching settings. Range • Standard • Movie • Dynamics • Photo • sRGB 24 How to adjust your monitor - BenQ G2200WT | User Manual - Page 25
from Picture Mode. The screen will be divided into two windows; the left window demonstrates images of Standard mode, while the right window presents the images under the specified mode. This feature is provided to allow aspect ratio's other than 16:10 to be displayed without geometric distortion - BenQ G2200WT | User Manual - Page 26
• English • French • German • Italian • Spanish • Polish/ Japanese • Czech/ Traditional Chinese • Hungarian/ Simplified Chinese • Serbo-Croatian • Romanian • Dutch • Russian • Swedish • Portuguese 26 How to adjust your monitor - BenQ G2200WT | User Manual - Page 27
or X keys to change the settings. OSD Lock Prevents all the monitor settings from being accidentally changed. Press the W or X keys to change . Press MENU to leave the OSD Settings menu. DDC/CI* Allows the monitor Press the ENTER key to settings to be set through select this option. Press - BenQ G2200WT | User Manual - Page 28
instructions on the link "Adjusting the Screen Resolution" on the CD. Select the native resolution. Pixel errors can be seen: One of several pixels is permanently black, one or more pixels are permanently white, one or more pixels are permanently red, green, blue or another color. • Clean the LCD - BenQ G2200WT | User Manual - Page 29
at its native resolution. To have the optimal display performance of each type of input sources, you can use the "Display Mode" function to set a proper aspect ratio for the input sources. See Display Mode on page 25 for details. The image is displaced in one direction: Read the instructions on the
-
 1
1 -
 2
2 -
 3
3 -
 4
4 -
 5
5 -
 6
6 -
 7
7 -
8
-
9
-
10
-
11
-
12
-
13
-
14
-
15
-
16
-
17
-
18
-
19
-
20
-
21
-
22
-
23
-
24
-
25
-
26
-
27
-
28
-
29
 |
 |

Welcome
G2200WT
22" Wide-Screen LCD Monitor
User Manual