BenQ LW61ST LX60ST and LW61ST User Manual
BenQ LW61ST Manual
 |
View all BenQ LW61ST manuals
Add to My Manuals
Save this manual to your list of manuals |
BenQ LW61ST manual content summary:
- BenQ LW61ST | LX60ST and LW61ST User Manual - Page 1
LX60ST/LW61ST Digital Projector User Manual - BenQ LW61ST | LX60ST and LW61ST User Manual - Page 2
Table of contents Important safety instructions 3 Introduction 7 Projector features 7 Shipping contents 8 Projector exterior view 48 Care of the projector 48 Light source information 49 Troubleshooting 52 Specifications 53 Projector specifications 53 Dimensions 54 Wall mount installation - BenQ LW61ST | LX60ST and LW61ST User Manual - Page 3
that you follow the instructions mentioned in this manual and marked on the product. Safety Instructions 1. Please read this manual before 5. you operate your protector or uninterruptible power supply (UPS). 3. Refer servicing to qualified service personnel. 6. Do not block the projection lens - BenQ LW61ST | LX60ST and LW61ST User Manual - Page 4
above 40°C / 104°F - Locations where the altitudes are higher than 3000 m (10000 feet). Under no circumstances should you ever undo or remove any cover. Refer servicing only to suitably qualified professional service personnel. 3000 m (10000 feet) 0 m (0 feet) 4 Important safety instructions - BenQ LW61ST | LX60ST and LW61ST User Manual - Page 5
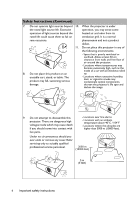
Safety Instructions (Continued) 12. Do not block the ventilation holes. 15. - Do not place this not use if tilted at an angle of more than 10 degrees left to right, nor at the projector serviced. angle of more than 15 degrees front to back. Using the projector when it is not fully horizontal may - BenQ LW61ST | LX60ST and LW61ST User Manual - Page 6
Safety Instructions (Continued) Ceiling mounting the projector We want you to have a pleasant experience using your BenQ projector, so we need to will perform the secondary role of restraining the projector should its attachment to the mounting bracket become loose. 6 Important safety instructions - BenQ LW61ST | LX60ST and LW61ST User Manual - Page 7
Introduction Projector features The projector integrates high-performance optical engine projection and a user-friendly design to deliver high reliability and ease of use. The projector offers the following features. • ECO BLANK - With technology, the Eco Blank function will save up to 90% of your - BenQ LW61ST | LX60ST and LW61ST User Manual - Page 8
is only supplied in some specific regions. Please consult your dealer for detailed information. Projector Power cord VGA cable Quick start guide User manual CD Warranty card* Remote control with batteries Optional accessories 1. Wall mount kit 2. RS232 cable 3. Soft carry bag 8 Introduction - BenQ LW61ST | LX60ST and LW61ST User Manual - Page 9
Projector exterior view Front/upper side 1. External control panel (See "Controls and functions" on page 1 10 for details.) 2. Vent (cool air intake) 4 3. Lens cover 2 4. Focus ring 5 5. 6 6. 7. Vent (heated air exhaust) Front IR remote sensor Projection lens 8. AC power jack 9. 12V DC - BenQ LW61ST | LX60ST and LW61ST User Manual - Page 10
light source. Lights up or flashes when the light source has developed a problem. 4. MENU/EXIT Turns on the On-Screen Display (OSD) menu. Goes menu settings. 5. Keystone/Arrow keys ( / Up, / Down) Manually corrects distorted images resulting from an angled projection. 6. Left/ Decreases the - BenQ LW61ST | LX60ST and LW61ST User Manual - Page 11
selection bar. 15. AUTO Automatically determines the best picture timings for the displayed image. 16. Keystone/Arrow buttons ( / Up, / Down) Manually corrects distorted images resulting from an angled projection. 17. Right Increases the projected image brightness. When the On-Screen Display (OSD - BenQ LW61ST | LX60ST and LW61ST User Manual - Page 12
18. ZOOM+/ZOOMMagnifies or reduces the projected image size. 19. VOLUME+/VOLUMEAdjusts the sound level. 20. MUTE Toggles projector audio between on and off. 21. ASPECT Selects the display aspect ratio. 22. MIC/VOL +/Adjusts the microphone sound level. 23. CAPTURE Captures the projected picture and - BenQ LW61ST | LX60ST and LW61ST User Manual - Page 13
• Replace only with the same or equivalent type recommended by the battery manufacturer. • Dispose of the used batteries according to the manufacturer's instructions and local environment regulations for your region. • Never throw the batteries into a fire. There may be danger of an explosion. • If - BenQ LW61ST | LX60ST and LW61ST User Manual - Page 14
Positioning your projector Choosing a location Your projector is designed to be installed in one of four possible installation locations: 1. Front Table Select this location with the projector placed on the table in front of the screen. This is the most common way to position the projector for - BenQ LW61ST | LX60ST and LW61ST User Manual - Page 15
Obtaining a preferred projected image size The distance from the projector lens to the screen, the zoom setting, and the video format each factors in the projected image size. Projection dimensions Refer to "Dimensions" on page 54 for the center of lens dimensions of this projector before - BenQ LW61ST | LX60ST and LW61ST User Manual - Page 16
LW61ST Screen size Screen Center of lens Vertical offset Projection distance Screen size Diagonal W Inch mm (mm) 80 2032 1723 100 2540 2154 120 3048 2585 150 3810 3231 180 4572 3877 200 5080 4308 220 5588 4739 240 6096 5169 270 6858 5816 300 7620 6462 H (mm) 1077 1346 1615 2019 - BenQ LW61ST | LX60ST and LW61ST User Manual - Page 17
Connection When connecting a signal source to the projector, be sure to: 1. Turn all equipment off before making any connections. 2. Use the correct signal cables for each source. 3. Ensure the cables are firmly inserted. • In the connections shown below, some cables may not be included with the - BenQ LW61ST | LX60ST and LW61ST User Manual - Page 18
• Many notebooks do not turn on their external video ports when connected to a projector. Usually a key combo like FN + F3 or CRT/LCD key turns the external display on/off. Locate a function key labeled CRT/ LCD or a function key with a monitor symbol on the notebook. Press FN and the labeled - BenQ LW61ST | LX60ST and LW61ST User Manual - Page 19
Once connected, the audio can be controlled by the projector On-Screen Display (OSD) menus. See "Audio Settings" on page 45 for details. The table below describes the connection methods for different devices, and where the sound is from. Device Audio input port PC/Component Video AUDIO IN 1/AUDIO - BenQ LW61ST | LX60ST and LW61ST User Manual - Page 20
On/Off Ring Tone" on page 36 for details. 3. If the projector is activated for the first time, select your OSD language following the onscreen instructions. 4. If you are prompted for a password, press the arrow keys to enter a six-digit password. See "Utilizing the password function" on page 24 for - BenQ LW61ST | LX60ST and LW61ST User Manual - Page 21
Adjusting the projected image Adjusting the projection angle The projector is equipped 2 adjuster feet. These adjusters change the image height and projection angle. To adjust the projector: Screw the adjuster feet to fine-tune the horizontal angle. To retract the feet, screw the adjuster feet - BenQ LW61ST | LX60ST and LW61ST User Manual - Page 22
the projector to automatically correct image keystoning, be sure the Auto Keystone function in the DISPLAY menu is On. Or you will need to manually correct it following ONE of these steps. • Using the remote control Press / on the projector or remote control to display the Keystone correction - BenQ LW61ST | LX60ST and LW61ST User Manual - Page 23
Using the menus The projector is equipped with On-Screen Display (OSD) menus for making various adjustments and settings. Below is the overview of the OSD menu. Main menu icon Main menu Sub-menu Highlight Current input signal DISPLAY Wall Color Aspect Ratio Auto Keystone Keystone Position Phase H. - BenQ LW61ST | LX60ST and LW61ST User Manual - Page 24
menu will be password-protected. IMPORTANT: The digits being input will be displayed as asterisks on-screen. Write your selected password down here in this manual in advance or right after the password is entered so that it is available to you should you ever forget it. Password Keep this - BenQ LW61ST | LX60ST and LW61ST User Manual - Page 25
. Recall Code: 0 2 1 2 3. Seek help from the local BenQ service center to decode the number. You may be required to provide proof of purchase that it is available to you should you ever forget it. Password Keep this manual in a safe place. 5. Confirm the new password by re-entering the new - BenQ LW61ST | LX60ST and LW61ST User Manual - Page 26
Disabling the password function To disable password protection, go back to the SYSTEM SETUP: Advanced > Security Settings > Change Security Settings menu after opening the OSD menu system. Press MODE/ENTER. The message "INPUT PASSWORD" is displayed. Enter the current password. i. If the password is - BenQ LW61ST | LX60ST and LW61ST User Manual - Page 27
Switching input signal The projector can be connected to multiple devices at the same time. However, it can only display one full screen at a time. When starting up, the projector automatically searches for the available signals. Be sure the Quick Auto Search function in the SOURCE menu is On if - BenQ LW61ST | LX60ST and LW61ST User Manual - Page 28
Magnifying and searching for details If you need to find the details on the projected picture, magnify the picture. Use the direction arrow keys for navigating the picture. • Using the remote control 1. Press ZOOM+/ZOOM- to display the Zoom bar. Press ZOOM+ to magnify the center of the picture. - BenQ LW61ST | LX60ST and LW61ST User Manual - Page 29
About the aspect ratio • In the pictures below, the black portions are inactive areas and the white portions are active areas. • OSD menus can be displayed on those unused black areas. 1. Auto: Scales an image proportionally to fit the projector's native resolution in its horizontal or vertical - BenQ LW61ST | LX60ST and LW61ST User Manual - Page 30
Optimizing the image Using Wall Color In the situation where you are projecting onto a colored surface such as a painted wall which may not be white, the Wall Color feature can help correct the projected picture's colors to prevent possible color difference between the source and projected pictures. - BenQ LW61ST | LX60ST and LW61ST User Manual - Page 31
6. Press to select a menu item to be changed and adjust the value with / . See "Fine-tuning the image quality in user modes" below for details. 7. When all settings have been done, highlight Save Settings and press MODE/ ENTER to store the settings. 8. The confirmation message "Setting Saved" is - BenQ LW61ST | LX60ST and LW61ST User Manual - Page 32
There are many different shades that are considered to be "white" for various purposes. One of the common methods of representing white color is known as the "color temperature". A white color with a low color temperature appears to be reddish white. A white color with a high color temperature - BenQ LW61ST | LX60ST and LW61ST User Manual - Page 33
Saturation is the amount of that color in a video picture. Lower settings produce less saturated colors; a setting of "0" removes that color from the image entirely. If the saturation is too high, that color will be overpowering and unrealistic. 6. Press to highlight Gain and adjust its values to - BenQ LW61ST | LX60ST and LW61ST User Manual - Page 34
To cancel the timer, perform the following steps: 1. Go to the SYSTEM SETUP: Basic > Presentation Timer menu and highlight Off. Press MODE/ENTER. A confirmation message is displayed. 2. Highlight Yes and press MODE/ENTER to confirm. You will see the message "Timer is Off" appearing on the screen. - BenQ LW61ST | LX60ST and LW61ST User Manual - Page 35
Locking control keys With the control keys on the projector locked, you can prevent your projector settings from being changed accidentally (by children, for example). When the Panel Key Lock is on, no control keys on the projector will operate except POWER. 1. Go to the SYSTEM SETUP: Basic > Panel - BenQ LW61ST | LX60ST and LW61ST User Manual - Page 36
4. If the action is successful, you see the message 'Captured Succeeded' on the screen. The captured picture is saved as MyScreen. 5. To view the captured picture displayed as the startup screen, set MyScreen in the SYSTEM SETUP: Basic > Splash Screen menu and restart the projector. • Using the OSD - BenQ LW61ST | LX60ST and LW61ST User Manual - Page 37
flash drive connected to the projector. It can eliminate the need for a computer source. Supported image formats: • JPEG(JPG) • BMP • Not all PDF files can be 2. The projector automatically displays the thumbnails. Or you can manually select USB Reader from the source selection bar. When viewing - BenQ LW61ST | LX60ST and LW61ST User Manual - Page 38
During a slide show To go to previous or next image rotate the image by 90 degree clockwise/ counterclockwise return to a previous page start/stop a slide show Press / / (Rotation is temporary; the image returns to its original orientation when you go back to thumbnails) Auto Enter Setting page - BenQ LW61ST | LX60ST and LW61ST User Manual - Page 39
Menu operation Menu system Please note that the on-screen display (OSD) menus vary according to the signal type selected and the projector model you are using. Main menu Sub-menu Options 1. DISPLAY 2. PICTURE 3. SOURCE Wall Color Off/Light Yellow/Pink/Light Green/ Blue/Blackboard Aspect Ratio - BenQ LW61ST | LX60ST and LW61ST User Manual - Page 40
Audio Settings Microphone Volume Power On/Off Ring Tone On/Off Light Source Normal/Economic/SMART Light Source Mode Selection ECO/Manual Adjustments Reset Light Source Timer Equivalent Light Source Hour Change Password Security Settings Power On Lock Change Security Settings Splash - BenQ LW61ST | LX60ST and LW61ST User Manual - Page 41
Main menu Sub-menu Options 5. SYSTEM SETUP: Advanced 6. INFORMA TION Baud Rate 2400/4800/9600/14400/19200/ 38400/57600/115200 Test Pattern On/Off Closed Caption Closed Caption Enable On/Off Caption Version CC1/CC2/CC3/CC4 Network On/Off Microphone On/Off Standby Settings Monitor Out - BenQ LW61ST | LX60ST and LW61ST User Manual - Page 42
adjusted. • The Keystone can only be adjusted within limited degrees. When you discover the inversion of the image depth, enable this function to correct the problem. 42 Operation - BenQ LW61ST | LX60ST and LW61ST User Manual - Page 43
1. DISPLAY menu Function Description Teaching Template Provides several preset patterns for various teaching purposes. Choose Blackboard or Whiteboard first by pressing / and press / to choose the pattern you need. Press MODE/ENTER to display the selected pattern. Pre-defined picture modes are - BenQ LW61ST | LX60ST and LW61ST User Manual - Page 44
3. SOURCE 4. SYSTEM SETUP: Basic Function Quick Auto Search Description See "Switching input signal" on page 27 for details. Color Space Conversion See "Changing Color Space" on page 27 for details. Presentation Timer Language Projector Position Menu Settings Operation Settings Reminds the - BenQ LW61ST | LX60ST and LW61ST User Manual - Page 45
Settings Power On Lock Splash Screen Lock See "Utilizing the password function" on page 24 for details. Web Control Lock See BenQ Network Projector Operation Guide for details. 5. SYSTEM SETUP: Advanced menu Operation 45 - BenQ LW61ST | LX60ST and LW61ST User Manual - Page 46
you can connect the projector using a suitable RS-232 cable and update or download the projector's firmware. This function is intended for qualified service personnel. Selecting On enables the function and the projector displays the grid test pattern. It helps you adjust the image size and focus and - BenQ LW61ST | LX60ST and LW61ST User Manual - Page 47
Reset All Settings Current System Status Description Wired LAN Wireless LAN Remote Desktop Broadcasting Projection Log In Code See BenQ Network Projector Operation Guide for details. AMX Device Discovery When AMX Device Discovery is On, the projector can be detected by AMX controller. Mac Address - BenQ LW61ST | LX60ST and LW61ST User Manual - Page 48
detergents. These can damage the case. Storing the projector If you need to store the projector for an extended time, please follow the instructions below: • Make sure the temperature and humidity of the storage area are within the recommended range for the projector. Please refer to "Specifications - BenQ LW61ST | LX60ST and LW61ST User Manual - Page 49
Light source information Getting to know the light source hour When the projector is in operation, the duration (in hours) of light source usage is automatically calculated by the built-in timer. See "Setting Light Source Mode Selection as Economic" below for more information on Economic mode. To - BenQ LW61ST | LX60ST and LW61ST User Manual - Page 50
Timing of replacing the light source When the Light indicator lights up red or a message appears suggesting it is time to replace the light source, please consult your dealer. The following light source warning displays will remind you to change the light source. Status Install a new light source - BenQ LW61ST | LX60ST and LW61ST User Manual - Page 51
Indicators Light Status & Description Off Off Off Off Off Red Green Orange Red Green Red Green Red Green Red Orange Red Power events Off Orange Stand-by mode. Off Green Flashing Powering up. Off Green Normal operation. • The projector needs to cool for 5 seconds after the power is turned - BenQ LW61ST | LX60ST and LW61ST User Manual - Page 52
Troubleshooting The projector does not turn on. Cause Remedy There is no power from the power cord. Plug the power cord into the AC is incorrect Cause You do not remember the password. Remedy Please see "Entering the password recall procedure" on page 25 for details. 52 Troubleshooting - BenQ LW61ST | LX60ST and LW61ST User Manual - Page 53
Specifications Projector specifications All specifications are subject to change without notice. Optical Resolution (LX60ST) 1024 x 768 XGA (LW61ST) 1280 x 800 WXGA Display system 1-CHIP DMD Lens F/Number F = 2.59 Light source Blue Laser Diode x 24 Electrical Power supply AC100-240V, 2.22 A, 50-60 - BenQ LW61ST | LX60ST and LW61ST User Manual - Page 54
Dimensions 393 mm (W) x 117 mm (H) x 298 mm (D) 393 298 117 Wall mount installation 105.5 76.6 (LX60ST) 75.95 (LW61ST) Minimum installation requirements LX60ST Computer Resolution: XGA Image Resolution: XGA Diagram Reference SMART Board 660 SMART Board 680 Promethean ActivBoard 164 - BenQ LW61ST | LX60ST and LW61ST User Manual - Page 55
Distance from top of wall mount to c 50 50 50 50 50 50 50 ceiling (mm) Minimum Ceiling Height e (mm) LW61ST Computer Resolution: WXGA Image Resolution: WXGA 2337.6 2565.6 2337.6 Diagram Reference SMART Board 685 2583.6 3274.6 2320.6 2565.6 Promethean Hitachi FX- - BenQ LW61ST | LX60ST and LW61ST User Manual - Page 56
will help you determine the exact mounting position so that it best suits your installation location. • The dimensions supplied are offered as a guide only and may differ depending on several factors relating to any specific installation. • The dimensions are based on the projector being configured - BenQ LW61ST | LX60ST and LW61ST User Manual - Page 57
.750 162.000 146.25 30.240 57.280 80.000 100.00 *Supported timing for non-3D and 3D signal with Frame Sequential and Top-Bottom format. **Supported timing for non-3D and 3D signal with Frame Sequential format. ***Supported timing for non-3D and 3D signal with Top-Bottom format. Specifications - BenQ LW61ST | LX60ST and LW61ST User Manual - Page 58
.241 80.000 1152 x 870@75Hz MAC21 75.06 68.68 100.00 *Supported timing for non-3D and 3D signal with Frame Sequential and Top-Bottom format. **Supported timing for non-3D and 3D signal with Frame Sequential format. ***Supported timing for non-3D and 3D signal with Top-Bottom format. 58 - BenQ LW61ST | LX60ST and LW61ST User Manual - Page 59
67.5 148.5 Displaying a 1080i(1125i)@60Hz or 1080i(1125i)@50Hz signal may result in slight image vibration. **Supported timing for non-3D and 3D signal with Frame Sequential format. Supported timing for Video and S-Video inputs Video mode NTSC** PAL SECAM PAL-M PAL-N PAL-60 NTSC4.43 Horizontal - BenQ LW61ST | LX60ST and LW61ST User Manual - Page 60
parts (labor included). To obtain warranty service, immediately notify the dealer from which you operate the product in accordance with BenQ's written instructions, especially the ambient humidity must be inbetween 10% mechanical, magnetic, optical, chemical, manual or otherwise, without the prior
-
 1
1 -
 2
2 -
 3
3 -
 4
4 -
 5
5 -
 6
6 -
 7
7 -
8
-
9
-
10
-
11
-
12
-
13
-
14
-
15
-
16
-
17
-
18
-
19
-
20
-
21
-
22
-
23
-
24
-
25
-
26
-
27
-
28
-
29
-
30
-
31
-
32
-
33
-
34
-
35
-
36
-
37
-
38
-
39
-
40
-
41
-
42
-
43
-
44
-
45
-
46
-
47
-
48
-
49
-
50
-
51
-
52
-
53
-
54
-
55
-
56
-
57
-
58
-
59
-
60
 |
 |

LX60ST/LW61ST
Digital Projector
User Manual