BenQ P992 User Manual
BenQ P992 Manual
 |
View all BenQ P992 manuals
Add to My Manuals
Save this manual to your list of manuals |
BenQ P992 manual content summary:
- BenQ P992 | User Manual - Page 1
Benq Color Monitor User's Manual Copyright 3. Slots and openings in the cabinet and the back or bottom Copyright © 2002 by Benq kind into this product. Do not attempt to service this product yourself, as make changes from shall be easily accessibe. Safety Instructions 1. The AC plug isolates - BenQ P992 | User Manual - Page 2
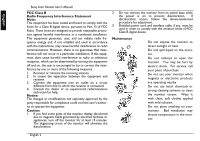
Benq Color Monitor User's Manual not installed and used in accordance with the instructions, may cause harmful interference to radio communications. monitor. ✗ Do not attempt to open the monitor. You may be hurt by electric shock. For service, call your place of purchase. ✗ Do not use your monitor - BenQ P992 | User Manual - Page 3
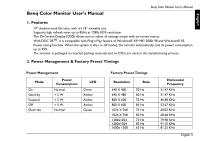
English Benq Color Monitor User's Manual Benq Color Monitor User's Manual 1. Features ✗ 19" shadow mask flat tube, with it's 18" viewable size ✗ Supports high refresh rates up to 85Hz at 1280x1024 resolution. ✗ The On-Screen Display (OSD) allows you to adjust all settings simply with on-screen - BenQ P992 | User Manual - Page 4
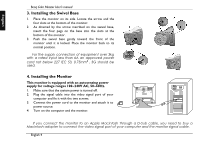
Benq Color Monitor User's manual 3. Installing the Swivel Base 1. Place the monitor on its side. Locate the arrow and the four slots at the bottom of the monitor. 2. As directed by the arrow inscribed on the swivel base, insert the four pegs on the base into the slots at the bottom of the monitor - BenQ P992 | User Manual - Page 5
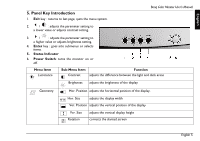
or adjusts brightness setting. 4. Enter key : goes into submenus or selects items. 5. Status Indicator 6. Power Switch: turns the monitor on or off. Benq Color Monitor User's Manual Menu Item Luminance Sub-Menu Item Function Contrast adjusts the difference between the light and dark areas - BenQ P992 | User Manual - Page 6
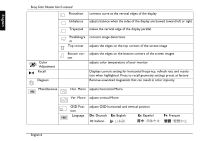
English Benq Color Monitor User's manual Pincushion corrects curve at the vertical edges of the display on the bottom corners of the screen images adjusts color temperature of your monitor Displays current setting for horizontal frequrncy, refresh rate and resolution when highlighted. Press - BenQ P992 | User Manual - Page 7
English 6. Troubleshooting Can't find Benq P992 on the Windows® XP/ ME/ 2000/ 98/ 95 monitor lists. You need to update the Windows® XP/ ME/ 2000/ 98 or Windows® 95 setup information for your Benq P992. You can download the updated file from the web site (http:// www.benq.com) There is no picture on
-
 1
1 -
 2
2 -
 3
3 -
 4
4 -
 5
5 -
 6
6 -
 7
7
 |
 |

Benq Color Monitor User’s Manual
English 1
English
Copyright
Copyright © 2002 by Benq Corporation (formerly Acer Com-
munications & Multimedia Inc.). All rights reserved.
No part
of this publication may be reproduced, transmitted, tran-
scribed, stored in a retrieval system or translated into any lan-
guage or computer language, in any form or by any means,
electronic, mechanical, magnetic, optical, chemical, manual or
otherwise, without the prior written permission of Benq Cor-
poration.
Disclaimer
Benq Corporation makes no representations or warranties,
either expressed or implied, with respect to the contents
hereof and specifically disclaims any warranties, merchantabil-
ity or fitness for any particular purpose.
Further,
Benq Cor-
poration reserves the right to revise this publication and to
make changes from time to time in the contents hereof with-
out obligation of
Benq Corporation to notify any person of
such revision or changes.
CE Declaration
This monitor complies with 72/23/EEC and 89/336/EEC modi-
fied by 92/31/ECC. These directives refer to EMC.
Canadian Department of Communications
Regulatory Statement
This digital apparatus does not exceed Class B limits for radio
noise emissions from digital apparatus set out in the Radio
Interference Regulations of the Canadian Department of
Communications.
Safety Instructions
1.
The AC plug isolates this equipment from the AC supply.
2.
Unplug this product from the wall outlet before cleaning.
Do not use liquid cleaners or aerosol cleaners.
Use a
damp cloth for cleaning.
3.
Slots and openings in the cabinet and the back or bottom
are provided for ventilation.
They must not be blocked
or covered.
This product should never be placed near
or over a radiator or heat register, or in a built-in
installation unless proper ventilation is provided.
4.
This product should be operated from the type of power
indicated on the marking label.
If you are not sure of the
type of power available, consult your dealer or local
power company.
5.
This product should be operated with a 3-wire
grounding-type plug, a plug having a third (grounding) pin.
This plug will only fit into a grounding-type power outlet.
This is a safety feature.
If you are unable to insert the
plug into the outlet, contact your electrician to make the
necessary outlet changes.
6.
Never push objects of any kind, or spill liquid of any kind
into this product.
7.
Do not attempt to service this product yourself, as
opening or removing covers may expose you to
dangerous voltages or other risks. If any above
mentioned misuse or other accident (dropping, mis-
operations) occurs, contact qualified service personnel
for servicing.
8.
Use only the proper type of power supply cord set
(provided in your PC box) for this unit.
It should be a
detachable type: UL listed/CSA certified, type SVT/SJT,
VDE approved or its equivalent.
9.
The power supply cord serves as a power disconnect
device for plug able equipment.
The socket outlet shall
be installed near the equipment and shall be easily
accessibe.