BenQ SP870 SP870 User Manual
BenQ SP870 - XGA DLP Projector Manual
 |
UPC - 840046019181
View all BenQ SP870 manuals
Add to My Manuals
Save this manual to your list of manuals |
BenQ SP870 manual content summary:
- BenQ SP870 | SP870 User Manual - Page 1
SP870 Digital Projector User Manual Welcome - BenQ SP870 | SP870 User Manual - Page 2
30 Using Wall Color 30 Selecting a picture mode 30 Fine-tuning the image quality in user modes projector 44 Lamp information 44 Replacing the lamp 46 Indicators 48 Troubleshooting 49 Specifications 50 Projector specifications 50 Dimensions 50 Timing chart 51 Other information 53 Warranty - BenQ SP870 | SP870 User Manual - Page 3
this quality BenQ projector! It has been designed to provide you with an enjoyable viewing experience in various situations. For the best results, please read this manual through carefully as it is your guide through the control menus and operation. Important safety instructions Your projector is - BenQ SP870 | SP870 User Manual - Page 4
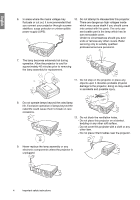
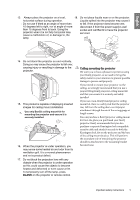
undo or remove any other covers. Refer servicing only to suitably qualified professional service personnel. 7. The lamp becomes extremely hot during operation. Allow the projector to cool for approximately 45 minutes prior to removing the lamp assembly for replacement. 11. Do not step on the - BenQ SP870 | SP870 User Manual - Page 5
and call BenQ to have the projector serviced. lamp. 14. Do not stand the projector on end vertically. Doing so may cause the projector to fall lamp, press BLANK on the projector or remote control. Ceiling mounting the projector We want you to have a pleasant experience using your BenQ projector, - BenQ SP870 | SP870 User Manual - Page 6
makes the projector cool in a shorter time • FAQ to troubleshoot operational problems with one quick key press • Presentation timer for better control of time during presentations • High quality manual zoom lens • One-key auto-adjustment to display the best picture quality • Digital keystone - BenQ SP870 | SP870 User Manual - Page 7
in some specific regions. Please consult your dealer for detailed information. Projector (UK) (US) (KOREA) (CHINA) (AU) (EU) (3-2 power adaptor) Power cord VGA cable Remote control with batteries Quick start guide Multi-language user manual CD Warranty card* Optional accessories - BenQ SP870 | SP870 User Manual - Page 8
English Projector exterior view Front/upper side 4 5 6 1 7 2 8 1 3 Rear/lower side Lamp cover 14. Rear IR remote sensor 15. RS232 control port 16. USB socket 17. DVI-D signal input socket 18. RGB (PC)/Component Video (YPbPr/ YCbCr) signal input socket 19. DC 12V output terminal Used - BenQ SP870 | SP870 User Manual - Page 9
if the projector's temperature becomes too high. See "Indicators" on page 48 for details. 1 10. LAMP indicator light 2 Indicates the status of the lamp. Lights up when the lamp has developed a problem. See "Indicators" on page 48 for details. 11. AUTO 3 9 Automatically determines the best - BenQ SP870 | SP870 User Manual - Page 10
the sound" on page 37 13. II POWER Toggles the projector between standby mode and on. "Starting up the projector" on page 22, "Shutting down the projector" on page 38 "Selecting the aspect ratio" on page 29 14. DIGITAL ZOOM+/DIGITAL ZOOM- 3. CAPTURE Magnifies or reduces the projected image size - BenQ SP870 | SP870 User Manual - Page 11
the front Approx. 15° • Operating the projector from the rear Approx. 15° Do not look into the laser light window or shine the laser light beam on yourself or others. See the warning messages on the back of the remote control prior to using it. The laser pointer is not a toy. Parents should - BenQ SP870 | SP870 User Manual - Page 12
Note that a special rear projection screen and the BenQ projector ceiling mount kit are required for this installation location. *Set Rear Ceiling after you turn the projector on. *To set the projector position: 1. Press MENU/EXIT on the projector or remote control and then press / until the SYSTEM - BenQ SP870 | SP870 User Manual - Page 13
projector lens to the screen, the zoom setting, and the video format each factors in the projected image size. 4:3 is the native aspect ratio of this projector digital projector does not project directly forward (like older style reel-to-reel film projectors did). Instead, digital projectors are - BenQ SP870 | SP870 User Manual - Page 14
. There is 3% tolerance among these numbers due to optical component variations. BenQ recommends that if you intend to permanently install the projector, you should physically test the projection size and distance using the actual projector in situ before you permanently install it, so as to make - BenQ SP870 | SP870 User Manual - Page 15
English Projection dimensions Refer to "Dimensions" on page 50 for the center of lens dimensions of this projector before calculating the appropriate position. Maximum zoom Minimum zoom Screen Center of lens Vertical offset Projection distance 4:3 screen diagonal Feet Inches mm 4.0 48 - BenQ SP870 | SP870 User Manual - Page 16
input socket on the input socket on the projector. projector. 2. If you wish to make use of the projector (mixed mono) speakers in your presentations, take desktop computer Many notebooks do not turn on their external video ports when connected to a projector. Usually a key combo like FN + F3 or - BenQ SP870 | SP870 User Manual - Page 17
output socket on the projector to an external monitor with a VGA or VGA to DVI-A cable by following the instructions below. To connect the projector to a monitor: • cable to the DVI input socket of the input socket of the video monitor. video monitor. 3. Connect the other end of the cable to the - BenQ SP870 | SP870 User Manual - Page 18
of matching terminals on both the projector and the Video source device as described below: Best video quality The best available video connection method is DVI-D. If your source device is equipped with a DVI-D socket, you can enjoy digital video quality. See "Connecting a DVI-D source device - BenQ SP870 | SP870 User Manual - Page 19
a DVI-D source device The projector provides a DVI-D input socket that allows you to connect it to a DVI-D source device like a DVD player. DVI-D format is used to directly carry a digital signal to a digital display without signal conversion. The pure digital connection provides faster and higher - BenQ SP870 | SP870 User Manual - Page 20
to blue, and red to red. 2. Connect the other end with 3 RCA type 2. Connect the other end of the Component Video connectors to the COMPONENT sockets of the to VGA (D-Sub) adaptor cable (with a D-Sub projector. Match the color of the plugs to the type connector) to the D-SUB/COMP. IN socket - BenQ SP870 | SP870 User Manual - Page 21
projector to an S-Video/Video source device: 1. Take an S-Video/Video cable and connect one end to the S-Video/Video output socket of the Video source device. 2. Connect the other end of the S-Video/Video cable to the S-VIDEO/VIDEO socket on the projector. 3. If you wish to make use of the projector - BenQ SP870 | SP870 User Manual - Page 22
heat produced by the projection lamp. 4. Press II POWER on the projector or remote control to start the projector. As soon as the lamp lights up, a "Power six digit password. See "Utilizing the password function" on page 24 for details. 6. Switch all of the connected equipment on. 7. The projector - BenQ SP870 | SP870 User Manual - Page 23
language first. 1. Press MENU/EXIT on the projector or remote control 2. Press to highlight Language and press to turn the OSD menu on. / to select a preferred language. DISPLAY Wall Color Aspect Ratio Keystone Position Phase H. Size Digital Zoom Off Auto 0 0 SYSTEM SETUP: Basic Presentation - BenQ SP870 | SP870 User Manual - Page 24
turn on the projector. If you enter the wrong password, the password error message as pictured to the right displays lasting for three seconds, and the INPUT PASSWORD message follows. You can retry by entering another six-digit password, or if you did not record the password in this manual, and you - BenQ SP870 | SP870 User Manual - Page 25
projector or remote control for 3 seconds. The projector will display a coded number on the screen. Write down the number and turn off your projector. Seek help from the local BenQ service digits being input will display as asterisks on-screen. Write your selected password down here in this manual - BenQ SP870 | SP870 User Manual - Page 26
Picture Mode. See "Selecting a picture mode" on page 30 for details. Video S-Video • The native display resolution of this projector is in a 4:3 aspect ratio. For best display picture results, you should select and use an input signal which outputs at this resolution. Any other resolutions will be - BenQ SP870 | SP870 User Manual - Page 27
to optimize the picture quality. To do this, press AUTO on the projector or remote control. Within 3 seconds, the built-in Intelligent Auto Adjustment function will readjust the values of Frequency and Clock to provide the best picture quality. The current source information will be displayed in the - BenQ SP870 | SP870 User Manual - Page 28
to the screen. To correct this, besides adjusting the height of the projector, you will need to manually correct it by following one of these steps. • Using the remote control Press / on the control panel of the projector or remote control to display the Keystone correction page. Press to correct - BenQ SP870 | SP870 User Manual - Page 29
the advent of digital signal processing, digital display devices like this projector can dynamically stretch and scale the image output to a different aspect than that of the image input signal. To change the projected picture ratio (no matter what aspect the source is): • Using the remote control - BenQ SP870 | SP870 User Manual - Page 30
steps. • Press MODE on the projector or remote control repeatedly until your desired mode is required, such as using the projector in well lit rooms colorful movies, video clips from digital cameras or DVs through the PC input for best viewing in a blackened (little light) environment. 5. User 1/User - BenQ SP870 | SP870 User Manual - Page 31
the contrast. Use this to set the peak white level after you have previously adjusted the Brightness setting to suit your selected input and viewing environment. +30 +50 +70 Adjusting Color Highlight Color in the PICTURE menu and adjust the values by pressing / on the projector or remote control - BenQ SP870 | SP870 User Manual - Page 32
independently adjust its range and saturation according to your preference. If you have purchased a test disc which contains various color test patterns and can be used to test the color presentation on monitors, TVs, projectors, etc. You can project any image from the disc on the screen and enter - BenQ SP870 | SP870 User Manual - Page 33
color in a video picture. Lower settings produce less saturated colors; a setting of "0" removes that color from the image entirely. If the saturation is too high, that color use. Follow these steps to utilize this function: 1. Press TIMER SET UP on the remote Period is reset. Presentation Timer - BenQ SP870 | SP870 User Manual - Page 34
displays. Highlight Yes and press ENTER on the projector or remote control to confirm. You will see the message "Timer is Off " displaying on the screen. How to use the TIMER ON key? It is a multi-functional key the timer or not by following the on-screen instruction. • If the timer is already on, - BenQ SP870 | SP870 User Manual - Page 35
of the remote control prior to using it. Once BLANK is pressed, the projector lamp enters remote control. Even if an image is frozen on the screen, the pictures are running on the video problems encountered by users regarding image quality, installation, special feature operation and service - BenQ SP870 | SP870 User Manual - Page 36
, press and hold / on the remote control or projector for 3 seconds. You can also use the remote control to enter the SYSTEM SETUP: Basic projector from over-heating. In cases like this, you should switch to High Altitude mode to solve these symptoms. However, this is not to state that this projector - BenQ SP870 | SP870 User Manual - Page 37
speakers. Be sure you have made a correct connection to the projector audio input. See "Connection" on page 16 for how the audio input is connected. Muting the sound To temporarily turn off the sound, • Using the remote control Press MUTE to temporarily turn off the sound. While the sound is - BenQ SP870 | SP870 User Manual - Page 38
back of the remote control prior to using it. 2. Press II POWER a second time. The POWER indicator light flashes orange, the projection lamp shuts down, light is a steady orange and fans stop. • To protect the lamp, the projector will not respond to any commands during the cooling process. • To - BenQ SP870 | SP870 User Manual - Page 39
H. Size Digital Zoom PC source: Dynamic/Presentation/sRGB/Cinema/User 1/ Picture Mode User 2 Video source: Dynamic/Standard/Cinema/User 1/User 2 Reference Mode PC source: Dynamic/Presentation/sRGB/Cinema Video source: Dynamic/Standard/Cinema Brightness Contrast Color Tint Sharpness - BenQ SP870 | SP870 User Manual - Page 40
SETUP: Basic 5. SYSTEM SETUP: Advanced Language Projector Position Front Table/Rear Table/Rear Ceiling/ 8 hr/12 hr Splash Screen BenQ/Black/Blue Quick Cooling On/Off Lamp Mode Normal/Economic Lamp Settings Reset Lamp Timer Equivalent Lamp Hour Security Settings Change Password Power On - BenQ SP870 | SP870 User Manual - Page 41
maximum or minimum. Adjusts the clock phase to reduce image distortion. 2. PICTURE menu H. Size Digital Zoom Picture Mode Reference Mode Brightness Contrast Color Tint Sharpness Brilliant Color Color Temperature Adjusts the horizontal width of the image. Magnifies or reduces the projected image - BenQ SP870 | SP870 User Manual - Page 42
32 for details. Saves the settings made for User 1 or User 2 mode. Quick Auto Search Color Space Conversion See "Switching input signal" on page 26 for details. See "Changing Color Space" on page 26 for details. Presentation Timer Language Projector Position Auto Power Off Blank Timer Panel Key - BenQ SP870 | SP870 User Manual - Page 43
. The following settings will still remain: Position, Phase, H. Size, User 1, User 2, Color Space Conversion, Language, Projector Position, High Altitude Mode, Lamp Settings, Security Settings. Displays possible solutions to problems you may encounter. Source Shows the current signal source. Picture - BenQ SP870 | SP870 User Manual - Page 44
the remote control. • Pack the projector in its original packing or equivalent. Transporting the projector It is recommended that you ship the projector with its original packing or equivalent. When you carry the projector yourself, please use the original box or a suitable soft carry case. Lamp - BenQ SP870 | SP870 User Manual - Page 45
to avoid the inconvenience when the projector runs out of lamp time. Notice • The lamp MUST be replaced before the projector will operate normally. Notice Replace Lamp Soon Lamp > XXXX Hours Lamp-usage time exceeded Replace lamp (refer to user manual) Then reset lamp timer OK OK "XXXX" shown - BenQ SP870 | SP870 User Manual - Page 46
hazardous waste regulations to dispose of this lamp in a proper manner. • To assure optimal performance from the projector, it is recommended that you purchase a BenQ projector lamp for lamp replacement. • If lamp replacement is performed while the projector is suspended upside-down from the ceiling - BenQ SP870 | SP870 User Manual - Page 47
or remote control. The lamp time will be reset to '0'. Notice Reset Lamp Timer? Loose screw may cause a bad connection, which could result in malfunction. Do not over tighten the screw. 8. Ensure the handle is fully laid flat and locked in place. 9. Replace the lamp cover on the projector. Reset - BenQ SP870 | SP870 User Manual - Page 48
Orange Orange Off Off Red Red Red Red Red Red Red Red Red Red Red Red Red Green Green LAMP Status & Description Off Stand-by mode. Off Powering up. Off Normal operation. 1. The projector needs 90 seconds to cool down as it was abnormally Off shut down without the normal cooling down - BenQ SP870 | SP870 User Manual - Page 49
Remedy Adjust the focus of the lens using the focus ring. Adjust the projection angle and direction as well as the height of the projector if necessary. Open the lens cover. Remote control does not work Cause Remedy The batteries are out of power. Replace the batteries with new ones. There is - BenQ SP870 | SP870 User Manual - Page 50
English Specifications Projector specifications All specifications are subject to change without notice. Optical Input terminals Resolution 1024 x 768 XGA Display system 1-CHIP DMD Lens F/Number F=2.4 to 2.7, f=38.87 to 46.63 mm Lamp 360 W lamp Electrical Power supply AC 100-240 V, 5.1 A, 50- - BenQ SP870 | SP870 User Manual - Page 51
Video mode NTSC PAL SECAM PAL-M PAL-N PAL-60 NTSC4.43 Horizontal Frequency (kHz) 15.73 15.63 15.63 15.73 15.63 15.73 15.73 Vertical Frequency (Hz) 60 50 50 60 50 60 60 Color sub-carrier Frequency (MHz) 3.58 4.43 4.25 or 4.41 3.58 3.58 4.43 4.43 Specifications - BenQ SP870 | SP870 User Manual - Page 52
Supported timing for DVI-D (HDCP) input Resolution 720 x 400 640 x 480 800 x 600 1024 x 768 1280 x 800 1280 x 1024 1280 x 960 1440 x 900 1400 x 1050 1600 x 1200 640 x 480@67Hz 832 x 624@75Hz 1024 x 768@75Hz 1152 x 870@75Hz VIDEO 576p 720p_50 720p_60 1080i_50 1080i_60 1080p 1080p 52 Specifications - BenQ SP870 | SP870 User Manual - Page 53
be the warranty period, BenQ's only obligation and your determined by turning the equipment off and on, the user is exclusive remedy shall be replacement of any defective parts encouraged to try to correct the interference by one or more (labor included). To obtain warranty service, immediately - BenQ SP870 | SP870 User Manual - Page 54
Other similar adjustments are also available by using the On-Screen Display (OSD) controls on the products. • BenQ's monitors and projectors include user-selectable color controls, such as color temperature selections (Monitor: 5800K, 6500K and 9300K, Projector: 5500K, 6500K, 7500K and 9300K), with
-
 1
1 -
 2
2 -
 3
3 -
 4
4 -
 5
5 -
 6
6 -
 7
7 -
8
-
9
-
10
-
11
-
12
-
13
-
14
-
15
-
16
-
17
-
18
-
19
-
20
-
21
-
22
-
23
-
24
-
25
-
26
-
27
-
28
-
29
-
30
-
31
-
32
-
33
-
34
-
35
-
36
-
37
-
38
-
39
-
40
-
41
-
42
-
43
-
44
-
45
-
46
-
47
-
48
-
49
-
50
-
51
-
52
-
53
-
54
 |
 |

SP870 Digital Projector
User Manual
Welcome