Beretta 92 FS Compact Inox Owners Manual - Page 8
B. Unloading the Pellets - parts
 |
View all Beretta 92 FS Compact Inox manuals
Add to My Manuals
Save this manual to your list of manuals |
Page 8 highlights
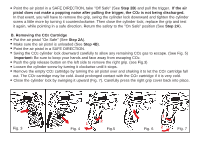
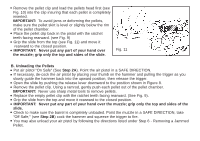
Remove the pellet clip and load the pellets head first (see Fig. 10) into the clip insuring that each pellet is completely inserted. IMPORTANT: To avoid jams or deforming the pellets, make sure the pellet skirt is level or slightly below the rim of the pellet chamber. Place the pellet clip back in the pistol with the ratchet teeth facing rearward. (see Fig. 9) Grip the slide from the top (see Fig. 11) and move it rearward to the closed position. IMPORTANT: Never put any part of your hand over the muzzle; grip only the top and sides of the slide. Fig. 11 B. Unloading the Pellets Put air pistol "On Safe" (See Step 2A). Point the air pistol in a SAFE DIRECTION. If necessary, de-cock the air pistol by placing your thumb on the hammer and pulling the trigger as you slowly guide the hammer back into the upward position, then release the trigger. Open the slide by pushing the release lever downward to the position shown in Figure 8. Remove the pellet clip. Using a ramrod, gently push each pellet out of the pellet chamber. IMPORTANT: Never use sharp metal tools to remove pellets. Replace the empty pellet clip with the ratchet teeth facing rearward. (See Fig. 9). Grip the slide from the top and move it rearward to the closed position. IMPORTANT: Never put any part of your hand over the muzzle; grip only the top and sides of the slide. Check to make sure the barrel is completely unloaded. Point the muzzle in a SAFE DIRECTION, take "Off Safe," (see Step 2B) cock the hammer and squeeze the trigger to fire. You may also unload your air pistol by following the directions listed under Step 6 - Removing a Jammed Pellet.
-
 1
1 -
2
-
 3
3 -
 4
4 -
 5
5 -
 6
6 -
 7
7 -
 8
8 -
 9
9 -
 10
10 -
 11
11 -
 12
12 -
 13
13 -
14
-
15
-
16
-
17
 |
 |
