Beretta STAMPEDE DELUXE Beretta Stampede User Manual - Page 22
Position Could Damage Or Break The Half-cock Notch
 |
View all Beretta STAMPEDE DELUXE manuals
Add to My Manuals
Save this manual to your list of manuals |
Page 22 highlights
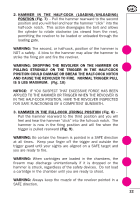
2. HAMMER IN THE HALF-COCK (LOADING/UNLOADING) POSITION (Fig. 7) - Pull the hammer rearward to the second position and you will feel and hear the hammer "click" into the half-cock notch. This action disengages the bolt and allows the cylinder to rotate clockwise (as viewed from the rear), permitting the revolver to be loaded or unloaded through the loading gate. WARNING: The second, or half-cock, position of the hammer is NOT a safety. A blow to the hammer may allow the hammer to strike the firing pin and fire the revolver. WARNING: DROPPING THE REVOLVER ON THE HAMMER OR PULLING STRONGLY ON THE TRIGGER IN THE HALF-COCK POSITION COULD DAMAGE OR BREAK THE HALF-COCK NOTCH AND CAUSE THE REVOLVER TO FIRE. NORMAL TRIGGER PULL IS 5 LBS MAXIMUM. (Fig. 10) NOTICE: IF YOU SUSPECT THAT EXCESSIVE FORCE HAS BEEN APPLIED TO THE HAMMER OR TRIGGER WHEN THE REVOLVER IS IN THE HALF-COCK POSITION, HAVE THE REVOLVER INSPECTED FOR SAFE FUNCTIONING BY A COMPETENT GUNSMITH. 3. HAMMER IN THE FULL-COCK (FIRING) POSITION (Fig. 8) - Pull the hammer rearward to the third position and you will feel and hear the hammer "click" into the full-cock notch. The hammer is now in the firing position and will fire when the trigger is pulled rearward (Fig. 9). WARNING: Be certain the firearm is pointed in a SAFE direction at all times. Keep your finger off the trigger and outside the trigger guard until your sights are aligned on a SAFE target and you are ready to fire. WARNING: When cartridges are loaded in the chambers, the firearm may discharge unintentionally if it is dropped or the hammer is struck, regardless of the safety devices. Do not load a cartridge in the chamber until you are ready to shoot. WARNING: Always keep the muzzle of the revolver pointed in a SAFE direction. ! ! ! ! ! 22
-
 1
1 -
2
-
3
-
4
-
5
-
6
-
7
-
8
-
9
-
10
-
11
-
12
-
13
-
14
-
15
-
16
-
 17
17 -
 18
18 -
 19
19 -
 20
20 -
 21
21 -
 22
22 -
 23
23 -
 24
24 -
 25
25 -
 26
26 -
 27
27 -
28
-
29
-
30
-
31
-
32
-
33
-
34
-
35
-
36
-
37
-
38
-
39
-
40
-
41
-
42
-
43
 |
 |