Bernina 1001 Manual - Page 33
Bernina 1001 Manual
 |
View all Bernina 1001 manuals
Add to My Manuals
Save this manual to your list of manuals |
Page 33 highlights
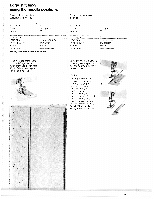
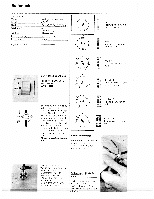
With gimp cord Buttonhole with gimp cord The gimp cord strengthens the buttonhole. Sewing with gimp cord The gimp cord is especially It is easier to position the important for all knitted cord if the needle is already fabrics - including hand and machine knits -to in the fabric: 1. Using the handwheel, t is prevent the buttonhole from lower the needle and check pulling out of shape. that it is in the centre of the presser foot. If not, turn The thickness of the cord the handwheel. Lower the depends on the fabric to be needle into the fabric sewn. Suitable cords are: precisely at the start of the perle cord no. 8, thick hand buttonhole. Do not lower sewing thread or fine the foot yet. crochet cord. Sew a trial buttonhole. Lay the fabric under the foot so that the folded edge or seam lies in front of the 1 presser foot. The loop of the gimp will lie at the end of the buttonhole where the button will pull (Fig.1). 2. Hook the gimp cord over the centre prong of the buttonhole foot and take both ends back under the foot (Fig. 2). Lower the foot and check that the cord is able to slide, i.e. is not trapped by the foot. 3. Sew the buttonhole. At position 2 (reverse straight stitch), the cord comes away from the prong of the I foot. Therefore, it is advis- able to hold the loop of gimp down LIGHTLY with the finger (Fig. 3). Finally, pull the loop of gimp through.With knitted fabrics, pull the gimp ends to the rear with a coarse • hand sewing needle (Fig. 4) and tie or sew in securely. In woven fabrics, the gimp ends can be simply cut off. 4 Sewing able/special accessory
-
 1
1 -
2
-
3
-
4
-
5
-
6
-
7
-
8
-
9
-
10
-
11
-
12
-
13
-
14
-
15
-
16
-
17
-
18
-
19
-
20
-
21
-
22
-
23
-
24
-
25
-
26
-
27
-
 28
28 -
 29
29 -
 30
30 -
 31
31 -
 32
32 -
 33
33 -
 34
34 -
 35
35 -
 36
36 -
 37
37 -
 38
38 -
39
-
40
-
41
-
42
-
43
-
44
 |
 |
