Bernina Artista 640E User Guide
Bernina Artista 640E Manual
 |
View all Bernina Artista 640E manuals
Add to My Manuals
Save this manual to your list of manuals |
Bernina Artista 640E manual content summary:
- Bernina Artista 640E | User Guide - Page 1
or changing the needle, threading the bobbin or changing the presser foot etc. 10. Always unplug the sewing computer from the electrical outlet when removing covers, lubricating or when making any other user servicing adjustments mentioned in this instruction manual. 11. Never drop or insert any - Bernina Artista 640E | User Guide - Page 2
BERNINA Embroidery Software, the Bernina Stitch Regulator (BSR) and the wonderful variety of accessories available at your local Bernina dealer. We wish you lots of fun with our newest additions in the wonderful line of Bernina machines. H.P. Ueltschi President BERNINA Sewing Machine Manufacturers - Bernina Artista 640E | User Guide - Page 3
and Deleting Stitches and Stitch Combinations Setup Program Sewing and Sewing Computer Support 84 - 86 87 - 91 92 - 101 102 - 108 Preparing for Embroidery / Important Information Working on Motifs and Embroidering Embroidery Support Peripherals and Accessories Glossary Summary Stitches and motivs - Bernina Artista 640E | User Guide - Page 4
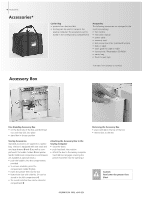
• to remove a bobbin, press the compartment holder F lightly • insert the presser feet into the slot • Buttonhole foot with slide No. 3A can be stored in the left compartment G • the needle selection box can be stored in compartment H Attaching the Accessory Box to the Sewing Computer • close the - Bernina Artista 640E | User Guide - Page 5
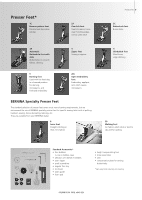
of BERNINA specialty presser feet for specific sewing tasks such as quilting, heirloom sewing, home decorating, tailoring, etc. They are available from your BERNINA dealer. 8 Jeans foot Straight stitching in thick, firm fabrics Accessories 5 3C Buttonhole foot Buttonholes 5 Blindstitch foot Blind - Bernina Artista 640E | User Guide - Page 6
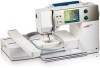
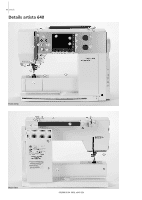
6 Details Details artista 640 11 10 18 19 16 17 9 21 22 23 24 25 15 14 31 30 29 28 27 26 13 7 12 8 6 5 2 3 4 1 Front view 20 32 33 34 35 36 38 37 39 40 Back view - Bernina Artista 640E | User Guide - Page 7
USB connection 51 PC connection 52 Embroidery module connection 53 Foot control socket 54 Drop feed dog Details 7 1 Bobbin cover 2 Stitch plate 3 Attachment base for special accessories 4 Darning hoop connection 5 Presser foot 6 Needle clamp 7 Thread guide 8 Needle threader 9 Thread take-up cover - Bernina Artista 640E | User Guide - Page 8
with sewing computer model artista 640. Power Switch The switch is on the handwheel side of the sewing computer I the sewing computer is switched on («I») 0 the sewing computer is switched off («0») The sewing light is switched on and off with the power switch. ! Refer to the safety instructions - Bernina Artista 640E | User Guide - Page 9
the sewing surface • free arm for large tubular items such as pant legs and waistbands To Attach • raise the needle and presser foot • Instructions 9 Free Hand System (FHS) Presser Foot Lifter Presser Foot Lifter • the FHS raises and lowers the presser foot • push to the right • the presser foot - Bernina Artista 640E | User Guide - Page 10
the thread with the thread cutter Winding the Bobbin While Sewing or Embroidering • place thread spool on vertical spool then, following the direction of the arrow, take thread through the thread guide and around the pre-tension stud • follow the instructions as described above for the next steps - Bernina Artista 640E | User Guide - Page 11
until it lies in the T-shaped slit at the end of the spring. Clockwise Turning of the Bobbin The bobbin must turn clockwise. Threading the Upper Thread C A B D Attaching the Thread Spool • raise the needle and presser foot • turn the power switch to «0» (off) • attach the foam pad • place spool - Bernina Artista 640E | User Guide - Page 12
the upper thread • sew one stitch by tapping on the foot control twice • pull the upper thread to bring the lower thread up through the stitch plate hole • take both threads through the slit on the presser foot to the back • pull threads over the head frame cutter The bobbin thread must be brought - Bernina Artista 640E | User Guide - Page 13
power switch to «0» (off) • lower the presser foot • loosen the needle clamp screw • pull the needle down to remove Inserting the Needle • flat side of needle to the back • insert the needle as far as it will go • tighten the needle clamp screw ! Operating Instructions 13 Refer to the safety - Bernina Artista 640E | User Guide - Page 14
spool pin (both spools have to turn in the same direction) • thread as usual by guiding two threads on the left side of the tension disc A and one thread on the right side of the disc By using the Supplementary thread guide (special accessories), thread winds off the spool much easier. - Bernina Artista 640E | User Guide - Page 15
all sewing needs • it has a high tensile strength and is particularly colorfast • polyester thread is more flexible and is recommended where a strong and elastic seam is required Operating instructions 15 The following are the guidelines: fine fabrics: fine thread (darning thread, embroidery - Bernina Artista 640E | User Guide - Page 16
the correct size needle. Correct Needle/Thread Combination When sewing, the thread should travel smoothly down the long groove on the front of the needle. Too Thin Thread or too Thick Needle The thread has too much clearance in the groove. Skipped stitches and damage to the thread can occur. Too - Bernina Artista 640E | User Guide - Page 17
distance: 1.0 / 1.6 / 2.0 / 2.5 / 3.0 / 4.0 / 6.0 / 8.0 Visible hems in stretch fabrics, pintucks, decorative sewing Triple needle 130/705 H-DRI Needle distance 3.0 Decorative sewing Special needles are available at your BERNINA dealer. Operating Instructions 17 Needle size 60-100 70-90 90-100 - Bernina Artista 640E | User Guide - Page 18
correctly Changing the Presser Foot Changing the Presser Foot • raise the needle and presser foot • turn power switch to «0» (off) ! Refer to the safety instructions! Raising the Lever • raise the clamping lever • remove the presser foot Attaching the Presser Foot • guide the foot upwards over - Bernina Artista 640E | User Guide - Page 19
are helpful for sewing corners and buttonholes, etc. Removing the Stitch Plate • turn power switch off («0») • raise the presser foot and needle • lower feed dog • press the stitch plate down at the back right corner until it flips up • remove the stitch plate Replacing the Stitch Plate • place - Bernina Artista 640E | User Guide - Page 20
Uneven layers To solve this problem, place one, two or three compensating plates as required behind the needle under the presser foot to level it. To correct the height in front of the foot, place one or more plates to the right of the foot close to the needle. Sew until the foot is level again and - Bernina Artista 640E | User Guide - Page 21
(basic setting always visible) G Presser Foot Indicator H Presser Foot Pressure Indicator J Picture of selected, active stitch and number (Stitch Altering Area) K External functions L Setup Program M Tutorial (only for embroidery) N Personal Program O Functions P Stitch Selection by Number Q Main - Bernina Artista 640E | User Guide - Page 22
22 Displays on Screen Stitch Selection - Stitch Display - Functions Stitch Selection • touch the stitch of your choice • the stitch is highlighted in blue • every stitch in the Stitch Altering Area (SAA) is displayed with its number Altering the Stitch Width • turn the upper knob Display of - Bernina Artista 640E | User Guide - Page 23
the Presser Foot Indicator Temporary Altered Stitch Memory Stitch length, stitch width, needle position, etc. are automatically saved. When the sewing computer is settings programmed by BERNINA can be changed and stored in the SAA. They will stay saved even after the sewing computer is turned off - Bernina Artista 640E | User Guide - Page 24
• a new row appears at the bottom • touch the arrow (up) • the first row of stitches appears again • the Scroll function (up/down) is used to find and view all the sewing computer's stitches Stitch Selection by Number • touch the function «0-9» • the screen changes to a numeric pad • touch numbers - Bernina Artista 640E | User Guide - Page 25
on Screen 25 Practical Stitches Practical Stitch Button • the Practical Stitch menu appears • 9 practical stitches appear on the screen • use arrows to scroll for viewing additional stitches Decorative Stitches Decorative Stitch Button • the Decorative Stitch menu appears • the 6 categories - Bernina Artista 640E | User Guide - Page 26
• by scrolling the straight stitch eyelet and hand-look buttonhole will be visible Quilt Stitch Button • the Quilt Stitch screen appears • 9 quilt stitches are visible on screen • use arrows to scroll for additional stitches Embroidery Mode / Sewing Mode Embroidery Mode / Sewing Mode Button - Bernina Artista 640E | User Guide - Page 27
Tutorial for Embroidery Tutorial Button Setup Program Setup Program Displays on Screen 27 • the Selection menu (menu summary) appears • 9 menus for advice on embroidery are available on the screen Can only be selected when embroidering • options appear • use Setup to customize your sewing - Bernina Artista 640E | User Guide - Page 28
bobbin thread are cut automatically Start-Stop Button • starts and stops the sewing computer when operating it without foot control • starts and stops the sewing/ embroidery computer in the embroidery mode with attached embroidery module • starts and stops the BSR function (optional) when BSR foot - Bernina Artista 640E | User Guide - Page 29
following functions are found on various screens and programs of the artista 640 sewing computer. External Functions 29 Single Mode • the Single Mode is always active (green) when turning on the sewing computer and only the selected stitch can be sewn Combi Mode • touch symbol • the Combi Mode is - Bernina Artista 640E | User Guide - Page 30
computer sews every second stitch (max. stitch length 10mm) • can be activated for all practical, decorative, and directional stitches except buttonholes • functions and stitches can be combined • can be programmed in Combi Mode and saved in File Drawers Applications: • combine with straight stitch - Bernina Artista 640E | User Guide - Page 31
• size will be reduced to approx. 6mm (field with 2 is blue) Manual 4 or 6 Step Buttonholes • touch symbol • a special screen appears • sew manual buttonhole in 4 or 6 steps (according to buttonhole type) Delete • touch symbol • deletes individual stitches or letters above the cursor • deletes - Bernina Artista 640E | User Guide - Page 32
width will be limited automatically • this prevents the inserted special needle (double needle, etc.) from hitting the presser foot or the stitch plate = avoiding needle breakage • the numbers represent the distance in mm between the needles of the double and triple needle • touch the needle symbol - Bernina Artista 640E | User Guide - Page 33
may vary when using other types of thread such as embroidery thread, and it may be necessary to adjust the tension to suit the fabric and stitch type. Altering the Tension • touch symbol Functions 33 Altering the Tension • the perfect stitch formation is shown in the middle of the touch- screen - Bernina Artista 640E | User Guide - Page 34
Stitches Straight stitch All non-stretch fabrics. All straight stitch work Running stitch Most types of fabric. Mending, patching, reinforcing seams Triple zig-zag Reinforced seams in firm fabrics, visible hems and seams, decorative stitching, couching Double overlock All types of knit. Sews - Bernina Artista 640E | User Guide - Page 35
darning program Automatic darning in fine and mediumweight fabrics Lycra stitch All two-way stretch fabrics, flat joining seams and hems, reinforced seaming on underwear Knit overlock All knits, machine or handmade, overlock seam. Sews and finishes edges in one operation Reinforced darning program - Bernina Artista 640E | User Guide - Page 36
5cm) • seam lies flat • seam does not stretch Suggested stitches: • straight, narrow zig-zag, super stretch, and triple zig-zag Application: • for woven fabrics • works for most types of sewing projects, including clothing, home accessories, and crafts Overlock Seams Seams which cannot be pressed - Bernina Artista 640E | User Guide - Page 37
external knob) revert to other functions manually • Method 3: turn sewing computer off («0») - altered settings will not be saved Example: • select Zig-zag stitch No. 2 and alter stitch width to 9mm (e.g. overcasting an edge) • select straight stitch and sew seam • overcasting another edge: select - Bernina Artista 640E | User Guide - Page 38
, e.g. manual darning • suitable for all fabrics Triple Straight Stitch Seam Stitch: Needle: Thread: Feed dog: Presser foot: Triple straight stitch No. 6 Jeans or 80-90 universal cotton or polyester up (sewing position) Reverse pattern foot No. 1C or Jeans foot No. 8 (optional accessory) Open - Bernina Artista 640E | User Guide - Page 39
Securing Stitch (Straight Stitch With Securing) Stitch: Needle: Thread: Feed dog: Presser foot: Securing stitch No. 5 size and type suitable for the fabric selected cotton or polyester up (sewing position) Reverse pattern foot No. 1C Practical Stitches - Applications 39 Securing Stitch • for all - Bernina Artista 640E | User Guide - Page 40
: Thread: Feed dog: Presser foot: Straight stitch No. 1 size and type suitable for the fabric selected cotton, polyester or cordonnet (topstitching) up (sewing position) Reverse pattern foot No. 1C, Blindstitch foot No. 5 or Edge stitch foot No. 10 (optional accessory) Narrow Edgestitching Outer - Bernina Artista 640E | User Guide - Page 41
shorten stitch length, satin stitch setting will be indicated by parallel lines on stitch length bar Oversewing edges If edges roll, use the Vari-overlock stitch and foot No. 2A. Embroidery with satin stitch Experiment with adjusting the stitch width for new decorative effects. The sewing computer - Bernina Artista 640E | User Guide - Page 42
Applications Darning Program Stitch: Needle: Thread: Feed dog: Presser foot: Simple darning program No. 22, Reinforced darning program No. 23 size and type suitable for the fabric selected lightweight darning thread up (sewing position) Automatic buttonhole foot No. 3A, Reverse pattern foot No. 1C - Bernina Artista 640E | User Guide - Page 43
Presser foot: Straight stitch No. 1 size and type suitable for the fabric selected darning thread down (darning position) Darning foot No. 9 Darning Holes or Worn Areas Replaces both lengthways and crossways threads in all fabrics. Preparation • stretch fabric into darning hoop (optional accessory - Bernina Artista 640E | User Guide - Page 44
length and/or stitch width (only one of these adjustments may be necessary) Presser Foot Pressure • soft, loose knits can wave when sewn: • reduce the pressure until the seam lies flat • the sewing computer must still feed the fabric properly Possible Problems With Sewing Knits Seam Becomes Wavy - Bernina Artista 640E | User Guide - Page 45
, soft knits such as silk jersey and interlock. Sewing • guide the raw edge along the pin on the overlock foot • the stitch will form over the pin and over the edge of the fabric Double Overlock Seam Stitch: Needle: Thread: feed dog: Presser foot: Double overlock No. 10 size and type suitable - Bernina Artista 640E | User Guide - Page 46
Seam • overlock seam in coarse or loose knits Sewing • sew stretch overlock along the fabric edge • the stitch should sew over the edge of the fabric on the right swing of the needle Super Stretch/Stretch Seam Stitch: Needle: Thread: Feed dog: Presser foot: Super stretch No. 11 or Stretch No. 18 - Bernina Artista 640E | User Guide - Page 47
for fabrics in which a normal straight stitch seam would stretch open. Hems With Practical Stitches Stitch: Needle: Thread: Feed dog: Presser foot: Jersey stitch No. 14 universal, ballpoint or stretch cotton or polyester up (sewing position) Reverse pattern foot No. 1C Visible Stretch Hem - Bernina Artista 640E | User Guide - Page 48
- Applications Ribbing With Overlock Seams Stitch: Needle: Thread: Feed dog: Presser foot: Vari-overlock No. 3 size and type suitable for the fabric selected cotton or polyester up (sewing position) Overlock foot No. 2A Ribbing With Overlock Seam • for all fine cotton, synthetic and mixed - Bernina Artista 640E | User Guide - Page 49
Feed dog: Presser foot: Needle position: Straight stitch No. 1 size and type suitable for the fabric selected cotton or polyester up (sewing position) Zipper foot No. 4 or Zipper foot with guide No. 14 (optional accessory) far right or far left Preparation • baste seam closed and clean finish the - Bernina Artista 640E | User Guide - Page 50
the work under the presser foot with the guide positioned against the folded back fabric Sewing • the needle should just pierce the edge of the fold • after sewing about 4" (10cm), check both sides of fabric and adjust the stitch width if necessary Fine stitch width adjustment • sew a test on the - Bernina Artista 640E | User Guide - Page 51
(1cm); press and baste if required Sewing • sew from the right side a presser foot away from the edge • trim excess fabric from the wrong side Balance/Corrections The Honeycomb stitch opens up and it does not look correct: • turn the stitch length knob until the stitch in the right portion of the - Bernina Artista 640E | User Guide - Page 52
width: Needle: Thread: Feed dog: Presser foot: Universal stitch No. 15 depends on width of elastic type and size to suit the fabric selected cotton or polyester up (sewing position) Reverse pattern foot No. 1C or Embroidery foot No. 6 (optional accessory) Sewing on Elastic • for gathering long - Bernina Artista 640E | User Guide - Page 53
to remove Piecing Stitch / Straight Stitch Stitch: Stitch length: Needle: Thread: feed dog: Presser foot: Straight stitch No. 1 1.5mm - max. 2mm size and type suitable for the fabric selected cotton or polyester up (sewing position) Patchwork foot No. 37 (optional accessory) Patchwork foot No. 57 - Bernina Artista 640E | User Guide - Page 54
615) • heavyweight fabrics • use more intricate decorative stitches - programmed with satin stitches - on heavyweight fabrics for outstanding decorative stitching (e.g. Decorative stitch No. 401) Perfect Stitch Formation • use the same needle and bobbin thread color • use a stabilizer on the wrong - Bernina Artista 640E | User Guide - Page 55
Stitch: Needle: Thread: Feed dog: Presser foot: Decorative stitches size and type suitable for the fabric selected cotton, decorative up (sewing position) Reverse pattern foot No. 1C, Open embroidery foot No. 20C, Embroidery foot No. 6 (optional accessory), Clear foot No. 34C (optional accessory - Bernina Artista 640E | User Guide - Page 56
Thread: Feed dog: Presser foot: Decorative stitches size and type suitable for the fabric selected cotton, decorative up (sewing position) Reverse pattern foot No. 1C or Open embroidery foot No. 20C, Embroidery foot No. 6 (optional accessory), Clear foot No. 34C (optional accessory) Create amazing - Bernina Artista 640E | User Guide - Page 57
End»/«Pattern Repeat» • touch the external Pattern End button: the sewing computer will stop at the end of an individual stitch or the active stitch in a combination • touch the Pattern Repeat 1-9x function on the screen: the sewing computer will stop on completion of the number of single repeats - Bernina Artista 640E | User Guide - Page 58
• open Practical Stitches window and touch Straight stitch No. 1 once • open Decorative Stitches window and touch stitch No. 606 in Machine Embellishment stitches once • open Practical Stitches window and touch Straight stitch No. 1 once • the stitches alternate continuously as you sew Example of - Bernina Artista 640E | User Guide - Page 59
Formation • use the same color for upper and bobbin threads • use stabilizer on the wrong side to reinforce sewing project • use additional water soluble stabilizer on the right side on pile and long fiber fabric (e. g. wool, velvet, etc.) • use simpler letters, programmed with straight stitches - Bernina Artista 640E | User Guide - Page 60
60 Lettering - Applications Combining Lettering Stitch: Needle: Thread: Feed dog: Presser foot: Letters size and type suitable for the fabric selected cotton, decorative up (sewing position) Reverse pattern foot No. 1C Alphabets • individual letters and rows of the same letter of the same - Bernina Artista 640E | User Guide - Page 61
Combination as Single or Multiple Repeat • create pattern combination • touch «Pattern Repeat 1-9x» button one or more times (numbers 1-9 appear) • sewing computer stops automatically after completing selected number of patterns Change Size • touch Alphabet Size button; the field with number 2 is - Bernina Artista 640E | User Guide - Page 62
, coats, rainwear Straight stitch buttonhole For reinforcing buttonholes, pocket edges, especially for stitching buttonholes in leather or imitation leather Straight stitch eyelet Opening for cords and narrow ribbons/bands, decorative work Narrow buttonhole (heirloom sewing) Light- to mediumweight - Bernina Artista 640E | User Guide - Page 63
-56, 59 and 63) is selected. Manual Buttonhole • touch symbol to open special screen display • sew manual buttonhole in 4 or 6 steps (according to buttonhole type) Application: • for individual manually sewn buttonholes • to repair existing buttonholes Programming Buttonhole Length • the symbol is - Bernina Artista 640E | User Guide - Page 64
after any changes to the stitch length If a buttonhole is to be sewn at right angles to a seam, we recommend the use of the height compensating plates for buttonholes (available as optional accessory). Place the plates from the back between fabric and bottom of slide foot up to the thick part - Bernina Artista 640E | User Guide - Page 65
or Stabilizers for Buttonholes Automatic Buttonholes • for best results always sew buttonholes on area that is lined with interfacing (1) • the interfacing should suit the fabric type Buttonholes - Important Information 65 1 • for thick and fluffy fabrics an embroidery stabilizer can be - Bernina Artista 640E | User Guide - Page 66
the needle at the beginning of the buttonhole • raise the presser foot • guide the cord under the foot to the right • hook the cord over the pin at the back of the foot • bring the cords to the front of the foot • pull them into the slit Sewing • sew the buttonhole in the usual manner, do not hold - Bernina Artista 640E | User Guide - Page 67
or secure with stitches Cutting Buttonholes Open • using the seam ripper, cut from the ends towards the middle • in order not to cut the ends of short buttonholes by mistake, place a pin at the end of the buttonhole for additional security Buttonhole Cutter and Block (special accessory) • place the - Bernina Artista 640E | User Guide - Page 68
Entry Length Keyhole or Round Buttonholes • any Balance alterations affect both beads if keyhole is distorted to the right (picture A): • the keyhole or eye is balanced as follows: • turn stitch length knob counter clockwise • 1. sew straight stitches until the sewing if keyhole is distorted to - Bernina Artista 640E | User Guide - Page 69
buttonhole foot No. 3A • select type of buttonhole • touch the Direct Entry Length function Determining Buttonhole Length • a special screen display appears • enter buttonhole length with the stitch width or stitch automatically Buttonhole Size • the sewing computer calculates the buttonhole size - Bernina Artista 640E | User Guide - Page 70
«auto» and the programmed length (in mm) appears on the screen to indicate that the buttonhole length is programmed Auto Buttonhole the sewing computer sews the following automatically: • straight stitches in reverse • the first bartack • the second bead forwards • the second bartack • the securing - Bernina Artista 640E | User Guide - Page 71
No. 54, 55, 56 Sewing Straight Stitches • the stitching sequence is displayed in the Stitch Altering Area • sew straight stitches forwards, stopping at the desired length Programming Buttonhole • press the Quick Reverse button on head frame, continue sewing • «auto» and the programmed length - Bernina Artista 640E | User Guide - Page 72
on the screen to indicate that the buttonhole length is programmed Auto Buttonhole the sewing computer sews the following automatically: • the eye • the second bead in reverse • the bartack, the securing stitches and stops automatically All subsequent buttonholes will be sewn automatically to the - Bernina Artista 640E | User Guide - Page 73
in Long Term Memory Long term saving of buttonhole programs is only possible for buttonholes originally stitched as «auto» length buttonholes. Buttonholes - Applications 73 Saving Buttonhole (Save) • touch the displayed buttonhole in the Stitch Altering Area (left portion of screen) • a special - Bernina Artista 640E | User Guide - Page 74
Step Buttonholes Stitch: Needle: Thread: Feed dog: Presser foot: any buttonhole size and type suitable for the fabric selected cotton or polyester up (sewing position) Buttonhole foot No. 3C Opening Manual Buttonhole • select the type of buttonhole desired • touch «man» for the Manual buttonhole - Bernina Artista 640E | User Guide - Page 75
Straight Stitch Buttonhole Stitch: Needle: Thread: Feed dog: Presser foot: Straight stitch buttonhole No. 59 size and type suitable for the fabric selected cotton or polyester up (sewing position) Buttonhol foot No. 3C or Automatic buttonhole foot No. 3A Straight Stitch • select stitch No. 59 on - Bernina Artista 640E | User Guide - Page 76
bedding, etc. For work which is subject to heavy wear or washing, sew Button sew-on program twice. Zig-zag or Straight Stitch Eyelets Stitch: Needle: Thread: Feed dog: Presser foot: Narrow zig-zag eyelet No. 61 or Straight stitch eyelet No. 62 size and type suitable for the fabric selected cotton - Bernina Artista 640E | User Guide - Page 77
straight stitch Piecing stitch/Straight stitch Stippling stitch Hand-look quilt stitch Blanket stitch Double blanket stitch Blindstitch Feather stitch Feather stitch variations Decorative quilt stitches Quilt stitch / Hand-look quilt stitch variations Blanket stitch (dual) Double blanket stitch - Bernina Artista 640E | User Guide - Page 78
is called quilting. Following stitches are suitable for quilting: • Nr. 324 Quilters securing program • Nr. 325 Quilting straight stitch • Nr. 328, 347, 348, 350 Hand-look quilt stitches • Nr. 327, 331 - 345, 351 Decorative quilt stitches • freehand quilting with or without BSR (optional accessory) - Bernina Artista 640E | User Guide - Page 79
Stitch: Needle: Upper thread: Bobbin thread: Feed dog: Presser foot: Quilt stitches Nos. 328, 347, 348, 350 size and type suitable for the fabric selected monofilament 30/2 cotton thread up (sewing position) Reverse pattern foot No. 1C or Walking foot No. 50 (optional accessory) Quilt Stitches - Bernina Artista 640E | User Guide - Page 80
Freehand Quilting With BSR (BERNINA Stitch Regulator) optional Stitch: Needle: Thread: Feed dog: Presser foot: Straight stitch No. 1 or Zig-zag stitch No. 2 size and type suitable for the fabric selected monofilament or cotton, embroidery thread, polyester down (darning position) BSR foot No. 42 - Bernina Artista 640E | User Guide - Page 81
to minimum • use slide-on table Quilt Stitches - Applications 81 • attach the BSR presser foot to the sewing computer and plug the cable into the green socket until it clicks into place • attach the desired presser foot sole to the BSR presser foot • removing sole: press both buttons (see arrows - Bernina Artista 640E | User Guide - Page 82
82 Quilt Stitches - Applications Beeper (Acoustic Signal) Deactivation/Activation Opening Setup Program • press the Setup button • selection menu appears • touch «5» • the screen «Audio Settings» appears 5 Selecting Sound for BSR in the Setup Program • one sound is set as default • touch the bar - Bernina Artista 640E | User Guide - Page 83
the BSR Sewing Function: Quilt Stitches - Applications 83 1. With the Foot Control • plug in the foot control • lower the presser foot • start the BSR mode by pressing the foot control • a red light appears on the presser foot • the foot control must be pressed continuously during sewing • the - Bernina Artista 640E | User Guide - Page 84
to this effect. Embroidery designs and/or stitch combinations must first be deleted. Programming Second Stitch • press the Buttonhole button • select Standard buttonhole (No. 51) • touch the Stitch Altering Area (light blue) • save the stitch as described above • insert further stitches in the same - Bernina Artista 640E | User Guide - Page 85
button Personal Screen • in the personal screen the programmed stitches are visible (progressive stitch numbers) • when more than 9 stitches are programmed, use arrow to scroll for viewing additional stitches Deleting Personal Stitches Activating Personal Program • press the Personal Program button - Bernina Artista 640E | User Guide - Page 86
Activating Personal Program • press the Personal Program button Personal Program Screen • select the stitch to be altered (e.g. zig-zag) • alter stitch width and length with the external stitch width and stitch length knobs • the alterations as well as the basic settings are indicated • touch - Bernina Artista 640E | User Guide - Page 87
, and numbers can be combined and stored in the memory system. The sewing computer has a memory system, in which the two memories - sewing and embroidery - can be stored. In the sewing memory stitch combinations with maximum 50 stitches can be stored in the Drawers as long as there is free storage - Bernina Artista 640E | User Guide - Page 88
Area • if the Combi Mode has already been in use and the sewing computer has not been switched off («0») since, the last programmed or selected stitch combination appears in the Stitch Altering Area • empty the Stitch Altering Area by deleting the combination or open an empty Drawer to program - Bernina Artista 640E | User Guide - Page 89
• the following is displayed on the screen: • the complete stitch combination on the left • next to it is the stitch combination in a given size; use the stitch width or the stitch length knob to scroll through the stitch combination • on the right the four buttons «Delete Combination», «Mirror - Bernina Artista 640E | User Guide - Page 90
• to activate the desired place, scroll the cursor or select appropriate stitch directly • select new stitch • the new stitch is inserted after the selected stitch • to insert a stitch at the very beginning of a combination, move the cursor right to the top using the scroll arrow • select new - Bernina Artista 640E | User Guide - Page 91
sections with the function «Sub-divider» • the machine sews the contents of the section where the cursor is placed • to sew the next section, place the cursor in the section to be sewn next Deleting Drawer Option 1: Overwriting • program new stitch combination • touch the button «File Drawers - Bernina Artista 640E | User Guide - Page 92
which can be altered to suit your requirements: 1 Display (screen) Settings 2 Sewing Settings 3 Embroidery Settings 4 Display (screen) Calibration 5 Display Messages and Sounds 6 Information 7 Update the sewing computer 8 Reset to Factory • the customized alterations remain saved even when the - Bernina Artista 640E | User Guide - Page 93
• press the Setup button • selection menu appears • touch «1» • in the now opened screen the Display Settings can be changed Setup-Program 93 Contrast • turn stitch width knob or touch «+» or «-» • the contrast of the screen changes • the changes are indicated by the number in the bar and the blue - Bernina Artista 640E | User Guide - Page 94
the basic settings • the tension alteration affects all stitches and remains saved when the sewing computer is turned off («0») Opening Setup Program • press the Setup button • selection menu appears • touch «3» • the screen for adjusting the embroidery hoop appears To Next Page • touch «To Next - Bernina Artista 640E | User Guide - Page 95
center of the embroidery hoop. Adjustments can only be activated if the embroidery module and the oval embroidery hoop are attached. It • tension adjustments affect all stitches and remain saved, also when the sewing computer is turned off. Motor Speed • turning stitch width knob or touching «+» - Bernina Artista 640E | User Guide - Page 96
96 Setup-Program Touch (Screen Sensibility) Opening Setup Program • press the Setup button • selection menu appears • touch «4» • the screen for calibrating the touch sensitivity of the screen appears 4 Touch Setup • touch the Calibration symbol • a further screen display appears Touch 2 Press and - Bernina Artista 640E | User Guide - Page 97
blue speaker means that the bar is active • gray background and red speaker means that the bar is inactive Selecting Stitch / Selecting Function / BSR • the selection of stitches and functions can be indicated acoustically • for Stiches (top) touch the bar with the speaker symbol one or more times - Bernina Artista 640E | User Guide - Page 98
screen «Display Messages and Monitoring Functions» appears • following display messages and monitoring functions can be turned on or off: • Upper Thread Control • Presser Foot Position • Lower Thread Control • if the bar is blue and the eye open, the message and function are turned on • if the bar - Bernina Artista 640E | User Guide - Page 99
and the selection menu appears Updating the Sewing and Embroidery Computer Opening Setup Program • press the Setup button • selection menu appears • insert the USB stick (min. 10 MB free space) with the new software version into the right side of the sewing computer • touch «7» 7 There are two - Bernina Artista 640E | User Guide - Page 100
by a message, and the sewing and embroidery computer is ready again for normal use with the new version • if the update cannot be carried out or 106 problems should occur during the update process, this error messages will appear Caution: Do not remove the BERNINA USB stick until the end of - Bernina Artista 640E | User Guide - Page 101
Delete User Data» Setup-Program 101 Deleting Personal Data • three choices are possible: • Sewing «Personal Program» • Embroidery «My Designs» • Embroidery «Memory Stick» (the Memory Stick must be pluged into the sewing computer) • touch the button of which the data should be deleted • confirm the - Bernina Artista 640E | User Guide - Page 102
Balance so that the stitch formation can be adjusted where necessary to suit the fabric. Balance for Practical and Decorative Stitches When sewing soft fabrics such as jersey or tricot, the fabric tends to stretch under the presser foot which also stretches the stitch being sewn. For example - Bernina Artista 640E | User Guide - Page 103
pull out plug from electrical outlet • remove presser foot and needle • open the free arm cover • press the stitch plate down at the back right corner, lift and remove • clean the area with the lint brush • replace the stitch plate Cleaning the Screen and the Sewing Computer • wipe with a damp cloth - Bernina Artista 640E | User Guide - Page 104
of instead of behind the presser foot. • When sewing over a thick area, the fabric was pushed with the needle still in the fabric; use Jeans foot No. 8 (optional accessory). • Poor quality thread, unevenly wound or knotted. • Information on needles see page 17 Faulty Stitching • Remnants of thread - Bernina Artista 640E | User Guide - Page 105
or lint in thread control slit area Check upper and/or lower thread and if necessary clean bobbin area of lint or stray thread. The winder is on. Lower presser foot The winder speed can be changed with the stitch width knob or the «+» und «-» onscreen buttons. If the winder is turned off or «ESC - Bernina Artista 640E | User Guide - Page 106
Raise presser foot The message disappears automatically if the presser foot was raised. Needle will penetrate presser foot or stitch plate. Check the settings in the Security screen. The sewing computer must be cleaned / lubricated. Corresponding instructions are on page 103 of the manual. This - Bernina Artista 640E | User Guide - Page 107
was not carried out. The original software version is still on the sewing computer. Insert the BERNINA Memory Stick with the update data into the sewing computer and restart the update. Check the update data on the BERNINA Memory Stick. Your sewing computer might already be provided with the latest - Bernina Artista 640E | User Guide - Page 108
108 Sewing ideas Sewing ideas - Bernina Artista 640E | User Guide - Page 109
Computer Details Setting up the Embroidery Computer 109 2 4 3 6 1 Embroidery surface 2 Embroidery arm 3 Embroidery hoop connection 4 Accessory box 1 5 Connecting lug right 6 Connecting lug center 7 Sewing computer connecting cable 8 Cable holder 5 Front view 1 8 8 Back view - Bernina Artista 640E | User Guide - Page 110
) Template for medium embroidery hoop Embroidery presser foot No. 26 Net for upper thread spools - pull over upper thread spool for even spooling Embroidery bobbin case Embroidery needle range Embroidery module bag USB connecting cable for PC embroidery software Embroidery software Editor Lite - Bernina Artista 640E | User Guide - Page 111
(150x400mm) Template for Mega-Hoop, VAR. 01 for a640 Adapter for free arm embroidery Straight stitch plate 9mm BERNINA USB Stick BERNINA artista software BERNINA Multiple spool holder BERNINA embroidery cards/Magic Box Suitcase system for sewing computer and embroidery module * can vary from - Bernina Artista 640E | User Guide - Page 112
the Embroidery Module Attaching the Module to the Sewing Computer Attaching the Module to the Sewing Computer • place the module on the sewing computer behind the free arm • push the module from the left towards the sewing computer so that the connecting lugs engage in the base plate Releasing - Bernina Artista 640E | User Guide - Page 113
to the L-shaped guide on the adapter • push the module towards the guide from the left until the connecting lugs engage in the base plate of the adapter Free Arm Embroidery Hoop • the small, oval embroidery hoop is specially designed for free arm embroidery Caution! Only the small hoop can be used - Bernina Artista 640E | User Guide - Page 114
undamaged needle • raise the needle so that the embroidery hoop can be attached Lower the Feed Dog • press the button on the right side of the sewing computer to lower the feed dog Straight Stitch Plate (optional accessory) • the straight stitch plate has a small needle hole. The needle insertion - Bernina Artista 640E | User Guide - Page 115
of the small hoop Embroidery Template • there is a template for each embroidery hoop • the embroidery surface is marked in 3/8" (1 cm) squares • the center and corners are marked with holes for transferring marks to fabric • place the template in the inner hoop so that the word BERNINA is at the - Bernina Artista 640E | User Guide - Page 116
embroidery after stitching • stabilizer will remain under larger embroidered areas Application: • for all elastic fabrics, especially suited for knits When using paper backed adhesive stabilizer make sure that the adhesive residue on needle, stitch plate • place stabilizer in hoop, paper side up • - Bernina Artista 640E | User Guide - Page 117
color, thread quality, needle, stitch density, tension, etc. to suit the motif if necessary • for the test use the same fabric and stabilizer that you will use on the project Scaling/Sizing Motifs • motifs can be scaled/sized on the embroidery computer or with the artista software on the PC • to - Bernina Artista 640E | User Guide - Page 118
damage the embroidery Step Stitch • a fill stitch with stitches of specified length sewn in rows used primarily to fill large areas quickly Fancy-Fill Stitches • to give areas a special effect • stitches that create a motif with an area to be filled Outline Stitches • usually straight or satin - Bernina Artista 640E | User Guide - Page 119
's clothing and items which will be washed often or subject to much wear and tear. When sewing with metallic threads, we recommend the use of the vertical spool pin and the supplementary thread guide (optional accessory). Embroidery is particularly effective if you use glossy rayon or polyester - Bernina Artista 640E | User Guide - Page 120
• remove embroidery hoop • attach Embroidery presser foot No. 26 • raise presser foot • lower feed dog • thread the bobbin thread through the pigtail tension guide of the embroidery bobbin case • if all embroidery requirements are fulfilled, close the screen with «OK» • the embroidery hoop will MOVE - Bernina Artista 640E | User Guide - Page 121
the most appropriate (smallest possible) hoop • the «Hoop» on-screen button shows which hoop should be attached • attach the recommended hoop Attaching the Embroidery Hoop Raising Needle and Embroidery Presser Foot • raise needle and embroidery presser foot • hold the hoop with the right side of - Bernina Artista 640E | User Guide - Page 122
presser foot • remove the embroidery hoop from the embroidery arm • cut threads close to the motif • carefully remove any connecting threads from the embroidered area • take care that the bobbin thread is not cut too closely to the stitch plate when removing the embroidery hoop Embroidery Screen - Bernina Artista 640E | User Guide - Page 123
On-screen Functions and Displays After turning on the embroidery computer or changing from Sewing to Embroidery Mode, the Selection menu appears. This happens when a motif is selected or combined with an existing motif. Functions and Displays 123 Return to Selection Menu • - Bernina Artista 640E | User Guide - Page 124
displayed with maximum stitch field in mm Possible Hoop Selections (display «Select Hoop») • select hoop (Small, Medium, Large Oval or Mega) • the display closes and the selected hoop is visible on the «Hoop» on-screen button • by touching «Check Module» the embroidery module is calibrated (reads - Bernina Artista 640E | User Guide - Page 125
the screen «Embroidery Menu» • the motif is ready for embroidery Edit 1 Screen Show Grid • touch symbol • a large cross hair indicates the hoop center • touch color Change Stitch Type • touch symbol • a special screen appears • satin stitches can be changed to step stitches • The stitch density can - Bernina Artista 640E | User Guide - Page 126
left turn knob counter clockwise • to move the motif vertically, turn the stitch length knob - to move up, turn knob clockwise to move down, turn displayed in 1/10 millimeter (mm) • to move the motif diagonally turn the stitch width and length knob (the number in both blue knob icons is the same) - Bernina Artista 640E | User Guide - Page 127
menu the motif can be embroidered and embroidery related alterations made (e.g. single color / multi color). Hoop Display • display of the attached embroidery hoop with stitch field dimensions in mm Hoop Relocator • this function makes threading easier if the thread has to be changed when the - Bernina Artista 640E | User Guide - Page 128
slide Stitch Width / Stitch Length Knobs • with different functions such as Alter Size, Rotate Motif, etc. the external knobs are used to work on the motifs • an Information Area appears when the knobs can be utilized Embroidery Mode/ Sewing Mode Button • changing from Embroidery Mode to Sewing Mode - Bernina Artista 640E | User Guide - Page 129
on Embroidering Motifs With no Alterations Motif Overview • select desired motif in the Motif Overview Embroidery 129 Select Hoop The most appropriate (smallest possible) hoop is automatically chosen for the selected embroidery motif: • the motif is shown on the display in the center of the most - Bernina Artista 640E | User Guide - Page 130
Embroidery menu touch «OK» in the Edit 1 or Edit 2 screen or the Start-Stop button on the head frame • the motif can be embroidered by pressing the Start-Stop-button Hoop rotating the motif can be moved to another position within the hoop. Preparation • select desired motif from the Selection menu • - Bernina Artista 640E | User Guide - Page 131
(0°/90°/180°/270°/360°) Embroidery 131 Checking the Motif Position With the functions «Check» and «Motif Center» the motif position can be checked before embroidering. Check The function «Check» reads the attached hoop size and stitching area: • touch symbol • the hoop size is read causing the - Bernina Artista 640E | User Guide - Page 132
the embroidery market. Bernina's stitch process engines add correct density in the majority of sizes and positions. However, since there might be an occasion when a certain percentage of scaling or rotation does not produce a 100% perfect recreation of the design, it is a good idea to test-sew your - Bernina Artista 640E | User Guide - Page 133
hoop after the special screen closes Embroidery 133 Change Stitch Properties Change Stitch Properties • change the following properties: • stitch type • stitch density • touch function • a special screen appears • touch the «Convert Stitches» symbol = 134 134 the basic setting for the straight - Bernina Artista 640E | User Guide - Page 134
(Split Stitch) The embroidery motifs are filled with long or straight stitches. Long stitch: • alternates from one side to the other Straight stitch (fill stitch): • consecutive stitches at regular intervals • Touch the «Convert Stitches» symbol • Long Stitch is converted into straight stitch, max - Bernina Artista 640E | User Guide - Page 135
turn the Stitch Width knob clockwise = the stitch density will be increased (more stitches) • Touch the «OK» symbol = The selected stitch density will be saved and the Edit 1 screen will appear • Touch the «Reset» symbol = the motif will automatically return to its basic state (100%) Embroidery 135 - Bernina Artista 640E | User Guide - Page 136
button («Alphabets», «Motifs» and «My Designs») appears • select desired embroidery motif or change to the Selection menu with the arrow «Return to is active. If the indicated hoop offers too little space, select a larger one with the function «Select Hoop». Creating / Altering Motif Combination - Bernina Artista 640E | User Guide - Page 137
be combined with other letters or motifs and embroidered with the embroidery computer. Application • names, monograms and addresses • words and in the hoop, rotate lettering by 90º (a large number of letters can fit into the lengthwise stitch area of the hoop). Should this not be of any help, then - Bernina Artista 640E | User Guide - Page 138
the motif turn stitch width knob counter clockwise • in the Information Area the alteration is displayed in percent • to reactivate the basic setting (100%) of the motif touch the Information Area Selecting the Most Appropriate Hoop for Adjusted Motif Size The best embroidery results are achieved - Bernina Artista 640E | User Guide - Page 139
. Combining Different Words The words (for example Nothing Sews Like A Bernina. Nothing.) are put together by the line and the function «Move Motif» • if a stitch of a motif is positioned outside the stitch area, the outline of the hoop is displayed in red Combining and Positioning Further - Bernina Artista 640E | User Guide - Page 140
work at hand, or the lettering is created first and the motif added afterwards (e.g. embellished text). Combining Example • select desired motif in the embroidery computer • the motif appears in the the Edit 1 screen • select «Add Motif» in the Edit 1 screen • select desired alphabet type from the - Bernina Artista 640E | User Guide - Page 141
Motif Colors The motif colors can be changed as well as embroidered in different ways. Preparation • select desired motif from the Selection menu • the motif is displayed in the Edit 1 screen Reallocating Motif Colors • touch the function «Color Number» in the Edit 1 or Edit 2 screen • the Color - Bernina Artista 640E | User Guide - Page 142
the thread color can be changed • the Embroidery Time is displayed for each color • to embroider the complete lettering combination in one color, touch the Single/Multi Color Motif symbol now visible Embroidering Individual Color Sections and Manual Adjustment of Color Sequence • special effects can - Bernina Artista 640E | User Guide - Page 143
created in the BERNINA artista software, can be combined, rearranged, and altered in different ways, then saved. Motifs can either be saved to the embroidery computer or on a stick (Personal Design Stick). The embroidery computer has a memory system, i.e. both the sewing stitch combinations and - Bernina Artista 640E | User Guide - Page 144
USB Stick • personal design sticks are available as optional accessories from your BERNINA dealer • open desired motif from embroidery computer, personal design stick or peripheral source • alter or combine motif if desired • touch «Save» in the Edit 1 screen • motif to be saved is displayed - Bernina Artista 640E | User Guide - Page 145
Edit 1 screen • motif to be saved is displayed as «New» on left of screen • select the Stick button (personal design stick inserted) or Embroidery Computer button from the Selection menu • touch the motif you wish to overwrite • confirm the appearing animation with «OK» • the motif is now saved - Bernina Artista 640E | User Guide - Page 146
146 Deleting Deleting a Saved Motif • select from the selection menu either «Memory Stick» (Memory Stick is inserted) or «Embroidery Computer» and select the folder «My Designs» • touch «Delete» • select the motif to be deleted in the screen visible now • confirm the appearing animation with « - Bernina Artista 640E | User Guide - Page 147
two choices are possible: • «My Designs» • «Memory Stick» (the stick must be plugged into the embroidery computer) • touch the button of which the data should be deleted • confirm the appearing display message with «OK» • the data is deleted and the screen - Bernina Artista 640E | User Guide - Page 148
148 Tutorial Tutorial Opening Tutorial • touch «Tutorial» • a screen with subjects appears Subjects • select the desired subject, e.g. Embroidery Hoops • Information on the desired subject appears Text Scrolling • this symbol indicates that text scrolling on screen can be activated with the stitch - Bernina Artista 640E | User Guide - Page 149
the knobs counter clockwise (or clockwise) to move the embroidery hoop backwards (or forwards) in the embroidery sequence • turn the stitch width knob slowly to move the hoop stitch by stitch • turn the stitch length knob to move the embroidery hoop in big steps (approx. 50 steps) • the number in - Bernina Artista 640E | User Guide - Page 150
stitch plate Unsatisfactory Stitch Formation • remnants of thread between tension discs: • pull folded thin fabric (use the fold, not an outer edge) back and forth between the tension disks to clean the left and right side of the thread tension • remove any remnants of thread from under the bobbin - Bernina Artista 640E | User Guide - Page 151
Lower presser foot. The message disappears automatically if the presser foot was lowered. Raise presser foot. The embroidery computer must be cleaned / lubricated. The message disappears automatically if the presser foot was raised. Corresponding instructions are on page 103 of the manual. This - Bernina Artista 640E | User Guide - Page 152
embroidery hoop. Attach embroidery hoop. Attach Embroidery foot No. 26. Thread bobbin case Design ist not completely inside the hoop. Remove embroidery hoop from embroidery module. Attach embroidery hoop to embroidery module. Attach Embroidery foot No. 26 to the embroidery computer. For embroidery - Bernina Artista 640E | User Guide - Page 153
Messages 153 Motif does not fit into the attached hoop Attach a larger embroidery hoop or reduce the size of the motif No embroidery module is attached. Attach embroidery module to the embroidery computer. Data transfer Mega-Hoop up As soon as the data transfer is compledted, the messeage will - Bernina Artista 640E | User Guide - Page 154
154 Accessories Accessories Suitcase System BERNINA offers a variety of extras (optional accessories) to go with the sewing and embroidery system artista 640, for new and unlimited opportunities. Ask your BERNINA dealer for more information. Thanks to the suitcase system with integrated wheels - Bernina Artista 640E | User Guide - Page 155
and a message indicates, to which embroidery position (top, center or bottom) the Mega-Hoop has to be moved. For artista 640 use the template named VAR. 01 Accessories 155 The embroidery Mega-Hoop includes user instructions! Embroidery Sticks 1 1 Embroidery stick In addition to the preprogrammed - Bernina Artista 640E | User Guide - Page 156
transfer from the PC to the Embroidery computer or vice versa has been completed, the USB connection cable MUST BE removed from the Embroidery computer. The BERNINA artista embroidery software includes user instructions! Ask your BERNINA dealer for other accessories for your embroidery computer! - Bernina Artista 640E | User Guide - Page 157
sewer manually changes the positions on screen. Mega-Hoop • mega means very large, hoop means frame • extra large embroidery hoop for stitching very large motifs or long borders Memory • memory, store • programs and data are saved and prepared for processing • the memory of the sewing and embroidery - Bernina Artista 640E | User Guide - Page 158
rather than press a key on the keyboard Tutorial • self-help program for learning about various embroidery computer features Update • latest version • updating the sewing and embroidery computer software: installing a newer or the latest version, or updating parts of a program Upgrade • to take - Bernina Artista 640E | User Guide - Page 159
Stitch Summary Practical Stitches Buttonholes Decorative Stitches Stitch Summary 159 - Bernina Artista 640E | User Guide - Page 160
160 Stitch Summary - Bernina Artista 640E | User Guide - Page 161
Quilt Stitches Alphabets Stitch Summary 161 - Bernina Artista 640E | User Guide - Page 162
162 Stitch Summary - Bernina Artista 640E | User Guide - Page 163
- Bernina Artista 640E | User Guide - Page 164
- Bernina Artista 640E | User Guide - Page 165
65-67 67 64-65 62 74 72 71 • Sewing Standard and Stretch Buttonholes • Straight Stitch Buttonhole Button Sew-on Program 70 75 75-76 C Carrier Bag 4 CFL Sewing Light 13 Changing the Needle 13 Changing the Presser Foot 18 Cleaning 103 Combining Motifs 135-136 Connecting the Adapter for - Bernina Artista 640E | User Guide - Page 166
• Adjusting Individual Practical Stitches 36 • Practical Stitches in the Combi Mode 58 • Practical Stitch Seams 36 • Practical Stitches Summary 34-35 • Sewing Knit Fabric 44 Preparing the Embroidery Computer for Embroidery 114 Presser Feet 5 Presser Foot Indicator 23 Ribbing with - Bernina Artista 640E | User Guide - Page 167
33, 114 Thread, Needle, Fabric 15 Threading the Bobbin Thread 114 Threading the Upper Thread 11, 114 • Double Needle, Triple Needle 14 Triple Straight Stitch 38 Trouble Shooting 104, 150 Tutorial (only for Embroidery) 148 Text Herbert Stolz Drawings Müller-Melzer ID, Kreuzlingen - Bernina Artista 640E | User Guide - Page 168
-
 1
1 -
 2
2 -
 3
3 -
 4
4 -
 5
5 -
 6
6 -
 7
7 -
8
-
9
-
10
-
11
-
12
-
13
-
14
-
15
-
16
-
17
-
18
-
19
-
20
-
21
-
22
-
23
-
24
-
25
-
26
-
27
-
28
-
29
-
30
-
31
-
32
-
33
-
34
-
35
-
36
-
37
-
38
-
39
-
40
-
41
-
42
-
43
-
44
-
45
-
46
-
47
-
48
-
49
-
50
-
51
-
52
-
53
-
54
-
55
-
56
-
57
-
58
-
59
-
60
-
61
-
62
-
63
-
64
-
65
-
66
-
67
-
68
-
69
-
70
-
71
-
72
-
73
-
74
-
75
-
76
-
77
-
78
-
79
-
80
-
81
-
82
-
83
-
84
-
85
-
86
-
87
-
88
-
89
-
90
-
91
-
92
-
93
-
94
-
95
-
96
-
97
-
98
-
99
-
100
-
101
-
102
-
103
-
104
-
105
-
106
-
107
-
108
-
109
-
110
-
111
-
112
-
113
-
114
-
115
-
116
-
117
-
118
-
119
-
120
-
121
-
122
-
123
-
124
-
125
-
126
-
127
-
128
-
129
-
130
-
131
-
132
-
133
-
134
-
135
-
136
-
137
-
138
-
139
-
140
-
141
-
142
-
143
-
144
-
145
-
146
-
147
-
148
-
149
-
150
-
151
-
152
-
153
-
154
-
155
-
156
-
157
-
158
-
159
-
160
-
161
-
162
-
163
-
164
-
165
-
166
-
167
-
168
 |
 |

1
Safety Instructions
IMPORTANT SAFETY INSTRUCTIONS !
DANGER
To reduce the risk of electrical shock:
1.
An appliance should never be left
unattended when plugged in.
2.
Always unplug this sewing computer from
the electrical outlet immediately after
using and before cleaning.
WARNING
To reduce the risk of burns, fire, electric shock
or injury to persons:
1.
Do not allow to be used as a toy. Close
attention is necessary when this sewing
computer is used by or near children and
infirm persons.
2.
Use this sewing computer only for its
intended use as described in this manual.
Use only attachments recommended by
the manufacturer as contained in this
manual.
3.
Never operate this sewing computer if:
•
it has a damaged cord or plug,
• it is not working properly
• it has been dropped or damaged,
•
it has fallen into water
Return the sewing computer to the
nearest authorized BERNINA dealer or
service center for examination, repair,
electrical or mechanical adjustment.
4.
Never operate the sewing computer with
any air vents blocked. Keep ventilation
openings of the sewing computer and
foot controller free from accumulation of
lint, dust and fabric remnants and the like.
5.
Keep fingers away from all moving parts.
Special care is required around the sewing
needle.
When using an electrical appliance, basic safety precautions should always
be followed, including the following:
Read all instructions before using this sewing computer. When the sewing
computer is not in use, it should be disconnected from the electricity supply
by removing the plug from the outlet.
6.
Always use the BERNINA original stitch
plate. The wrong plate can cause needle
breakage.
7.
Do not use bent needles.
8.
Do not pull or push fabric while stitching,
which may deflect the needle, causing it
to break.
9.
Turn power switch to «0» (off) when
making any adjustments in the needle
area, such as threading or changing the
needle, threading the bobbin or changing
the presser foot etc.
10. Always unplug the sewing computer from
the electrical outlet when removing
covers, lubricating or when making any
other user servicing adjustments
mentioned in this instruction manual.
11. Never drop or insert any object into any
openings on the sewing computer.
12. Do not use the sewing computer
outdoors.
13. Do not operate where aerosol (spray)
products are being used or where oxygen
is being administered.
14. To disconnect, turn all controls to the off
(«0») position then remove the plug from
the outlet.
15. Do not unplug by pulling on the cord,
instead, grasp the plug before pulling.
16. No responsibility will be taken on behalf
of
BERNINA
for any possible damage as
the result of misuse of the sewing
computer.
17. Under no circumstances should the
sewing computer be left unattended
when using the embroidery module.
18. This sewing computer is provided with
double insulation (except USA / Canada).
Use only identical replacement parts. See
instructions for servicing of double-
insulated machines.
SERVICING
DOUBLE-
INSULATED
PRODUCTS
In a double-insulated product, two systems
of
insulation are provided instead of grounding.
No grounding means is provided on a double-
insulated product nor should a means for
grounding be added to the product. Servicing
a double-insulated product requires extreme
care and knowledge of the system and should
only be done by qualified service personnel.
Replacement parts for a double-insulated
product must be identical to those parts in the
product. A double insulated product is
marked with the words «DOUBLE
INSULATION» or «DOUBLE INSULATED».
The symbol
may also be marked on the
product.
This sewing and embroidery computer is
intended for household use only.
SAVE THESE
INSTRUCTIONS!
031508.50.04_0601_a640_EN