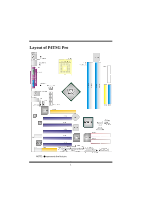
Biostar P4TSG PRO P4TSG Pro user's manual - Page 8
CPU Installation, CPU Fan Headers: JCFAN1, System Fan Headers: JSFAN1
 |
View all Biostar P4TSG PRO manuals
Add to My Manuals
Save this manual to your list of manuals |
Page 8 highlights
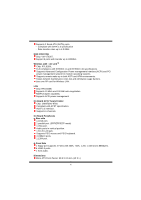
CPU Installation Step1: Pull the lever sideways away from the socket and then raise the lever up to a 90-degree angle. Step2: Look for the white dot/cut edge. The white dot/cut edge should point wards the lever pivot. The CPU will fit only in the correct orientation. Step3: Hold the CPU down firmly, and then close the lever to complete the installation. Step4: Put the CPU Fan on the CPU and buckle it. Connect the CPU fan power cable to the JCFAN1. This completes the installation. Step1 Step2 Step3 CPU Fan Headers: JCFAN1 1 Pin 1 Assignment Ground 2 JCFAN1 3 +12V FAN RPM Sense System Fan Headers: JSFAN1 Pin 1 1 JSFAN1 2 Assignment Ground +12V 3 FAN RPM Sense Step4 6
-
 1
1 -
2
-
 3
3 -
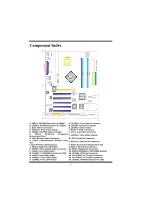 4
4 -
 5
5 -
 6
6 -
 7
7 -
 8
8 -
 9
9 -
 10
10 -
 11
11 -
 12
12 -
 13
13 -
14
-
15
-
16
-
17
-
18
-
19
-
20
-
21
-
22
-
23
-
24
-
25
-
26
-
27
-
28
-
29
-
30
-
31
-
32
-
33
-
34
-
35
-
36
-
37
-
38
-
39
-
40
-
41
-
42
 |
 |

6
CPU Installation
Step1
Step1
Step1
Step1:
Pull the lever sideways away from the socket and then raise the lever up to a
90-degree angle.
Step2
Step2
Step2
Step2:
Look for the white dot/cut edge. The white dot/cut edge should point wards the
lever pivot. The CPU will fit only in the correct orientation.
Step3:
Step3:
Step3:
Step3:
Hold the CPU down firmly, and then close the lever to complete the installation.
Step4:
Step4:
Step4:
Step4:
Put the CPU Fan on the CPU and buckle it. Connect the CPU fan power cable to
the JCFAN1. This completes the installation.
Step1
Step2
Step1
Step2
Step1
Step2
Step1
Step2
Step3
Step4
Step3
Step4
Step3
Step4
Step3
Step4
CPU Fan Headers: JCFAN1
Pin
Assignment
1
Ground
2
+12V
1
JCFAN1
3
FAN RPM Sense
System Fan Headers: JSFAN1
Pin
Assignment
1
Ground
2
+12V
1
JSFAN1
3
FAN RPM Sense