Bissell PowerGroom® Helix Rewind Vacuum 98N4 User Guide - Page 5
Assembly
 |
View all Bissell PowerGroom® Helix Rewind Vacuum 98N4 manuals
Add to My Manuals
Save this manual to your list of manuals |
Page 5 highlights
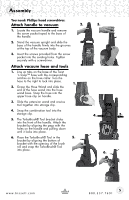
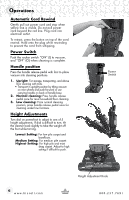
Assembly You need: Phillips head screwdriver. Attach handle to vacuum 2. 3. 1. Locate the vacuum handle and remove the screw packet taped to the base of the handle. 2. Stand the vacuum upright and slide the base of the handle firmly into the grooves at the top of the vacuum body. 3. Insert the screws provided from the screw packet into the existing holes. Tighten securely with a screwdriver. Attach vacuum hose and tools 1. Line up tabs on the base of the Twist 'n Snap™ hose with the corresponding notches on the hose collar. Turn the hose to the right to lock into place. 1. 2. Grasp the Hose Wand and slide the end of the hose wand into the hose wand base. Snap the hose into the upper hose clip on handle. 3. Slide the extension wand and crevice tool together into storage clip. 4. Snap the combination tool into the storage clip. 5. The TurboBrush® Tool bracket slides into the front of the handle. Attach the bracket by aligning the pegs with the holes on the handle and pulling down until it locks into place. 4. 3. 6. Place the TurboBrush® Tool in the 5. bracket by aligning the bottom of bracket with the opening of the brush roll and snap the TurboBrush® Tool into place. 6. w w w. b i s s e l l . c o m 5 800.237.7691
-
 1
1 -
 2
2 -
 3
3 -
 4
4 -
 5
5 -
 6
6 -
 7
7 -
 8
8 -
 9
9 -
 10
10 -
 11
11 -
12
-
13
-
14
-
15
-
16
 |
 |
