Bissell PowerGroom® Multi Cyclonic Canister 80Q2W User Guide - Page 11
Notice, Warning
 |
View all Bissell PowerGroom® Multi Cyclonic Canister 80Q2W manuals
Add to My Manuals
Save this manual to your list of manuals |
Page 11 highlights
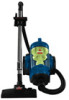
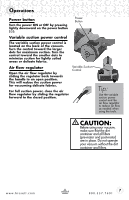
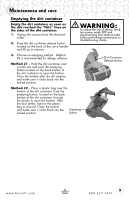
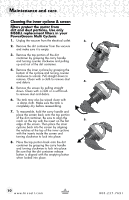
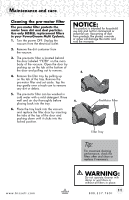
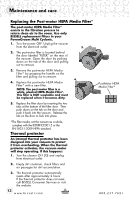
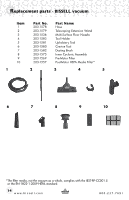
Maintenance and care Cleaning the pre-motor filter The pre-motor filter protects the motor from dirt and dust particles. Use only BISSELL replacement filters in your PowerGroom Multi Cyclonic. 1. Turn the power OFF. Unplug the vacuum from the electrical outlet. 2. Remove the dirt container from the vacuum. 3. The pre-motor filter is located behind the door labeled "FILTER" on the main body of the vacuum. Open the door by pushing up on the tab at the bottom of the door and pulling out to remove. 4. Remove the filter tray by pulling up on the tab of the tray. Remove the pre-motor filter and set aside. Tap the tray gently over a trash can to remove any dirt or debris. 5. The pre-motor filter can be washed in cold water with a mild detergent. Rinse well and air dry thoroughly before placing back into the tray. 6. Place the tray back into the vacuum and replace the filter door by inserting the tabs at the top of the door and pushing down until it clicks into the locked position. NOTICE: This product is intended for household use only and not for commercial or industrial use. Vacuuming of dust from products like plaster, concrete or ashes will damage the motor and void the warranty. 4. 4. Pre-Motor Filter Filter Tray Tip: For maximum cleaning performance, check the filters often and clean or replace if necessary. w w w. b i s s e l l . c o m WARNING: Do not operate cleaner with damp or wet filters or without all filters in place. 11 800.237.7691
-
 1
1 -
2
-
3
-
4
-
5
-
 6
6 -
 7
7 -
 8
8 -
 9
9 -
 10
10 -
 11
11 -
 12
12 -
 13
13 -
 14
14 -
 15
15 -
 16
16
 |
 |