Bissell Steam Mop Select 94E9T User Guide - Page 7
Getting ready
 |
View all Bissell Steam Mop Select 94E9T manuals
Add to My Manuals
Save this manual to your list of manuals |
Page 7 highlights
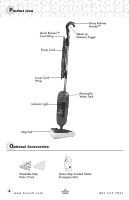
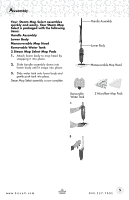
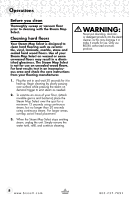
Operations Getting ready The mop pad may have already come attached to the mop head, if not follow steps 1A and 1B below. 1. Attach mop pad A. Set mop head in mop pad, making sure toggle is located on the back. B. Tighten mop pad by pulling on elastic cord while pressing on toggle. 2. Fill the water tank A. Remove tank by lifting straight up and away from unit. B. Unscrew cap at bottom of water tank. C. Fill water tank with water. For best results, water should be at room temperature. D. Replace the cap, tighten until snug. E. Replace water tank by gently sliding tank into place. 3. Twist the quick release cord wrap clockwise to unwrap the power cord completely and plug into a 120-Volt outlet as described on the Important Safety Instructions, page 3. 4. The indicator light will illuminate when the Steam Mop Select is plugged in. NOTE: Upon first use of the Steam Mop Select or first use after refilling the water tank, the pump may make a "knocking" sound. This is normal and should only last a few seconds. While in use, the pump will continue to make a soft "knocking" sound. This is also normal. 1A 1B 2A 2B 2D 2E Tip: Use of distilled water is recommended to prolong the life of your Steam Mop Select www.bissell.com 7 800.237.7691
-
 1
1 -
 2
2 -
 3
3 -
 4
4 -
 5
5 -
 6
6 -
 7
7 -
 8
8 -
 9
9 -
 10
10 -
 11
11 -
 12
12
 |
 |
