Blendtec Total Blender Classic WildSide Owners Manual - Page 5
Getting To Know Your Blender - press
 |
View all Blendtec Total Blender Classic WildSide manuals
Add to My Manuals
Save this manual to your list of manuals |
Page 5 highlights
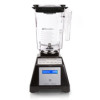
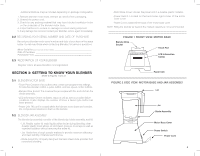
• Additional literature may be included depending on package configuration. 1. Remove blender motor base, blender jar, and lid from packaging. 2. Unwind the power cord. 3. Check for any packing material that may have blocked ventilation holes on the underside of the blender motor base. 4. Inspect all items to ensure no damage occurred during shipment. 5. If any damage has occurred contact your Blendtec service agent immediately. 2.2 RECORDING YOUR SERIAL NUMBER AND DATE OF PURCHASE Record your blender motor serial number and date of purchase in the space below. You will need these when contacting Blendtec for service or questions. Motor Serial #(Found on bottom of motor base Date of Purchase Purchased From 2.3 REGISTRATION OF YOUR BLENDER Register online at www.blendtec.com/registration SECTION 3: GETTING TO KNOW YOUR BLENDER (Refer to Figures 1 and 2) 3.1 BLENDER MOTOR BASE • Touch Pad: Consists of six buttons that contain pre-programmed settings for selective blender control, a pulse button, and two speed control buttons. • Blender Drive Socket: This is where the jar couples with the motor to turn the blade assembly. • LCD Information Center: Indicates status of unit as well as possible failure conditions. It also displays the number of times a blend cycle button has been pressed. • Power Unit: This unit is located within the blender motor base and contains the computerized electronics that run the blender. 3.2 BLENDER JAR ASSEMBLY The blender jar assembly consists of the blender jar, blade assembly, and lid. • Lid: Flexible rubber lid seals liquids within the jar during blending; clear durable plastic insert allows air and steam pressure to escape as well as ingredient addition without removing the entire lid. • Jar: Made from a tough durable material to provide maximum efficiency and clear visibility of blender performance. • Blade Assembly: Uniquely designed stainless steel blade provides fast, consistent blending. 4 • Motor Base Cover: Houses the power unit in a durable, plastic material. • Power Switch: Located on the back lower-right corner of the motor base cover. • Power Cord: Located at the back of the motor base cover. NOTE: Filling the blender jar beyond the marked capacity is not recommended. FIGURE 1 FRONT VIEW: MOTOR BASE Blender Drive Socket Touch Pad LCD Information Center Power Unit FIGURE 2 SIDE VIEW: MOTOR BASE AND JAR ASSEMBLY Lid Jar Blade Assembly Motor Base Cover Power Switch Power Cord 5
-
 1
1 -
 2
2 -
 3
3 -
 4
4 -
 5
5 -
 6
6 -
 7
7 -
 8
8 -
 9
9 -
 10
10 -
 11
11
 |
 |
