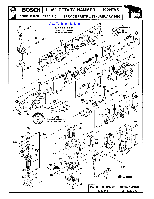
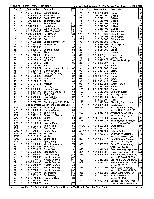
Bosch 11222EVS Parts List - Page 3
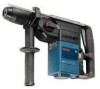
Evs, 11222evsg - hammer drill
 |
UPC - 000346276602
View all Bosch 11222EVS manuals
Add to My Manuals
Save this manual to your list of manuals |
Page 3 highlights
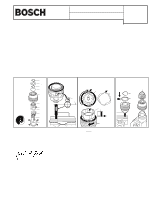
January 1995 TECHNICAL BULLETIN Section 6 - Hammers "chuck assembly instructions" model(s) affected 11222EVS 11222EVSG To: All Authorized and Factory Service Centers, Field Sales and Internal Support Personnel Re: Chuck Assembly Instructions for Rotary Hammers 11222EVS (06 11222 739) 11222EVSG (06 11222 783) Please insert this bulletin into the "Technical Bulletins" section of your Bosch Parts Manual, only after making any additions or notes to your Illustrated Parts List(s). Following these instructions will assist your repair of the Chuck Assembly. First assemble parts 50/8 and 50/14 onto part 50/4. Next assemble the rest of the pictured parts. Be sure to fit the tab on spring 50/5 into the slit in the sleeve 50/4. 50/ 13 50/ 12 50/ 10 50/ 14 50/ 4 50/ 8 50/ 11 50/ 7 50/ 5 50/ 1 50/ 11 Mount the assembly onto a SDS drill bit shank. To pre-load the assembly: Turn sleeve 50/4 approx.120°. Next, per the arrows, align and slide the lock sleeve 50/2 into 50/4. 120° 50/ 4 50/ 2 Install the remaining parts onto the assembly, then install Install chuck onto the tool. bevel upward 50/ 9 50/ 3 50/ 6 90° 50/ 4 50/ 2 Install bevel downward 50/ 4 All questions should be directed to your Authorized Service Manager. Gail D. Fred Product Service Department S-B Power Tool Company Chicago IL 60646-5999
-
 1
1 -
 2
2 -
 3
3
 |
 |
