Bosch 3931A Operating Instructions - Page 7
Thorough Cleaning Of - dust bag
 |
UPC - 000346407143
View all Bosch 3931A manuals
Add to My Manuals
Save this manual to your list of manuals |
Page 7 highlights
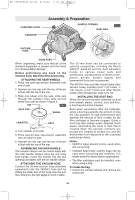
BM 1609929K45 08-06 8/14/06 11:42 AM Page 7 FIG. 4 FILTER CARTRIDGE FILTER COMPARTMENT LOCK CONTROL UNIT TOP SECTION CONTROL UNIT BOTTOM SECTION MOTOR PROTECTION FILTER 2. Grasp a new dust bag at the flange. Push it 2. Lower the top section down again. over the bottom of the connection piece first and then over the catch on the top of the connection piece. Make sure that the full length of the dust bag faces against the inner wall of the canister (Fig. 2). 3. Re-attach the control unit. 3. With slight pressure from the top of the control unit, the filter compartment lock will snap back again. CLEANING THE MOTOR PROTECTION FILTERS The motor protection filters are mostly 4. Lock the canister latches. maintenance-free. If the motor filters are dirty, REMOVING THE DUST BAG it may indicate that the filter cartridges are 1. Unlock the canister latches and remove the damaged and need to be replaced. If the motor control unit. filters need cleaning, take out the motor 2. Pull the dust bag away from and off of the connection piece. 3. Close the opening in the dust bag by folding down the lid 4. Remove bag and dispose of properly. protection filters from time to time and wash them. Allow them to dry thoroughly before reinserting. REMOVING THE MOTOR PROTECTION FILTERS 1. To open the filter access compartment, use REMOVING THE FILTER CARTRIDGES a coin to rotate the lock by 1/4 turn in the 1. First, clean the filters by setting the mode direction of the arrow and push the lock in. selector switch to the PULSE-CLEAN™ mode, which takes only 10 seconds. 2. To open the filter access compartment, use a coin to rotate the filter compartment lock by 1/4 turn in the direction of the arrow and 2. Lift up the top section. 3. Grasp the filter, pull up and remove. REPLACING THE MOTOR PROTECTION FILTERS push the lock in. 3. Lift up the top section of the control unit. 4. Grasp the filter cartridge by the fins, pull up and remove. (See Figure 4.) 1. Insert clean motor protection filters and ensure firm seating. 2. Lower the top section. Replace a damaged filter cartridge immediately. THOROUGH CLEANING OF THE FILTER CARTRIDGES If necessary, the filter cartridges can also be cleaned with a soft brush and can also be washed with water. REPLACING THE FILTER CARTRIDGES 3. With slight pressure from the top of the control unit, the filter compartment lock will snap back again. WAND STORAGE The wands from the optional VAC011 wand kit can be stored in the recesses at the bottom of the rear of the container. See Figure 1. 1. Insert new or cleaned filter cartridge and ensure firm seating. -7-
-
 1
1 -
 2
2 -
 3
3 -
 4
4 -
 5
5 -
 6
6 -
 7
7 -
 8
8 -
 9
9 -
 10
10 -
 11
11 -
 12
12 -
13
-
14
-
15
-
16
-
17
-
18
-
19
-
20
-
21
-
22
-
23
-
24
-
25
-
26
-
27
-
28
-
29
-
30
-
31
-
32
-
33
-
34
-
35
-
36
-
37
-
38
-
39
-
40
 |
 |
