Bosch B22CS50SNB Use and Care Manual - Page 8
Appliances and installation dimensions
 |
View all Bosch B22CS50SNB manuals
Add to My Manuals
Save this manual to your list of manuals |
Page 8 highlights
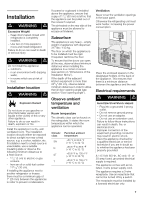
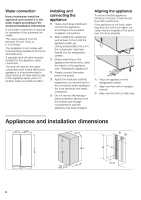
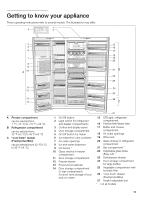
Water connection Have a technician install the appliance and connect it to the water supply according to the enclosed installation instructions. A cold water connection is required for operation of the automatic ice maker. The water pressure must be between 20 and 100 p.s.i. (1.4-6.9 bar). The installation must comply with local plumbing regulations and local and state laws. A separate shut-off valve must be installed for the appliance water connection. The shut-off valve for the water connection must not be behind the appliance. It is recommended to place the shut-off valve directly next to the appliance (base unit) or in another easily accessible location. Installing and connecting the appliance ˆ Have a technician install and connect the appliance according to the enclosed installation instructions. ˆ After installing the appliance, wait at least ½ hour until the appliance starts up. During transportation the oil in the compressor may have flowed into the refrigeration system. ˆ Before switching on the appliance for the first time, clean the interior of the appliance (see "Cleaning the appliance"). ˆ Always connect the water before the power. ˆ Apart from statutory national regulations, you should stick to the connection terms relating to the local electricity and water companies. ˆ Do not remove the transportation protection devices from the shelves and storage compartments until the appliance has been installed. Aligning the appliance To ensure that the appliance functions correctly, it must be set level with a spirit level. If the appliance is not level, water may flow out of the ice maker, ice cubes may be irregular or the doors may not close properly. ˆ Place the appliance in the designated location. ˆ Align front feet with a hexagon wrench. ˆ Align rear feet with an Allen key. Appliances and installation dimensions 151/4" 209/32" 3513/16" AB 687/8" 69" 36" 6825/32" 3513/16" min.11/2" max.21/8" 276/16" min.24" 8
-
 1
1 -
2
-
 3
3 -
 4
4 -
 5
5 -
 6
6 -
 7
7 -
 8
8 -
 9
9 -
 10
10 -
 11
11 -
 12
12 -
 13
13 -
14
-
15
-
16
-
17
-
18
-
19
-
20
-
21
-
22
-
23
-
24
-
25
-
26
-
27
-
28
-
29
-
30
-
31
-
32
-
33
-
34
-
35
-
36
-
37
-
38
-
39
-
40
-
41
-
42
-
43
-
44
-
45
-
46
-
47
-
48
-
49
-
50
-
51
-
52
-
53
-
54
-
55
-
56
-
57
-
58
-
59
-
60
-
61
-
62
-
63
-
64
-
65
-
66
-
67
-
68
-
69
-
70
-
71
-
72
-
73
-
74
-
75
-
76
-
77
-
78
-
79
-
80
-
81
-
82
-
83
-
84
-
85
-
86
-
87
-
88
 |
 |
