Bosch HDI7152U Use & Care Manual - Page 10
Sealed Gas Burners, Burner Caps, Diffusion Burner Caps, Burner Grates, Models with Stainless Steel
 |
UPC - 825225842279
View all Bosch HDI7152U manuals
Add to My Manuals
Save this manual to your list of manuals |
Page 10 highlights
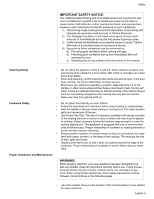
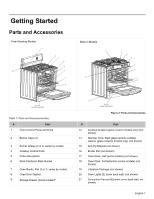
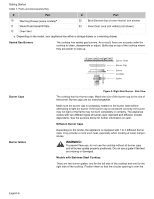
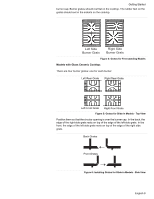
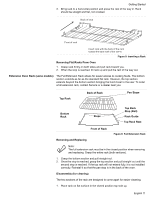
Getting Started Table 1: Parts and Accessories Key # Part # Part 10 Warming Drawer (some models)a 22 Broil Element (top of oven interior) (not shown) 11 Model # and Serial # Plate 23 Oven Door Lock (not visible) (not shown) 12 Oven Vent a. Depending on the model, your appliance has either a storage drawer or a warming drawer. Sealed Gas Burners The cooktop has sealed gas burners. As a result, there are no parts under the cooktop to clean, disassemble or adjust. Spills stay on top of the cooktop where they are easier to wipe up. Burner Grate Burner Cap Burner Cooktop Ignitor Burner Caps Burner Grates Figure 3: Right Side Burner - Side View The cooktop has four burner caps. Match the size of the burner cap to the size of the burner. Burner caps are not interchangeable. Make sure the burner cap is completely seated on the burner base before attempting to light the burner. If the burner cap is not placed correctly, the burner may not light or the flame may not burn completely or correctly. The appliance comes with two different types of burner caps: standard and diffusion (model dependent). See the sections below for further information on each. Diffusion Burner Caps Depending on the model, the appliance is equipped with 1 to 4 diffusion burner caps. They provide a more even heat, espceially when cooking at lower temperatures. WARNING: To prevent flare-ups, do not use the cooktop without all burner caps and all burner grates properly positioned. Do not use a grate if the feet are missing or damaged. Models with Stainless Steel Cooktop: There are two burner grates: one for the left side of the cooktop and one for the right side of the cooktop. Position them so that the circular opening is over the English 8
-
 1
1 -
2
-
3
-
4
-
 5
5 -
 6
6 -
 7
7 -
 8
8 -
 9
9 -
 10
10 -
 11
11 -
 12
12 -
 13
13 -
 14
14 -
 15
15 -
16
-
17
-
18
-
19
-
20
-
21
-
22
-
23
-
24
-
25
-
26
-
27
-
28
-
29
-
30
-
31
-
32
-
33
-
34
-
35
-
36
-
37
-
38
-
39
-
40
-
41
-
42
-
43
-
44
-
45
-
46
-
47
-
48
-
49
-
50
-
51
-
52
-
53
-
54
-
55
-
56
 |
 |