Bosch WAE20060UC Installation Instructions - Page 2
Leveling, Electrical, connection, Transportation, moving, Customer, service, Technical, - washing machine
 |
View all Bosch WAE20060UC manuals
Add to My Manuals
Save this manual to your list of manuals |
Page 2 highlights
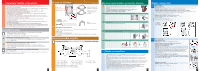
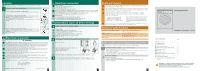
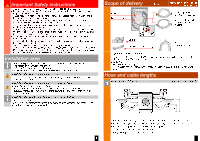
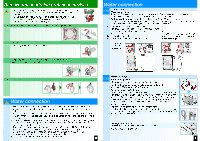
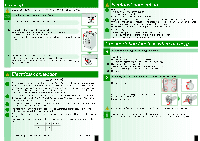
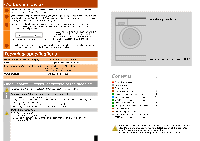
Leveling Strong odor, vibrations and "walking" can be the result of incorrect leveling! Level the washer with a bubble level. 1. Loosen counter nut with wrench counterclockwise. 2. Change height by rotating the appliance feet. Attention: All four appliance feet must be firmly on the floor. The washing machine must not wobble! Check alignment of the washing machine with a bubble level and, if required, correct. 3. Tighten the counter nut against the housing. Hold the feet while doing this and do not change the height. Attention: The counter nuts of all four washer feet must be screwed tightly against the housing! Electrical connection F F F F F d WARNING This appliance must be grounded. In the event of a malfunction or breakdown, grounding will reduce the risk of electrical shock by providing a path of least resistance for the electric current. This appliance features a cord with an equipmentĆgrounding conductor and a grounding plug. The plug must be plugged into an appropriate outlet which has been properly installed and grounded in accordance with all local regulations and ordinances. Improper connection of the equipment grounding conductor may result in electric shock. Have the appliance checked by a qualified electrician or service technician if you are in doubt as to whether the washer has been properly grounded. Do not modify the plug provided with the appliance - if it will not fit in the outlet, have a proper outlet installed by a qualified electrician. The washing machine must only be connected to an individual branch circuit via a socket which has been properly installed and grounded. The household electrical voltage must correspond to the voltage specifications on the washing machine. Connection specifications as well as the required fuses are stipulated on the appliance rating plate. Volts Hertz Amperes 208-240 60 10 Manufacturer (see Operating instructions) 1109 / 9000 484 651 5 Electrical connection F F F Make sure that: - the power plug fits into the socket. - the wire size is sufficient. - the grounding system is properly installed. The power cord may be replaced by an electrician only. Replacement power cords are available from Customer Service. To reduce the risk of fire or electrical shock, DO NOT use an extension cord or an adapter to connect the washing machine to the power supply. Use of a Ground Fault Circuit Interrupter (GFCI) is recommended. Electrical plug: - do not insert/pull out of the socket with damp hands. - do not pull the plug out of the socket by tugging the power cord. - never pull out the plug while the appliance is operating. Transportation (such as when moving) 1. Before transporting the washing machine: 1. Turn off the tap. 2. Release the water pressure in the supply hose. -> operating instructions, page 9; Filter in the water supply. 3. Drain any residual detergent solution. -> operating instructions, page 9; Detergent solution pump. 4. Isolate the washing machine from the power supply. 5. Remove the hoses. 2. Preparing and installing the transportation protection devices: 1. Remove the covers. 2. Insert all 4 transportation protection devices and clamp the mains cable to the holders. Tighten the bolts. After transportation, the transportation protection devices must be removed. -> page 3. To prevent unused detergent from flowing straight into the drain during the next wash: Pour 1 quart (approx. 1 liter) of water into compartment II and start the Drain programme. 6 Customer service F Before calling customer service, please check whether you can eliminate the fault yourself. -> operating instructions, What to do if ... F User information explained in the instructions provided and troubleshooting issues found in the Operating Instructions "What to do if.." section may not be covered by warranty service. Please carefully rule any of these issues before calling for service, F Contact information for customer service is found in list or via our website -> operating instruction. Please give customer service the product number (EĆNr.) and the production number (FD) of the appliance. E+ ĆNr. Product number FD Production number You can find the rating plate which contains this information in the frame of the open washing machine door and in the thick bordered box on the appliance rating plate at the back of the appliance. F Please help ensure faster service by providing the product number and production number to prevent unnecessary service calls. This will save you additional costs. Technical specifications Dimensions (width x depth x height) Weight Mains connection (according to model) Water pressure 23.6 x 23.2 x 33.2in. / 60 x 59 x 84,2cm 167,7lbs. (76kg) depending on model Nominal voltage 208-240V, 60Hz Nominal current 10A Nominal power 2000-2300W 14.5 to 120p.s.i. (1Ć10bar) UnderĆcounter / closet installation of the machine UnderĆcounter / inĆcabinet installation before connection to power supply. Installation in kitchen cabinetą(underĆcounter or in cabinet) - Cubicle width of 23.62in. / 60cm is required. - Only install the washing machine under a continuous counter top which is securely fastened to the neighboring cabinets. - If installing the washer in a closet, observe the minimum distances: Side: 0in., rear: 3.35in. / 85mm , top: 0in., front: 3.54in. / 90mm BuiltĆunder appliance Risk of electric shock! - 23.62in. / 60cm cavity width required. - Instead of the appliance cover panel, have a technician install a sheet metal cover; order no. WMZ 2420. 7 Washing machine Installation instructions enĆus Contents Page J Safety instructions 1 J Installation area 1 J Scope of delivery 2 J Hose and cable lengths 2 J Remove transportation safety devices . . . . . 3 J Water connection 3/4 J Leveling 5 J Electrical connection 5/6 J Transportation (such as when moving) . . . . . 6 J Customer service 7 J Technical specifications 7 J UnderĆcounter / closet installation of the machine 7 WARNING - to reduce the risk of fire, electric shock, or injury to persons, read the Important Safety instructions before operating this appliance. Also follow the separate operating instructions. Retain all documents for subsequent use or for the next owner.
-
 1
1 -
 2
2 -
 3
3 -
 4
4 -
 5
5 -
 6
6
 |
 |
