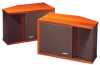
Bose 201 Series II Loud Owner's guide - Page 2
Series, Direct/Reflecting, Loudspeaker, System
 |
View all Bose 201 Series II Loud manuals
Add to My Manuals
Save this manual to your list of manuals |
Page 2 highlights
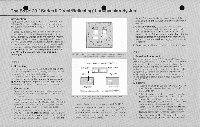
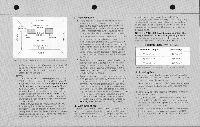
The Bol t 201 Series II Direct/Reflecting Loudspeaker System • Introduction Thank you for purchasing the Bose' 201- Series II Direct! Reflecting' Loudspeaker System. Its advanced design and quality construction will give you many years of listening pleasure. Since you Probably want to hear music from your 201 system as fast as possible. this guide is divided into two parts. To properly unpack and connect your system, read Part 1. After you have connected your 201 system. and are enjoying some music, read Part 2. II explains haw to double-check your connections. and gives you details on wire sizes. speaker phasing, fusing. and room acous! tics. To obtain the best possible performance from your 201 system, please read this entire guide thoroughly. PART 1 1. Unpacking The shipping carton contains two 201 Series II speakers. Unpack each speaker carefully. saving the carton and all packing materials 'or possible use later. If ettner speaker appears to be damaged when unpacking. do not attempt to connect or operate your speakers. Repack both speakers in their original carton and notify your authorized Bose dealer immediately. 2. Connection 1 Turn off your arniffiler or recever. and unplug it from its outlet (ac power mans) before attempting to connect your Speakers 2 Slightly separate the conductors at the end of each length of speaker wire (use 18 gauge or larger wire). For more details. see Part 2. Section 4. Strip approximately 1/2 inch (12 mm) of insulation off each conductor. 3. Connect one wire conductor to the black terminal (marked " - ")on the left speaker (see FIGURE I). Connect the other end of the same conductor to the output terminal marked COM. GND. NEG. or - "on the left BLACK RED io INPUT FIGURE I. To convect Ore wrCS to the Speakers. eaxxess thebungs beksv Illecomeet0tS and insert the enclsol the wires . _ STEREO AMPLIFIER OR RECEIVER belt 0%40 nigh' Output A' 1.5k telt Speaker Ripht Speaker 'Optional I 5.ampere. fas-tblow luso (see Section 6) FIGURE 2 Make sale loconnkt: terminals pusrtivelo anal negabve to negativeas ShOM1 channel of your receiver or amplifier (see FIGURE 2). 4. Similarly, connect the red terminal (marked " ") on the left speaker to the output terminal marked POS or "+" on the left channel of your amplifier or receiver. If your amplifier offers a choice of output impedances, use the terminal marked 8 or 8 OHMS. 5. Repeat Steps 3 and 4 above, connecting the right speaker to the right output channel of your amplifier or receiver 6. Check very carefully to be certain that no loose strands of wire are "bridged" from one terminal to the other on either one of your speakers or on any of the amplifier outputs. Bridged wires create short circuits which can damage your amplifier or receiver. Repair any loose strands before plugging in your amplifier or receiver. 7. Plug in your amplifier or receiver, turn it on. and enjoy! PART 2 3. Speaker Placement The unique design of your 201Series II system provides excellent sound in a wide variety of listening environments. Any speaker system, however. is dependent upon its placement. Your 201speakers can be set on bookshelves and/or tables, or can be flush mounted directly to a wall. To help your 201 system deliver optimum performance. and to help you decide between potential locations in your listening roan. the following guidelines are suggested (see FIGURE 3): A. Spacing 1. Place the left and right speakers on the left and right sides of the room respectively, spaced 3 1012 feet (0.9.3.6 m) apart. 2. To hear the most accurate bass response. set the speakers directly against the wall behind them. at least 18 inches (45 cm) from the floor or ceiling. If this is not possible in your room. you'll hear good performance with the speakers legated up to 12 inches (30 cm) away from the rear wall. Do not. however, place the speakers halfway between the floor and ceiling. as this will impair bass response. 3. Place the speakers at least 12 inches (30 cm) from the side walls. Optimum distance is 11/2 to 3 feel
-
 1
1 -
 2
2 -
 3
3 -
 4
4
 |
 |
