Bose 201 Series III Owner's guide - Page 3
Ie Se
 |
View all Bose 201 Series III manuals
Add to My Manuals
Save this manual to your list of manuals |
Page 3 highlights
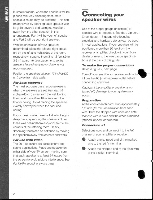
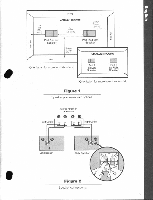
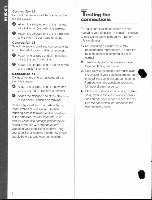
m U2 In smaller rooms, where the speakers will be '7). placed relatively dose together, more spacious sound may be preferred. This can be achieved by orienting each speaker with its grille covered end facing outward and away from the other speaker. In this arrangement, Part I will be your left speaker and Part 2 will be your right speaker. With the orientation of your speakers determined, place the left and right speakers on the left and right sides of the room, respectively, spacing them 3 to 12 feet (.9 to 3.6 m) apart. Verticalplacement, so the tweeters face directly up or down, is not recommended. Position the speakers at least 12 inches (30 cm) away from side walls. For bass response The most accurate bass response results when the speakers are set less than 18 inches (45 cm) away from the wall behind them, and more than 18 inches from the floor or ceiling. Avoid placing the speakers exactly halfway between the floor and ceiling. If your music system seems to be lacking in deep bass, try moving the speakers closer to the wall behind them and/or nearer to the corners of the listening room. Heavy, "booming" bass can be softened by moving the speakers away from corners and walls. For use with video The 201' speakers are suitable for video sound applications. Place one speaker on either side of your TV screen, making sure that each speaker i8 at least 24 inches from the screen to avoid picture interference. See For lifelike sound, previous page. Connecting your speaker wires Use of the proper gauge (thickness) of speaker wire is important. Standard zip cord (2-conductor, 18-gauge wire found at electrical and hardware stores) can be used in most applications. If your speakers will be positioned more than 30 feet from the receiver or amplifier, check with your Bose dealer or refer to the wire gauge specifications at the back of this guide. To make the proper connections Refer to figure 2, next page. Turn off your amplifier or receiver and unplug', it from the AC (mains) power outlet before connecting any wires. Caution: if the amplifier or receiver is not turnedoff, damage to your systemmay occur. Preparation At the ends of each cord, strip approximately 1/2 inch (12 mm) of insulation from each wire. Twist the stripped wire ends and note that one wire is plain and the other is marked (striped, ribbed, or collared). Connection #1 Select one cord and connect it to the left channel of your amplifier or receiver. e Attach one stripped end of the marked wire to the red (+) terminal. e Attach the stripped end of the plain wire to the black (-) terminal. S 2
-
 1
1 -
 2
2 -
 3
3 -
 4
4 -
 5
5 -
 6
6 -
 7
7 -
 8
8 -
 9
9
 |
 |
