Bose 31952 Owners Guide - Page 14
Inserting and replacing the batteries
 |
View all Bose 31952 manuals
Add to My Manuals
Save this manual to your list of manuals |
Page 14 highlights
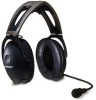
00_Cavu.book Page 10 Thursday, October 28, 2010 12:03 PM Tab 8, 16 Tab 7, 15 Tab 6, 14 Tab 5, 13 Tab 4, 12 Tab 3, 11 Tab2, 10 English PREPARING THE HEADSET FOR USE 3. To change a switch position, use a pen or a small, flat-tipped screwdriver to gently move the switch. The following table shows possible positions, default setting, and purpose for each switch. Switch 1. Auto Off function Options ON, OFF Default: ON 2. Mono/Stereo Mono, Stereo selection Default: MONO Purpose Set at the factory to enable the Auto Off function. The headset will turn off after 3 to 9 minutes of inactivity. To disable Auto Off, set the switch to OFF. With the switch in OFF position, the Acoustic Noise Cancelling® system will not turn off until you press and hold the power button for at least one second. Set at the factory for mono audio systems (to provide audio in both ears). Set it to stereo (ST) if your aircraft has a stereo intercom. Auto Off functionality The Auto Off feature detects when the headset is not in use and shuts it off after several minutes to preserve battery power. The exact time it takes to shut off varies and can range between 3 to 9 minutes after you stop using the headset. When the headset is running on battery power only and is not plugged in to an intercom, it will shut off even when there is an auxiliary input present. If you are on a phone call and unplugged from an intercom, the headset will allow you to complete your call, then it will turn off approximately three seconds after the call is terminated. Note: To use the headset when unplugged from the intercom to listen to auxiliary input audio or as a Bluetooth® wireless technology-enabled headset to make or receive calls, we recommend you disable the Auto Off feature for uninterrupted functionality. Inserting and replacing the batteries CAUTION: If the batteries do not fit correctly, do not force them in. Forcing an improper connection will cause permanent damage to the control module. To insert or replace the batteries 1. Turn off headset power. 2. Press down firmly on the battery compartment cover and slide the cover to release. The battery door is tethered. Do not detach the door from the control module. 3. Insert the two supplied alkaline AA batteries into the control module, observing proper polarity. 4. Replace the battery compartment cover. Note: Rechargeable batteries will alter the accuracy of the battery power indicator. 10
-
 1
1 -
2
-
3
-
4
-
5
-
6
-
7
-
8
-
 9
9 -
 10
10 -
 11
11 -
 12
12 -
 13
13 -
 14
14 -
 15
15 -
 16
16 -
 17
17 -
 18
18 -
 19
19 -
20
-
21
-
22
-
23
-
24
-
25
-
26
-
27
-
28
-
29
-
30
-
31
-
32
-
33
-
34
-
35
-
36
-
37
-
38
-
39
-
40
-
41
-
42
-
43
 |
 |
