Brother International 3100c Quick Setup Guide - English - Page 5
Parallel, Step 4., Step 5., Step 6. - scanner driver
 |
UPC - 012502603740
View all Brother International 3100c manuals
Add to My Manuals
Save this manual to your list of manuals |
Page 5 highlights
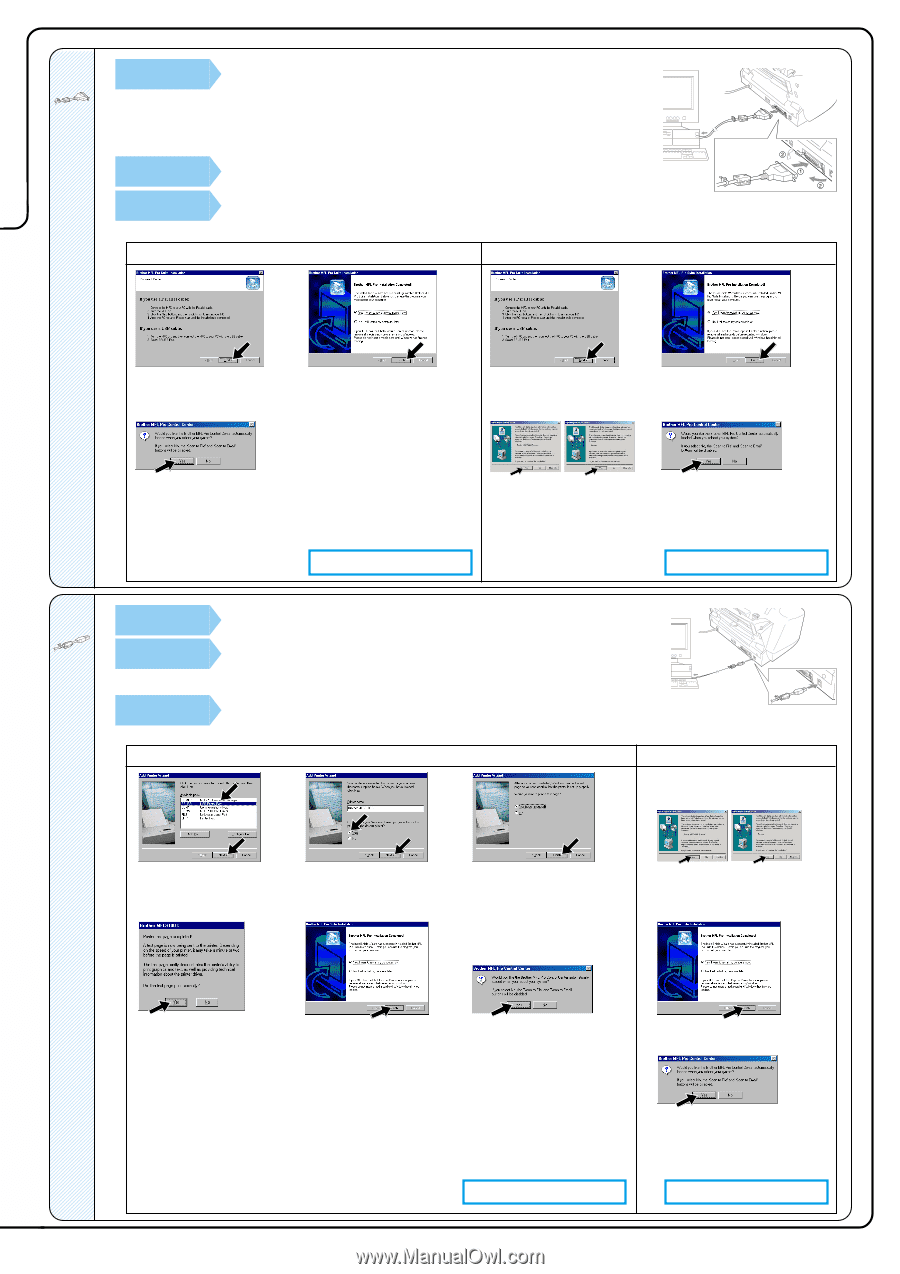
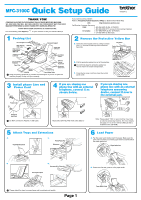
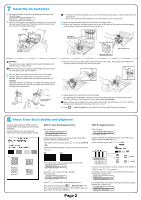
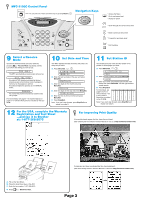
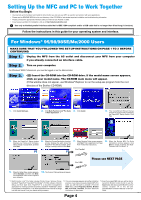
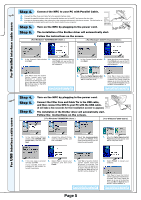
For USB interface cable users For Parallel interface cable users 111111111111111111111111111111111111111111111111111111111111111111111111111111111111111111111111111111111111111111111111111111111111111111111111111111111111111111111111111111111111111111111111111111111111111111111111111111111111111111111111111111111111111111111111111111111111111111111111111111111111111111111111111111111111111222222222222222222222222222222222222222222222222222222222222222222222222222222222222222222222222222222222222222222222222222222222222222222222222222222222222222222222222222222222222222222222222222222222222222222222222222222222222222222222222222222222222222222222222222222222222222222222222222222222222222222222222222222222222222333333333333333333333333333333333333333333333333333333333333333333333333333333333333333333333333333333333333333333333333333333333333333333333333333333333333333333333333333333333333333333333333333333333333333333333333333333333333333333333333333333333333333333333333333333333333333333333333333333333333333333333333333333333333333444444444444444444444444444444444444444444444444444444444444444444444444444444444444444444444444444444444444444444444444444444444444444444444444444444444444444444444444444444444444444444444444444444444444444444444444444444444444444444444444444444444444444444444444444444444444444444444444444444444444444444444444444444444444444555555555555555555555555555555555555555555555555555555555555555555555555555555555555555555555555555555555555555555555555555555555555555555555555555555555555555555555555555555555555555555555555555555555555555555555555555555555555555555555555555555555555555555555555555555555555555555555555555555555555555555555555555555555555555666666666666666666666666666666666666666666666666666666666666666666666666666666666666666666666666666666666666666666666666666666666666666666666666666666666666666666666666666666666666666666666666666666666666666666666666666666666666666666666666666666666666666666666666666666666666666666666666666666666666666666666666666666666666666777777777777777777777777777777777777777777777777777777777777777777777777777777777777777777777777777777777777777777777777777777777777777777777777777777777777777777777777777777777777777777777777777777777777777777777777777777777777777777777777777777777777777777777777777777777777777777777777777777777777777777777777777777777777777888888888888888888888888888888888888888888888888888888888888888888888888888888888888888888888888888888888888888888888888888888888888888888888888888888888888888888888888888888888888888888888888888888888888888888888888888888888888888888888888888888888888888888888888888888888888888888888888888888888888888888888888888888888888888999999999999999999999999999999999999999999999999999999999999999999999999999999999999999999999999999999999999999999999999999999999999999999999999999999999999999999999999999999999999999999999999999999999999999999999999999999999999999999999999999999999999999999999999999999999999999999999999999999999999999999999999999999999999999000000000000000000000000000000000000000000000000000000000000000000000000000000000000000000000000000000000000000000000000000000000000000000000000000000000000000000000000000000000000000000000000000000000000000000000000000000000000000000000000000000000000000000000000000000000000000000000000000000000000000000000000000000000000000111111111111111111111111111111111111111111111111111111111111111111111111111111111111111111111111111111111111111111111111111111111111111111111111111111111111111111111111111111111111111111111111111111111111111111111111111111111111111111111111111111111111111111111111111111111111111111111111111111111111111111111111111111111111111222222222222222222222222222222222222222222222222222222222222222222222222222222222222222222222222222222222222222222222222222222222222222222222222222222222222222222222222222222222222222222222222222222222222222222222222222222222222222222222222222222222222222222222222222222222222222222222222222222222222222222222222222222222222222333333333333333333333333333333333333333333333333333333333333333333333333333333333333333333333333333333333333333333333333333333333333333333333333333333333333333333333333333333333333333333333333333333333333333333333333333333333333333333333333333333333333333333333333333333333333333333333333333333333333333333333333333333333333333444444444444444444444444444444444444444444444444444444444444444444444444444444444444444444444444444444444444444444444444444444444444444444444444444444444444444444444444444444444444444444444444444444444444444444444444444444444444444444444444444444444444444444444444444444444444444444444444444444444444444444444444444444444444444555555555555555555555555555555555555555555555555555555555555555555555555555555555555555555555555555555555555555555555555555555555555555555555555555555555555555555555555555555555555555555555555555555555555555555555555555555555555555555555555555555555555555555555555555555555555555555555555555555555555555555555555555555555555555666666666666666666666666666666666666666666666666666666666666666666666666666666666666666666666666666666666666666666666666666666666666666666666666666666677777777777777777777777777777777777777777777777777777777777777777777777777777777777777777777777777777777777777777777777777777777777777777777777777777778888888888888888888888888888888888888888888888888888888888888888888888888888888888888888888888888888888888888888888888888888888888888888888888888888888 Step 4. Connect the MFC to your PC with Parallel Cable. A. Connect the Filter Core and Cable Tie to the parallel interface cable. B. Connect the parallel interface cable to the parallel interface port of the MFC and secure the wire clips. C. Connect the interface cable to the printer port of the computer and secure it with the two screws. For the location of your computer's parallel printer port, see the User's Guide for your computer. Step 5. Turn on the MFC by plugging in the power cord. Step 6. The installation of the Brother driver will automatically start. Follow the instructions on the screen. ( For Windows® 95/98/98SE/Me Users ) ( For Windows® 2000 Professional User ) 1. In the Connect Cable window, 2. When the above screen appears, click Next. click Finish and wait as the PC restarts Windows® and continues the installation. 1. In the Connect Cable window, 2. When the above screen appears, click Next. Click Finish and wait as the PC restarts Windows® and continues the installation. 3. Click Yes to have the Control Center loaded each time Windows® is started. The Control Center will appear as an icon in the task tray. If you click No the Scan keys on the MFC will be disabled. *3 The Brother PC fax, Printer and Scanner drivers have been installed and the installation is now complete. 3. When the Digital Signature Not 4. Click Yes to have the Control Found dialog boxes appear, click Center loaded each time Windows® Yes to install the driver. is started. The Control Center will appear as an icon in the task tray. If you click No the Scan to key on the MFC will be disabled. *3 The Brother PC fax, Printer and Scanner drivers have been installed and the installation is now complete. Step 4. Step 5. Step 6. Turn on the MFC by plugging in the power cord. Connect the Filter Core and Cable Tie to the USB cable, and then connect the MFC to your PC with the USB cable. (It will take a few seconds for the installation screen to appear.) The installation of the Brother driver will automatically start. Follow the instructions on the screen. ( For Windows® 98/98SE/Me Users ) ( For Windows® 2000 Users ) 1. In the Add Printer Wizard window, select BRUSB: USB Printer Port, and then click Next. 2. Accept the default Printer name by selecting Yes, and then click Next. 3. Select Yes (recommended), and then click Finish. A test page will be printed so you can check the print quality. 1. When the Digital Signature Not Found dialog boxes appear, click Yes to install the driver. 4. If the test page is printed correctly, click Yes. If you click No, follow the prompts on the screen to correct the problem. 5. Select Yes to restart your computer, and then click Finish. 6. Click Yes to have the Control Center loaded each time Windows® is started. The Control Center will appear as an icon in the task tray. If you click No the Scan to key on the MFC will be disabled. *3 The Brother PC fax, Printer and Scanner drivers have been installed and the installation is now complete. 2. Select Finish to restart your computer. 3. Click Yes to have the Control Center loaded each time Windows® is started. The Control Center will appear as an icon in the task tray. If you click No the Scan to key on the MFC will be disabled. *3 The Brother PC fax, Printer and Scanner drivers have been installed and the installation is now complete. Page 5
-
 1
1 -
 2
2 -
 3
3 -
 4
4 -
 5
5 -
 6
6
 |
 |