Brother International BE-1204C Cap Frame Device Instruction Manual - English
Brother International BE-1204C Manual
 |
View all Brother International BE-1204C manuals
Add to My Manuals
Save this manual to your list of manuals |
Brother International BE-1204C manual content summary:
- Brother International BE-1204C | Cap Frame Device Instruction Manual - English - Page 1
BE-1204B-BC,BE-1206B-BC INSTRUCTION MANUAL CAP FRAME DEVICE Please read this manual before using the machine. Please keep this manual within easy reach for quick reference. - Brother International BE-1204C | Cap Frame Device Instruction Manual - English - Page 2
目次 / Contents 1 Notes on safety ...1 特長...2 FEATURES ...2 Wide cap frame ...2 Semiwide cap frame ...2 2 Setting the set frame base set, cap frame, and cap 2 Wide cap frame ...2 Semiwide cap frame ...6 10 Attaching the wide cap frame device / semiwide cap frame device 10 Attaching the - Brother International BE-1204C | Cap Frame Device Instruction Manual - English - Page 3
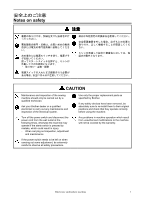
and inspection of the sewing machine should only be carried out by a qualified technician. Ask your Brother dealer or a qualified machine. Any problems in machine operation which result from unauthorized modifications to the machine will not be covered by the warranty. Electronic embroidery machine - Brother International BE-1204C | Cap Frame Device Instruction Manual - English - Page 4
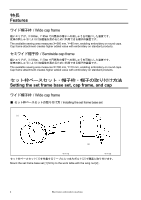
value with embroidery on standard products. Setting the set frame base set, cap frame, and cap Wide cap frame Installing the set frame base set [1] [2] W1411Q W1412Q 1 2 Mount the set frame base set [1] firmly to the work table with the wing nut [2] . 2 Electronic embroidery machine - Brother International BE-1204C | Cap Frame Device Instruction Manual - English - Page 5
plate W1415Q 3. 4 3 3. If the four screws [3] are loosened, the cap clamp plate can be extended or retracted to match the thickness of the material. Electronic embroidery machine 3 - Brother International BE-1204C | Cap Frame Device Instruction Manual - English - Page 6
in the cap frame. 5. 帽子枠[4 5 5. Release the snap lock [5] on the cap frame [4] to set the cap. NOTE) Pull down the lining inside the cap. 4 Electronic embroidery machine - Brother International BE-1204C | Cap Frame Device Instruction Manual - English - Page 7
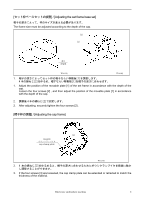
6. Hold the holder of cover frame W[6] in your fingers and close cover frame W[6]. Check that the guide pins are inside the groove and the notch of cover frame W[6] at this time. 7 5 7. [1], and set it on the cap frame driving assembly [7] mounted on the machine. Electronic embroidery machine 5 - Brother International BE-1204C | Cap Frame Device Instruction Manual - English - Page 8
the set frame base set with the two screws [2]. 2 3 4 2. Mount the set frame base set [3] firmly to the work table with the wing nut [4]. 6 Electronic embroidery machine - Brother International BE-1204C | Cap Frame Device Instruction Manual - English - Page 9
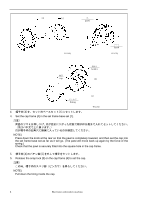
four wing nuts [6] and moving the snap lock sideways as shown in the illustration. 3. 帽子枠[7 3 3. Set the cap frame [7] in the set frame base set [3] . Electronic embroidery machine 7 - Brother International BE-1204C | Cap Frame Device Instruction Manual - English - Page 10
in as far as it will go while making sure that there are no wrinkles in the part of the cap to be embroidered. 8 Electronic embroidery machine - Brother International BE-1204C | Cap Frame Device Instruction Manual - English - Page 11
[1] [7] W1447Q 6 1 7 6. Remove the cap frame [7] from the set frame base set [1], and set it on the cap frame device mounted on the machine. Electronic embroidery machine 9 - Brother International BE-1204C | Cap Frame Device Instruction Manual - English - Page 12
only the proper replacement parts as specified by Brother. Any problems in machine operation which result from unauthorized modifications to the machine will not be covered by the warranty. [9] of the X-feed sash [1] fit into the inside oval holes of the sash. 10 Electronic embroidery machine - Brother International BE-1204C | Cap Frame Device Instruction Manual - English - Page 13
screw [10] on the X-feed sash [1]. After the setting of the cap frame, adjust the sash position to align it with the cap center. Electronic embroidery machine 11 - Brother International BE-1204C | Cap Frame Device Instruction Manual - English - Page 14
hole. Aligning the center hole of the cap frame sash N [8] with this pin can fix the set position of the driver C every time. 12 Electronic embroidery machine - Brother International BE-1204C | Cap Frame Device Instruction Manual - English - Page 15
, move the X-feed frame to front side manually, and make sure that the cap driving assembly frame moves easily within the cap frame area, and that the needle plate does not touch the end of cap frame, and the former should be parallel to the machine bed bottom. Electronic embroidery machine 13 - Brother International BE-1204C | Cap Frame Device Instruction Manual - English - Page 16
head according to the number attached. 2 2. If the clearance adjustment between the needle plate and the cap frame driver is needed after performing "Checking", follow the procedures below: 3 1]2 2]4 3. Loosen the two screws [1]. Loosen the four screws [2]. 14 Electronic embroidery machine - Brother International BE-1204C | Cap Frame Device Instruction Manual - English - Page 17
[1]. [7] [8] [5] [6] W1429Q 注意) X N[7 6 Note) Move the X-feed sash right and left to confirm that the cap frame sash N [7] and the driver support plate [6] do not interfere each other. Also confirm that they do not interfere the next cap frame driver. Electronic embroidery machine 15 - Brother International BE-1204C | Cap Frame Device Instruction Manual - English - Page 18
cover A [8], then fasten the screw [1]. X N[7 6 Note) Move the X-feed sash right and left to confirm that the cap frame sash N [7] and the driver support plate [6] do not interfere each other. Also confirm that they do not interfere the next cap frame driver. 16 Electronic embroidery machine - Brother International BE-1204C | Cap Frame Device Instruction Manual - English - Page 19
the cap frame sash N [5] and the wire [6] should be about 7 mm. 3 1 2 3. After the adjustment is completed, fasten the screw [1] and the fixing nut [2] firmly. Electronic embroidery machine 17 - Brother International BE-1204C | Cap Frame Device Instruction Manual - English - Page 20
2 3 1 5 1~2mm T ガタ 6 4[4 Loosen the screw [2] to move the cap support holder [3], and adjust the clearance between the cap support [1] and the needle plate base [5] to be 1 to 2 mm. Use the accessory T-shape hexagonal wrench 4 [4] for this adjustment. 18 Electronic embroidery machine - Brother International BE-1204C | Cap Frame Device Instruction Manual - English - Page 21
縫製 / Sewing Select switch [PC PC control type] W1433Q W1437Q Select the Flat/Cap hoop select switch on the machine to CAP mode. Select the [Settings] menu on the personal computer, and then select [Wide Cap] or [Semi-wide Cap] from [Embroidery Hoop]. The frame direction and sewing area will - Brother International BE-1204C | Cap Frame Device Instruction Manual - English - Page 22
of frame type (Stand-Alone type) Specify a type of an embroidery hoop set on the machine. Semi-wide cap frame Wide cap frame Currently selected hoop W0495Q 5. Press . Modified setting is saved and the previous screen is displayed again. 20 Electronic embroidery machine W1463Q - Brother International BE-1204C | Cap Frame Device Instruction Manual - English - Page 23
embroidery hoop changes the display. W1437Q W1464Q 1 1. Select [Embroidery Hoop] and the type from Settings menu. The pattern direction and embroidering area may vary depending on the selected embroidery hoop type. Make sure that the selection is correct. Electronic embroidery machine - Brother International BE-1204C | Cap Frame Device Instruction Manual - English - Page 24
in injury. Use only the proper replacement parts as specified by Brother. Any problems in machine operation which result from unauthorized modifications to the machine will not be covered by the warranty. [2] [10] [9] to take them out from the Y-feed sash [2]. 22 Electronic embroidery machine - Brother International BE-1204C | Cap Frame Device Instruction Manual - English - Page 25
[10] [8] W1465Q 4 C 4. Remove the driver C assembly from the bed. 5 10 N[8 5. Fix the cap frame sash N [8] with the thumb screw [10]. W1438Q Electronic embroidery machine 23 - Brother International BE-1204C | Cap Frame Device Instruction Manual - English - Page 26
24 Electronic embroidery machine - Brother International BE-1204C | Cap Frame Device Instruction Manual - English - Page 27
Electronic embroidery machine 25 - Brother International BE-1204C | Cap Frame Device Instruction Manual - English - Page 28
INSTRUCTION MANUAL 〒467-8561 15 番 1 号 TEL(052)824-2392 BROTHER INDUSTRIES,LTD. 15-1.Naeshiro-cho, Mizuho-ku, Nagoya 467-8561, Japan. Phone:81-52-824-2177 Printed in Japan 855-C42,C43,C64,C65 SA2112-001 2003.05.WB(1)
-
 1
1 -
 2
2 -
 3
3 -
 4
4 -
 5
5 -
 6
6 -
 7
7 -
8
-
9
-
10
-
11
-
12
-
13
-
14
-
15
-
16
-
17
-
18
-
19
-
20
-
21
-
22
-
23
-
24
-
25
-
26
-
27
-
28
 |
 |

BE-1204B-BC,BE-1206B-BC
帽子枠装置
この説明書を読んでから、製品をご使用ください。
この説明書は、必要なときにすぐに取り出せる場所に、保管してください。
CAP FRAME DEVICE
Please read this manual before using the machine.
Please keep this manual within easy reach for quick reference.
取扱説明書
INSTRUCTION MANUAL