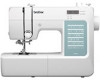
Brother International CP60X Stitch Chart
Brother International CP60X Manual
 |
View all Brother International CP60X manuals
Add to My Manuals
Save this manual to your list of manuals |
Brother International CP60X manual content summary:
- Brother International CP60X | Stitch Chart - Page 1
reverse stitches with the walking foot. • When using the twin needle, set the machine to the twin needle mode. For details, refer to the Operation Manual. *1 Twin needle can be used by attaching zigzag foot "J". For details on using the twin needle, refer to the Operation - Brother International CP60X | Stitch Chart - Page 2
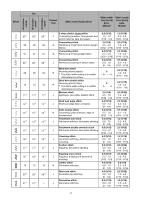
60 stitches model 50 stitches model 40 stitches model No. Stitch Presser foot Stitch name/Applications Stitch width (mm (inch)) Auto. Manual Stitch length (mm (inch)) Auto. Manual 05*1 05*1 05*1 06 06 06 07 07 07 08*1 08*1 08*1 09 09 09 10 10 10 11*1 11*1 11*1 12*1 12*1 - Brother International CP60X | Stitch Chart - Page 3
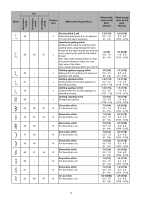
60 stitches model 50 stitches model 40 stitches model No. Stitch Presser foot Stitch name/Applications Stitch width (mm (inch)) Auto. Manual Stitch length (mm (inch)) Auto. Manual 22*1 22*1 21*1 23 23 22 24 24 23 25 25 - 26 26 24 27 27 - 28 28 - 29 29 25 30 30 26 31 - Brother International CP60X | Stitch Chart - Page 4
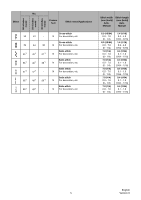
stitches model 50 stitches model 40 stitches model No. Stitch Presser foot Stitch name/Applications Stitch width (mm (inch)) Auto. Manual Stitch length (mm (inch)) Auto. Manual 38 - - 39 35 31 40 - - 41 - - 42 - - 43 - - 44 36 32 45 37 33 46 38 - 47 39 - 48 40 - Brother International CP60X | Stitch Chart - Page 5
. Satin stitch N For decoration, etc. Satin stitch N For decoration, etc. Satin stitch N For decoration, etc. Satin stitch N For decoration, etc. Stitch width (mm (inch)) Auto. Manual Stitch length (mm (inch)) Auto. Manual 6.0 (15/64) 0.0 - 7.0 (0 - 1/4) 6.0 (15/64
-
 1
1 -
 2
2 -
 3
3 -
 4
4 -
 5
5
 |
 |
1
Memo
•
When any of the following stitches (reverse stitch patterns) are selected, pressing
(Reverse/
Reinforcement stitch button) will sew reverse stitches.
When any other stitch is selected, pressing
(Reverse/Reinforcement stitch button) will sew
reinforcement stitches.
•
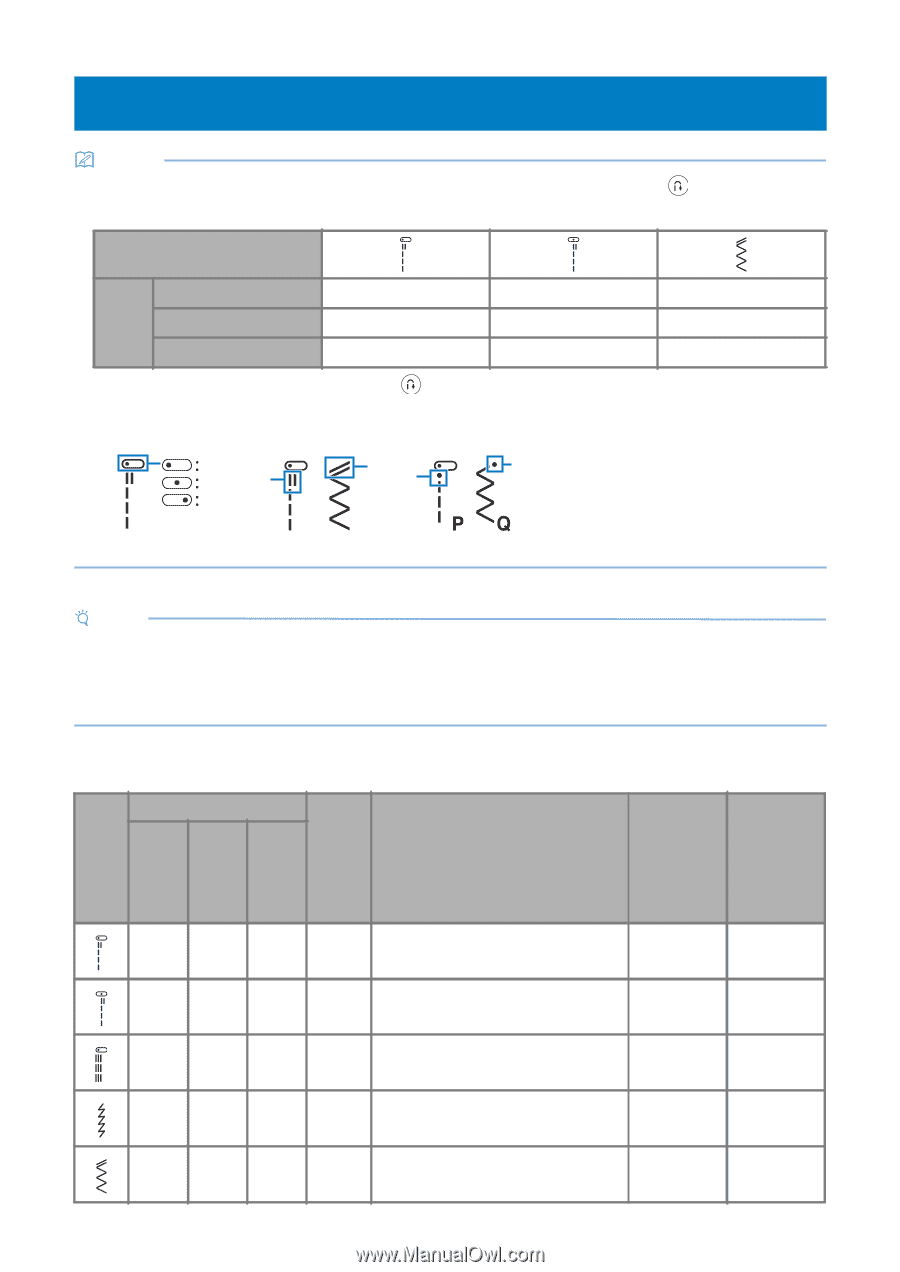
The stitch pattern symbols indicate the following.
Note
•
The walking foot can only be used with straight or zigzag stitch patterns. Do not sew reverse stitches with
the walking foot.
•
When using the twin needle, set the machine to the twin needle mode. For details, refer to the Operation
Manual.
*1
Twin needle can be used by attaching zigzag foot “J”.
For details on using the twin needle, refer to the Operation Manual.
Stitch Chart
Stitch
No.
Presser
foot
Stitch name/Applications
Stitch width
(mm (inch))
Auto.
Manual
Stitch length
(mm (inch))
Auto.
Manual
00
*1
00
*1
00
*1
J
Straight stitch (Left)
General sewing, gather, pintuck, etc.
0.0 (0)
0.0 - 7.0
(0 - 1/4)
2.5 (3/32)
0.2 - 5.0
(1/64 - 3/16)
01
*1
01
*1
01
*1
J
Straight stitch (Middle)
General sewing, gather, pintuck, etc.
3.5 (1/8)
0.0 - 7.0
(0 - 1/4)
2.5 (3/32)
0.2 - 5.0
(1/64 - 3/16)
02
*1
02
*1
02
*1
J
Triple stretch stitch
General sewing for reinforcement and
decorative topstitching
0.0 (0)
0.0 - 7.0
(0 - 1/4)
2.5 (3/32)
1.5 - 4.0
(1/16 - 3/16)
03
*1
03
*1
03
*1
J
Stem stitch
Reinforced stitching, sewing and
decorative applications
1.0 (1/16)
1.0 - 3.0
(1/16 - 1/8)
2.5 (3/32)
1.0 - 4.0
(1/16 - 3/16)
04
*1
04
*1
04
*1
J
Zigzag stitch
For overcasting, mending.
3.5 (1/8)
0.0 - 7.0
(0 - 1/4)
1.4 (1/16)
0.0 - 4.0
(0 - 3/16)
Stitch
No.
60 stitches
00
01
04
50 stitches
00
01
04
40 stitches
00
01
04
1
Left needle position
2
Middle (center) needle position
3
Right needle position
4
Reverse stitch pattern
5
Reinforcement stitch pattern
a
b
c
d
e
d
e
60 stitches
model
50 stitches
model
40 stitches
model