Brother International CS-6000/6000b/6000t/6000i Operation Manual - Page 39
Piecing, Quilting
 |
View all Brother International CS-6000/6000b/6000t/6000i manuals
Add to My Manuals
Save this manual to your list of manuals |
Page 39 highlights
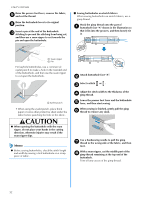
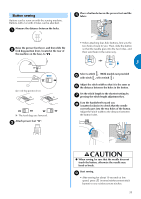
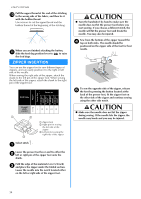
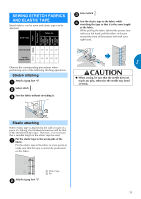
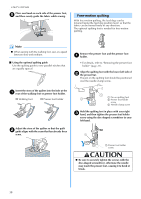
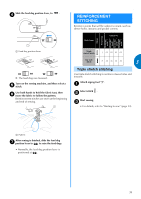
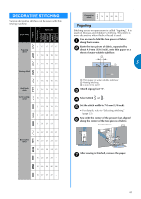
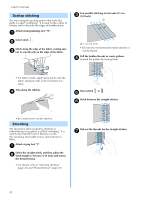
Piecing Sewing together two pieces of fabric is called "piecing". The fabric pieces should be cut with a 6.5 mm (1/4 inch) seam allowance. Sew a piecing straight stitch 6.5 mm (1/4 inch) from either the right side or the left side of the presser foot. Baste or pin along the seam allowance of the a fabric that you wish to piece together. Attach zigzag foot "J". b Select stitch or . c Sew with the side of the presser foot aligned d with the edge of the fabric. ■ For a seam allowance on the right side Align the right side of the presser foot with the edge of the fabric, and sew using stitch . 1 Quilting Sandwiching batting between the top and bottom layers of fabric is called "quilting". Quilts can easily be sewn using the optional walking foot and the optional quilting guide. Note ● Only use the walking foot with straight or zigzag stitches. Do not use other patterns. Reverse stitches cannot be sewn with the walking foot. Baste the fabric to be quilted. a Remove the presser foot and the presser foot b holder. 3 • For details, refer to "Removing the presser foot holder" (page 21). Hook the connecting fork of the walking foot c onto the needle clamp screw, lower the presser foot lever, and then use the presser foot holder screw to attach the walking foot to the presser bar. a 6.5 mm (1/4 inch) a 6.5 mm (1/4 inch) ■ For a seam allowance on the left side Align the left side of the presser foot with the edge of the fabric, and sew using stitch . 1 a 6.5 mm (1/4 inch) a 6.5 mm (1/4 inch) Memo ● To change the width of the seam allowance (the needle position), adjust the stitch width. For details, refer to "Changing the needle position" (page 29). a Connecting fork b Needle clamp screw c Presser foot holder screw CAUTION ● Use the disc-shaped screwdriver to tighten the screw securely. If the screw is loose, the needle may strike the presser foot and cause injury. ● Be sure to turn the handwheel toward the front of the machine to check that the needle does not strike the presser foot. If the needle strikes the presser foot, injury may result. Select stitch , or . d 37
-
 1
1 -
2
-
3
-
4
-
5
-
6
-
7
-
8
-
9
-
10
-
11
-
12
-
13
-
14
-
15
-
16
-
17
-
18
-
19
-
20
-
21
-
22
-
23
-
24
-
25
-
26
-
27
-
28
-
29
-
30
-
31
-
32
-
33
-
 34
34 -
 35
35 -
 36
36 -
 37
37 -
 38
38 -
 39
39 -
 40
40 -
 41
41 -
 42
42 -
 43
43 -
 44
44 -
45
-
46
-
47
-
48
-
49
-
50
-
51
-
52
-
53
-
54
-
55
-
56
-
57
-
58
-
59
-
60
 |
 |
