Brother International CS-6000/6000b/6000t Operation Manual - Page 31
Blind Hem Stitching
 |
View all Brother International CS-6000/6000b/6000t manuals
Add to My Manuals
Save this manual to your list of manuals |
Page 31 highlights
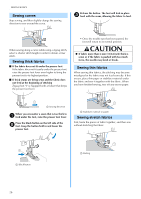
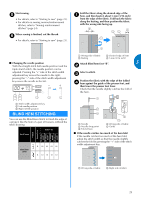
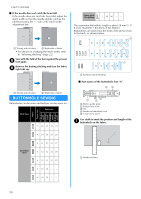
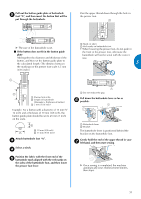
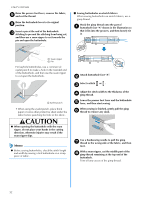
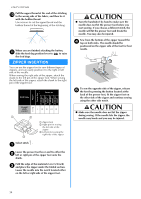
Start sewing. e • For details, refer to "Starting to sew" (page 23). • For details on sewing reverse/reinforcement stitches, refer to "Sewing reinforcement stitches" (page 24). When sewing is finished, cut the thread. f • For details, refer to "Starting to sew" (page 23). Fold the fabric along the desired edge of the a hem, and then baste it about 5 mm (3/16 inch) from the edge of the fabric. Fold back the fabric along the basting, and then position the fabric with the wrong side facing up. ■ Changing the needle position With the straight stitch (left needle position) and the triple stretch stitch, the needle position can be adjusted. Pressing the "+" side of the stitch width adjustment key moves the needle to the right; pressing the "-" side of the stitch width adjustment key moves the needle to the left. a Wrong side of fabric c Desired edge of hem b Basting d 5 mm (3/16 inch) Attach blind hem foot "R". 3 b Select a stitch. c Position the fabric with the edge of the folded d hem against the guide of the presser foot, and then lower the presser foot lever. Check that the needle slightly catches the fold of the hem. a Stitch width adjustment key b Left needle position c Right needle position BLIND HEM STITCHING You can use the Blind Hem Stitch to finish the edge of a project, like the hem of a pair of trousers, without the stitch showing. Pattern No. Stitch Name Pattern Presser Foot 70 stitches model 60 stitches model 50 stitches model 40 stitches model Blind hem stitch R 09 09 09 09 R 10 10 10 10 a Needle b Needle drop point c Fold of hem d Wrong side of fabric e Guide ■ If the needle catches too much of the hem fold If the needle catches too much of the hem fold, adjust the stitch width so that the needle slightly catches the fold by pressing the "+" side of the stitch width adjustment key. a Wrong side of fabric b Right side of fabric 29
-
 1
1 -
2
-
3
-
4
-
5
-
6
-
7
-
8
-
9
-
10
-
11
-
12
-
13
-
14
-
15
-
16
-
17
-
18
-
19
-
20
-
21
-
22
-
23
-
24
-
25
-
 26
26 -
 27
27 -
 28
28 -
 29
29 -
 30
30 -
 31
31 -
 32
32 -
 33
33 -
 34
34 -
 35
35 -
 36
36 -
37
-
38
-
39
-
40
-
41
-
42
-
43
-
44
-
45
-
46
-
47
-
48
-
49
-
50
-
51
-
52
-
53
-
54
-
55
-
56
-
57
-
58
-
59
-
60
 |
 |