Brother International CS5055 Sewing Guide - Page 30
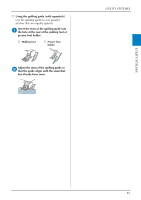
needle hits the presser foot, the needle, If a different stitch is selected or
 |
View all Brother International CS5055 manuals
Add to My Manuals
Save this manual to your list of manuals |
Page 30 highlights
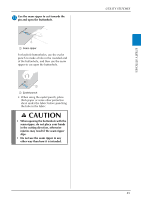
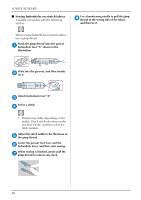
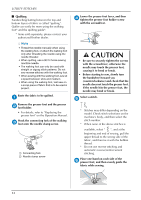
UTILITY STITCHES Attach the presser foot holder to the right g pin of zipper foot "I". I 1 2 1 Pin on the right side 2 Needle drop point Select the straight stitch (middle (center) h needle position). Topstitch around the zipper. i 1 3 2 4 * Check the stitch number on the machine's body, and set the machine for that stitch. CAUTION • When using zipper foot "I", be sure to select the straight stitch (middle (center) needle position), and slowly turn the handwheel toward you (counterclockwise) to check that the needle does not touch the presser foot. If a different stitch is selected or the needle hits the presser foot, the needle may bend or break. 1 Stitching 2 Right side of fabric 3 Basting stitching 4 End of zipper opening CAUTION • When sewing, be sure that the needle does not touch the zipper, otherwise the needle may bend or break. Memo • If the presser foot contacts the zipper slider, leave the needle lowered (in the fabric) and raise the presser foot. After moving the slider so it will not contact the presser foot, lower the presser foot and continue sewing. Remove the basting stitching. j 30
-
 1
1 -
2
-
3
-
4
-
5
-
6
-
7
-
8
-
9
-
10
-
11
-
12
-
13
-
14
-
15
-
16
-
17
-
18
-
19
-
20
-
21
-
22
-
23
-
24
-
 25
25 -
 26
26 -
 27
27 -
 28
28 -
 29
29 -
 30
30 -
 31
31 -
 32
32 -
 33
33 -
 34
34 -
 35
35 -
36
-
37
-
38
-
39
-
40
-
41
-
42
-
43
-
44
-
45
-
46
-
47
-
48
 |
 |
