Brother International DCP-8085DN Software Users Manual - English - Page 179
Scan to USB, 1sided, 2sided Ledge, Change Setting, Start Scan
 |
UPC - 012502622703
View all Brother International DCP-8085DN manuals
Add to My Manuals
Save this manual to your list of manuals |
Page 179 highlights
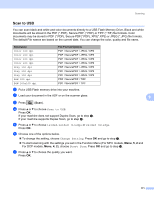
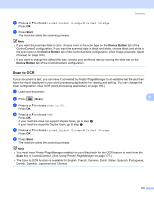
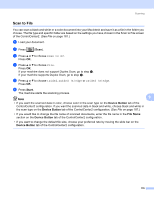
Scanning Scan to USB 9 You can scan black and white and color documents directly to a USB Flash Memory Drive. Black and white documents will be stored in the PDF (*.PDF), Secure PDF (*.PDF) or TIFF (*.TIF) file formats. Color documents may be stored in PDF (*.PDF), Secure PDF(*.PDF), XPS(*.XPS) or JPEG (*.JPG) file formats. The default File names are based on the current date. You can change the color, quality and file name. Resolution Color 100 dpi Color 200 dpi Color 300 dpi Color 600 dpi Gray 100 dpi Gray 200 dpi Gray 300 dpi B&W 200 dpi B&W 200x100 dpi File Format Options PDF / SecurePDF / JPEG / XPS PDF / SecurePDF / JPEG / XPS PDF / SecurePDF / JPEG / XPS PDF / SecurePDF / JPEG / XPS PDF / SecurePDF / JPEG / XPS PDF / SecurePDF / JPEG / XPS PDF / SecurePDF / JPEG / XPS PDF / SecurePDF / TIFF PDF / SecurePDF / TIFF a Put a USB Flash memory drive into your machine. b Load your document in the ADF or on the scanner glass. 9 c Press (Scan). d Press a or b to choose Scan to USB. Press OK. If your machine does not support Duplex Scan, go to step f. If your machine supports Duplex Scan, go to step e. e Press a or b to choose 1sided, 2sided (L)edge or 2sided (S)edge. Press OK. f Choose one of the options below. „ To change the setting, choose Change Setting. Press OK and go to step g. „ To start scanning with the settings you set in the Function Menu (For MFC models, Menu, 5, 2 and For DCP models, Menu, 4, 2), choose Start Scan. Press OK and go to step j. g Press a or b to choose the quality you want. Press OK. 171
-
 1
1 -
2
-
3
-
4
-
5
-
6
-
7
-
8
-
9
-
10
-
11
-
12
-
13
-
14
-
15
-
16
-
17
-
18
-
19
-
20
-
21
-
22
-
23
-
24
-
25
-
26
-
27
-
28
-
29
-
30
-
31
-
32
-
33
-
34
-
35
-
36
-
37
-
38
-
39
-
40
-
41
-
42
-
43
-
44
-
45
-
46
-
47
-
48
-
49
-
50
-
51
-
52
-
53
-
54
-
55
-
56
-
57
-
58
-
59
-
60
-
61
-
62
-
63
-
64
-
65
-
66
-
67
-
68
-
69
-
70
-
71
-
72
-
73
-
74
-
75
-
76
-
77
-
78
-
79
-
80
-
81
-
82
-
83
-
84
-
85
-
86
-
87
-
88
-
89
-
90
-
91
-
92
-
93
-
94
-
95
-
96
-
97
-
98
-
99
-
100
-
101
-
102
-
103
-
104
-
105
-
106
-
107
-
108
-
109
-
110
-
111
-
112
-
113
-
114
-
115
-
116
-
117
-
118
-
119
-
120
-
121
-
122
-
123
-
124
-
125
-
126
-
127
-
128
-
129
-
130
-
131
-
132
-
133
-
134
-
135
-
136
-
137
-
138
-
139
-
140
-
141
-
142
-
143
-
144
-
145
-
146
-
147
-
148
-
149
-
150
-
151
-
152
-
153
-
154
-
155
-
156
-
157
-
158
-
159
-
160
-
161
-
162
-
163
-
164
-
165
-
166
-
167
-
168
-
169
-
170
-
171
-
172
-
173
-
 174
174 -
 175
175 -
 176
176 -
 177
177 -
 178
178 -
 179
179 -
 180
180 -
 181
181 -
 182
182 -
 183
183 -
 184
184 -
185
-
186
-
187
-
188
-
189
-
190
-
191
-
192
-
193
-
194
-
195
-
196
-
197
-
198
-
199
-
200
-
201
-
202
-
203
-
204
-
205
-
206
-
207
-
208
-
209
-
210
-
211
-
212
-
213
-
214
-
215
-
216
-
217
-
218
-
219
-
220
-
221
-
222
-
223
-
224
-
225
-
226
-
227
-
228
-
229
 |
 |