Brother International ImageCenter„ ADS2500W Quick Setup Guide - English
Brother International ImageCenter„ ADS2500W Manual
 |
View all Brother International ImageCenter„ ADS2500W manuals
Add to My Manuals
Save this manual to your list of manuals |
Brother International ImageCenter„ ADS2500W manual content summary:
- Brother International ImageCenter„ ADS2500W | Quick Setup Guide - English - Page 1
Setup Guide Start Here ADS-2500W Thank you for choosing Brother, your support is important to us and we value your business. Your Brother product is engineered and manufactured to the highest standards to deliver reliable performance, day-in and day-out. Please read the Product Safety Guide first - Brother International ImageCenter„ ADS2500W | Quick Setup Guide - English - Page 2
2 Connect the power cord c Pull the Output Tray out of the machine a and then unfold the Document Stopper b. Important DO NOT connect the USB cable yet. a Connect the power cord. WARNING The machine must be fitted with a three prong grounded plug. 2 1 b Open the Top Cover a. 1 3 Choose your - Brother International ImageCenter„ ADS2500W | Quick Setup Guide - English - Page 3
4 Set the date and time The machine displays the date and time. a Press . b Swipe up or down, or press a or b to display Initial Setup. Press Initial Setup. c Press Date & Time. d Press Date. e Enter the last two digits of the year on the Touchscreen, and then press OK. f Enter the two digits - Brother International ImageCenter„ ADS2500W | Quick Setup Guide - English - Page 4
6 Set the Time Zone You can set the time zone (not summer time but standard time) on the machine for your location. For example, the time zone for Eastern Time in the USA and Canada is UTC-05:00. a Press . b Swipe up or down, or press a or b to display Initial Setup. Press Initial Setup. c Press - Brother International ImageCenter„ ADS2500W | Quick Setup Guide - English - Page 5
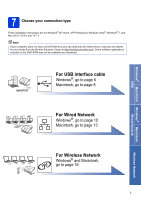
drivers, manuals and utilities for your model from the Brother Solutions Center at http://solutions.brother.com/. Some software applications included on the DVD-ROM may not be available as a download. For USB interface cable Windows®, go to page 6 Macintosh, go to page 8 For Wired Network Windows - Brother International ImageCenter„ ADS2500W | Quick Setup Guide - English - Page 6
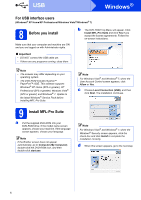
system. • The DVD-ROM includes Nuance™ PaperPort™12SE. This software supports Windows® XP Home (SP3 or greater), XP Professional (SP3 or greater), Windows Vista® (SP2 or greater) and Windows® 7. Update to the latest Windows® Service Pack before installing MFL-Pro Suite. 9 Install MFL-Pro Suite - Brother International ImageCenter„ ADS2500W | Quick Setup Guide - English - Page 7
follow the on-screen instructions. Note • If an error message appears during the software installation, run the Installation Diagnostics located in (Start)/ All Programs/Brother/ADS-2500W. • Depending on your security settings, a Windows® Security or antivirus software window may appear when using - Brother International ImageCenter„ ADS2500W | Quick Setup Guide - English - Page 8
Note For Mac OS X v10.5.x users, upgrade to Mac OS X v10.6.x - 10.7.x before installation. a Put the supplied installer DVD-ROM into your DVD-ROM drive. on-screen instructions. d Please wait for the software to install. After the installation, the Brother software will search for the Brother device. - Brother International ImageCenter„ ADS2500W | Quick Setup Guide - English - Page 9
USB 11 Install Presto! PageManager and Presto! BizCard a Click Presto! PageManager or Presto! BizCard and follow the on-screen instructions. Finish The installation is now complete. Macintosh Windows® Macintosh USB 9 - Brother International ImageCenter„ ADS2500W | Quick Setup Guide - English - Page 10
software supports Windows® XP Home (SP3 or greater), XP Professional (SP3 or greater), Windows Vista® (SP2 or greater) and Windows® 7. Update to the latest Windows® Service Pack before installing MFL-Pro Suite. • If you have previously set up your machine for a wireless network the network cable - Brother International ImageCenter„ ADS2500W | Quick Setup Guide - English - Page 11
the Windows® Firewall or the Windows® Firewall is off, this screen may appear. See the instructions provided with your firewall software for information on how to add the following network ports. For network scanning, add UDP port 54925. If you still have trouble with your network connection - Brother International ImageCenter„ ADS2500W | Quick Setup Guide - English - Page 12
or contact Brother customer service. Note If an error message appears during the software installation, run the Installation Diagnostics located in (Start)/All Programs/Brother/ ADS-2500W LAN. Finish The installation is now complete. Now go to Proceed to Install Optional Applications on page 33 - Brother International ImageCenter„ ADS2500W | Quick Setup Guide - English - Page 13
10.7.x before installation. • If you have previously set up your machine for a wireless network and then want to set it up on a wired network , you should check that the machine's Wired Enable is set to On. The wireless network the network cable - Brother International ImageCenter„ ADS2500W | Quick Setup Guide - English - Page 14
long, and then click Next. c Choose Wired Network Connection (Ethernet), and then click Next. Follow the on-screen instructions. d Please wait for the software to install. After the installation, the Brother software will search for the Brother device. This will take a few moments to complete - Brother International ImageCenter„ ADS2500W | Quick Setup Guide - English - Page 15
BizCard and follow the on-screen instructions. 12 Install MFL-Pro Suite on additional computers (if needed) If you want to use your machine with multiple computers on the network, install MFL-Pro Suite on each computer. Go to step 10 on page 14. Also see step 8 on page 13 before you install. Finish - Brother International ImageCenter„ ADS2500W | Quick Setup Guide - English - Page 16
, you will need to install the drivers and software. The following steps will guide you through the configuration and installation process. To achieve optimum results with normal everyday document scanning, place the Brother machine as close to the network access point/router as possible with - Brother International ImageCenter„ ADS2500W | Quick Setup Guide - English - Page 17
your wireless setup method The following instructions will offer three methods for setting up your Brother machine on a wireless network. Choose the method you prefer for your environment. a Setup using the installation DVD-ROM and a USB cable (Windows® & Macintosh) You need to temporarily use - Brother International ImageCenter„ ADS2500W | Quick Setup Guide - English - Page 18
, mobile devices and Windows®) • If your wireless access point/router does not support WPS (Wi-Fi Protected Setup™) or AOSS™, write down the wireless network settings of your wireless access point/router in the area below. Please do not contact Brother Customer Service for assistance without the - Brother International ImageCenter„ ADS2500W | Quick Setup Guide - English - Page 19
. See the instructions provided with your firewall software for information on how to add the following network ports. For network scanning, add UDP port 54925. If you still have trouble with your network connection, add UDP port 137 and 161. Note For Windows Vista® and Windows® 7, when the - Brother International ImageCenter„ ADS2500W | Quick Setup Guide - English - Page 20
you wrote down for your network in step 9-a on page 17, and then click Next. f Temporarily connect the USB cable directly to the computer and the machine. If the confirmation screen appears, check the box and click Next, go to g. Otherwise, go to h. Note For instructions on connecting the USB - Brother International ImageCenter„ ADS2500W | Quick Setup Guide - English - Page 21
access point/router. To install MFL-Pro Suite For Windows® users: Now go to Step 12-e on page 29 For Macintosh users: Now go to Step 12-d on page 31 Note • The settings will remain unchanged if you click Cancel. • If you want to manually enter the IP address settings of your machine, click - Brother International ImageCenter„ ADS2500W | Quick Setup Guide - English - Page 22
For Wireless Network Users 10 Manual setup from the control panel using the Setup Wizard (Macintosh, mobile devices and Windows®) You must have the wireless settings you wrote down for your network in step 9-b on page 18 before you proceed. You cannot configure an enterprise wireless network using - Brother International ImageCenter„ ADS2500W | Quick Setup Guide - English - Page 23
) for additional details on how to use your machine with the application. To download the User's Guide for the application you are using, please go to the manuals download section on your model's home page on the Brother Solutions Center at http://solutions.brother.com/. 23 Wireless Network - Brother International ImageCenter„ ADS2500W | Quick Setup Guide - English - Page 24
For Wireless Network Users 10 One-push setup using WPS or AOSS™ (Windows® & Macintosh) a Confirm your wireless access point/router has the WPS or AOSS™ symbol as shown below. b Place the Brother machine within range of your WPS or AOSS™ access point/router. The range may differ depending on your - Brother International ImageCenter„ ADS2500W | Quick Setup Guide - English - Page 25
For Wireless Network Users Troubleshooting Please do not contact Brother Customer Service for assistance without the wireless security information. We cannot assist you in locating your network security settings. How can I find the wireless security information (SSID and Network Key) 1) You - Brother International ImageCenter„ ADS2500W | Quick Setup Guide - English - Page 26
WEP encryption, enter the key used as the first WEP key. Your Brother machine supports the use of the first WEP key only. See How can I find the wireless security information (SSID and Network Key) on page 25 to confirm. The wireless security information (Authentication method/Encryption method - Brother International ImageCenter„ ADS2500W | Quick Setup Guide - English - Page 27
machine and the wireless access point/router. Confirm your wireless access point/router supports WPS or AOSS™ and try starting again. If you do not know ask the manufacturer of your wireless access point/router or ask your network administrator. Two or more wireless access points that have WPS or - Brother International ImageCenter„ ADS2500W | Quick Setup Guide - English - Page 28
Wireless Network Windows® Install the drivers & software (Windows® XP Home/XP Professional/Windows Vista®/Windows® 7) 11 software supports Windows® XP Home (SP3 or greater), XP Professional (SP3 or greater), Windows Vista® (SP2 or greater) and Windows® 7. Update to the latest Windows® Service - Brother International ImageCenter„ ADS2500W | Quick Setup Guide - English - Page 29
the Windows® Firewall or the Windows® Firewall is off, this screen may appear. See the instructions provided with your firewall software for information on how to add the following network ports. For network scanning, add UDP port 54925. If you still have trouble with your network connection - Brother International ImageCenter„ ADS2500W | Quick Setup Guide - English - Page 30
)/All Programs/Brother/ ADS-2500W LAN. b The following screens will appear. • When the Software Update Setting screen appears, choose the software update setting you want and click OK. • When the Brother Product Research & Support Program starts up, follow the on-screen instructions. Note Internet - Brother International ImageCenter„ ADS2500W | Quick Setup Guide - English - Page 31
Wireless Network Macintosh Install the drivers & software (Mac OS X v10.6.x, 10.7.x) 11 Before you install d Choose your Follow the on-screen instructions to complete the wireless configuration. c Choose Wireless Network Connection, and then click Next. Windows® Macintosh Wireless Network 31 - Brother International ImageCenter„ ADS2500W | Quick Setup Guide - English - Page 32
Network Macintosh e The installation of the Brother drivers will automatically start. Please wait for the software the on-screen instructions. The name in the User's Guide.) The installation of network, install MFL-Pro Suite on each computer. Go to step 11 on page 31. Finish The installation is - Brother International ImageCenter„ ADS2500W | Quick Setup Guide - English - Page 33
Install Optional Applications Windows® 1 Install optional applications Nuance PDF Converter Professional 7 scan, or import your business cards and Presto! BizCard automatically saves the data and image for each card. Different viewing modes are available for easy searching, editing, creating, - Brother International ImageCenter„ ADS2500W | Quick Setup Guide - English - Page 34
ensure you have installed the driver and connected the machine to your computer by following the instructions in this guide. a Confirm that the ControlCenter. For details, see the User's Guide on the DVD-ROM. • You can use ControlCenter or the scanner driver to initiate scanning from the computer, as - Brother International ImageCenter„ ADS2500W | Quick Setup Guide - English - Page 35
For Wireless Network Users Reset the network settings to factory default To restore all network settings of the internal Scan server to factory default, please follow the steps below. a Make sure the machine is not operating, then disconnect all the cables from the machine (except the power cord). - Brother International ImageCenter„ ADS2500W | Quick Setup Guide - English - Page 36
registered marks of the Wi-Fi Alliance. Each company whose software title is mentioned in this manual has a Software License Agreement specific to its proprietary programs. Any trade names and product names of companies appearing on Brother products, related documents and any other materials are all
-
 1
1 -
 2
2 -
 3
3 -
 4
4 -
 5
5 -
 6
6 -
 7
7 -
8
-
9
-
10
-
11
-
12
-
13
-
14
-
15
-
16
-
17
-
18
-
19
-
20
-
21
-
22
-
23
-
24
-
25
-
26
-
27
-
28
-
29
-
30
-
31
-
32
-
33
-
34
-
35
-
36
 |
 |
1
Start Here
Quick Setup Guide
USA/CAN Version 0
ADS-2500W
Thank you for choosing Brother, your support is important to us and we value your business. Your Brother product
is engineered and manufactured to the highest standards to deliver reliable performance, day-in and day-out.
Please read the Product Safety Guide first before you set up your machine. Then, please read this Quick Setup
Guide for the correct setup and installation.
1
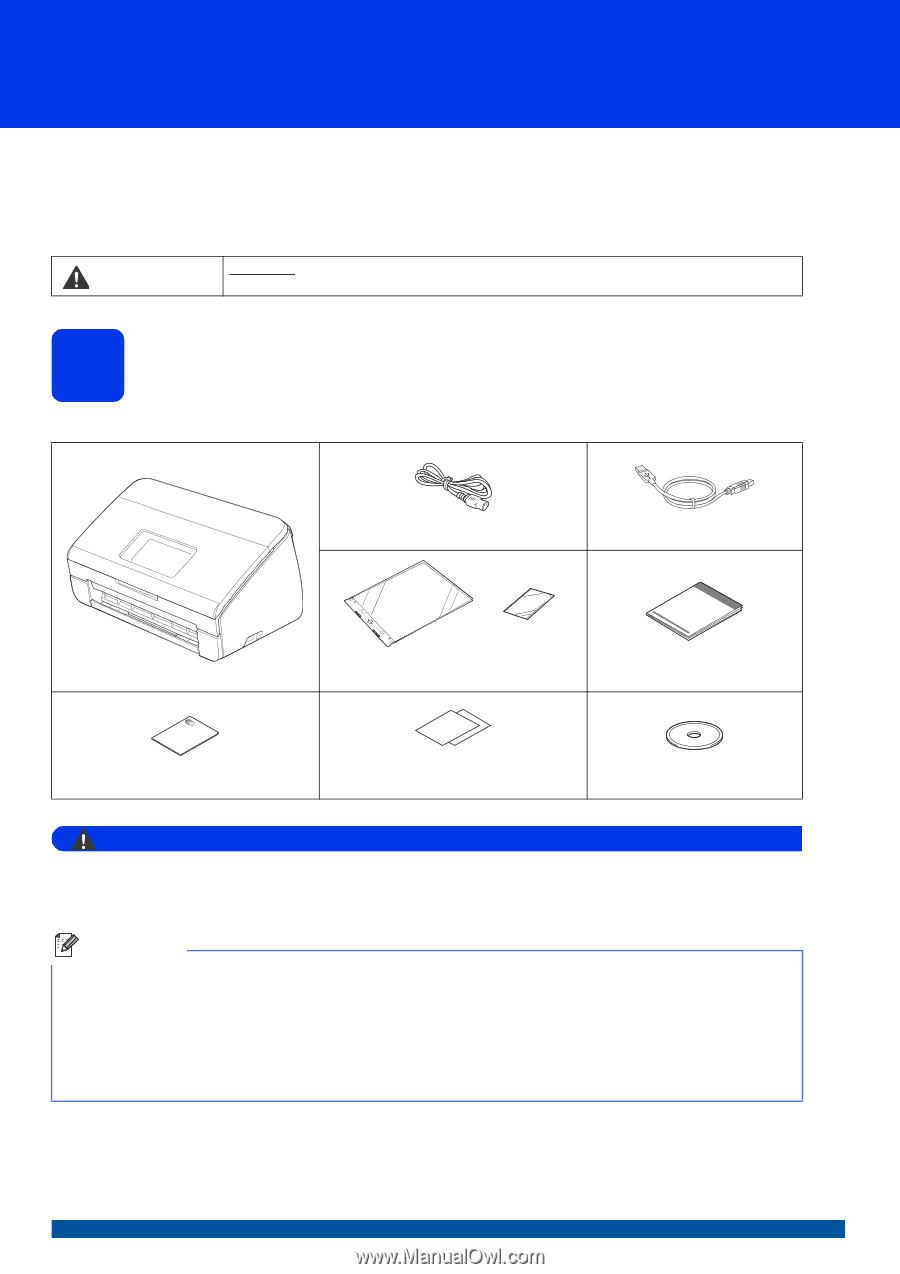
Unpack the machine and check the components
The components included in the box may differ depending on your country
.
WARNING
•
This product was packaged in a plastic bag. To avoid suffocation, keep such plastic bag away from
babies and children. Do not use the bag in cribs, beds, carriages or play pens. The bag is not a toy.
•
Only use the power cord supplied with this product.
a
Remove the protective tape and film covering the machine and the LCD.
b
Make sure you have all the components.
WARNING
WARNING
indicates a potentially hazardous situation which, if not avoided, could result in death
or serious injuries.
AC Power Cord
USB Interface Cable
Carrier Sheet/
Plastic Card Carrier Sheet
Quick Setup Guide
Product Safety Guide
Product Registration Sheet (USA only)
Warranty Card (USA only)
DVD-ROM
Note
•
We recommend that you save the original packaging in case you must ship your machine.
•
Please use the supplied USB cable if you wish to connect the machine to a computer.
USB cable
It is recommended to use a USB 2.0 cable (Type A/B) that is no more than 6 feet (2 meters) long.
Network cable
Use a straight-through Category5 (or greater) twisted-pair cable for 10BASE-T or 100BASE-TX Fast Ethernet
Network.