Brother International Innov-is 2800D Users Manual - English
Brother International Innov-is 2800D Manual
 |
View all Brother International Innov-is 2800D manuals
Add to My Manuals
Save this manual to your list of manuals |
Brother International Innov-is 2800D manual content summary:
- Brother International Innov-is 2800D | Users Manual - English - Page 1
- Brother International Innov-is 2800D | Users Manual - English - Page 2
- Brother International Innov-is 2800D | Users Manual - English - Page 3
, not the cord. 10. Keep fingers away from all moving parts. Special care is required around the machine needle. 11. Always use the proper needle plate. The wrong plate when making any other user servicing adjustments mentioned in the instruction manual. 16. This sewing machine is not intended for - Brother International Innov-is 2800D | Users Manual - English - Page 4
children) with reduced physical, sensory or mental capabilities, or lack of experience and knowledge, unless they have been given supervision or instruction concerning use of the appliance by a person responsible for their safety. Children should be supervised to ensure that they do not play - Brother International Innov-is 2800D | Users Manual - English - Page 5
declares that the product Product Name: Model Number: Brother Sewing Machine NV2500D/NV2500/NV2800D Complies with Part 15 of the FCC Rules. Operation is subject to , if not installed and used in accordance with the instructions, may cause harmful interference to radio communications. However, - Brother International Innov-is 2800D | Users Manual - English - Page 6
malfunction occurs or adjustment is required, first follow the troubleshooting table in the back of the operation manual to inspect and adjust the machine yourself. If the problem persists, please consult your local authorized Brother dealer. For additional product information and updates, visit our - Brother International Innov-is 2800D | Users Manual - English - Page 7
more useful functions or techniques. In chapter 6, you can learn how to edit more advanced embroidery patterns and combine patterns. Chapter 1 Chapter 2 Chapter 5 Chapter 6 • Parts related to operations described in the procedures are highlighted in blue. Perform the operations while comparing - Brother International Innov-is 2800D | Users Manual - English - Page 8
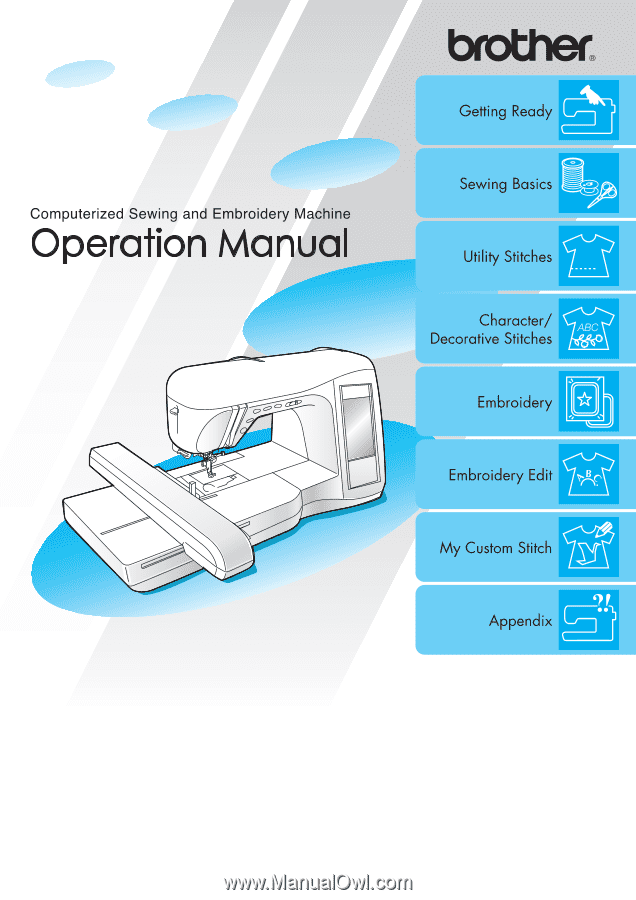
CONTENTS CONTENTS NAMES OF MACHINE PARTS AND THEIR FUNCTIONS 9 Machine 9 Needle and Presser Foot Section 10 Embroidery Unit 10 Operation Buttons 11 Included Accessories 11 Options 14 Top Stitching 74 Smocking 74 Fagoting 75 Tape or Elastic Attaching 76 Heirloom Stitching 77 - Brother International Innov-is 2800D | Users Manual - English - Page 9
from the Beginning 147 Automatically Resuming Embroidery When the Power Goes Off 147 Manually Resuming Embroidery After Turning Off the Power 148 Is Malfunctioning 196 TROUBLESHOOTING 198 ERROR MESSAGES 201 7 SPECIFICATIONS 207 UPGRADING YOUR MACHINE'S SOFTWARE 208 Upgrade Procedure - Brother International Innov-is 2800D | Users Manual - English - Page 10
8 - Brother International Innov-is 2800D | Users Manual - English - Page 11
NAMES OF MACHINE PARTS AND THEIR FUNCTIONS NAMES OF MACHINE PARTS AND THEIR FUNCTIONS Machine ■ Front View ■ Right-side/Rear View a Top cover Open the top cover to thread the machine and wind the bobbin. b Thread guide plate Pass the thread around the thread guide plate when threading the upper - Brother International Innov-is 2800D | Users Manual - English - Page 12
NAMES OF MACHINE PARTS AND THEIR FUNCTIONS Needle and Presser Foot Section Embroidery Unit a Buttonhole lever Lower The needle plate is marked with guides to help sew straight seams. i Needle bar thread guide Pass the upper thread through the needle bar thread guide. j Needle clamp screw Use the - Brother International Innov-is 2800D | Users Manual - English - Page 13
MACHINE PARTS AND THEIR FUNCTIONS Included Accessories The accessories are stored in the flat bed attachment. Open the flat bed attachment as shown below. a "Start/Stop" button When this button is pressed, the machine or damage to the machine may occur. b c a d a Embroidery foot "U" storage - Brother International Innov-is 2800D | Users Manual - English - Page 14
NAMES OF MACHINE PARTS AND THEIR FUNCTIONS 1 2 3 4 5 6 7 8 9 10 11 12 13 14 15 16 75/11 2 needles 90/14 2 needles 90/14 2 needles: Ball point needle (gold colored) 17 - Brother International Innov-is 2800D | Users Manual - English - Page 15
material XD0745-051 XC8167-451 SA-EBT SA519 EBT-CEN: X81164-001 BM3:XE0806-001 43 Operation Manual XD0954-151 44 Quick Reference Guide XD0956-051 45 Hard case XC9640-151 46 Embroidery unit carrying case SA529 D6EUC:XC9862-052 * Depending on the model, an alternate bobbin case with a pink - Brother International Innov-is 2800D | Users Manual - English - Page 16
MACHINE PARTS AND THEIR FUNCTIONS Options 1 2 3 4 5 6 7 8 Memo • All specifications are correct at the time of printing. • Please be aware that some specifications may change without notice. • Brother embroidery cards can be used with your machine guide SA538 SG1:XC8483-052 Embroidery - Brother International Innov-is 2800D | Users Manual - English - Page 17
ON/OFF 16 LCD SCREEN 17 ■ Display Precautions...17 ■ Key Functions ...18 Using the Machine Setting Mode Key 20 Using the Machine Operation Mode Key 22 ■ Contents of Each Category 22 Using the Pattern Explanation Key 23 LOWER/UPPER THREADING 24 Winding the Bobbin 24 ■ Using the - Brother International Innov-is 2800D | Users Manual - English - Page 18
should be turned to OFF or the plug must be removed from the socket-outlet. • When servicing the machine or when removing covers, either the machine or the electrical set must be unplugged. • For U.S.A. only This appliance has a polarized plug (one blade wider than the other). To reduce the risk - Brother International Innov-is 2800D | Users Manual - English - Page 19
damage to the display may result. Getting Ready • All or part of the display may sometimes become darker or lighter due to fluctuations brightness (see page 21). • The display may be dark immediately after the machine is turned on. This is a normal characteristic of the backlight and is - Brother International Innov-is 2800D | Users Manual - English - Page 20
and other operations for using the machine. Presser foot/Needle exchange key all keys and operation buttons so that parts can safely be changed. Press this Embroidery key Press this key to sew embroidery. 124 Embroidery edit key Press this key to combine embroidery patterns. By editing embroidery - Brother International Innov-is 2800D | Users Manual - English - Page 21
53 key sewing application and when you need instructions on how to sew the selected stitch pattern. select this setting before sewing, the machine will automatically sew reinforcement stitches (or settings to the original 52 settings. r Manual memory key Change the stitch pattern settings ( - Brother International Innov-is 2800D | Users Manual - English - Page 22
screen, and change other basic machine settings. a Select whether the needle stops in the raised or lowered position when the machine is stopped. b Select to display the next page. a b c a Select from among 10 embroidery frame displays (see page 134). b Select whether the thread color name, - Brother International Innov-is 2800D | Users Manual - English - Page 23
the service count of embroidery stitches. The service count is a reminder to take your machine in for regular servicing. (Contact your authorized dealer for details.) c Shows the product identification number for this machine. d Shows the version of the software installed on this machine. Memo - Brother International Innov-is 2800D | Users Manual - English - Page 24
Manual are stored in this machine. Press to open the screen shown below. Six categories are displayed at the top of the screen. Press a key to see more information about that category. ■ Contents of Each Category Names of Machine Parts and Their Functions Sewing Basics Troubleshooting - Brother International Innov-is 2800D | Users Manual - English - Page 25
the screen. the selected stitch. Getting Ready c Press (upper threading). Example: Displaying information on the use for . a Select , and then press . → The instructions for threading the machine appear. d Press to view the next page. → Uses for appear. b When you are finished with the - Brother International Innov-is 2800D | Users Manual - English - Page 26
machine. If bobbins from other models are used, the machine will not operate correctly. Use only the included bobbin or bobbins of the same type (part While sewing embroidery, the bobbin can conveniently be wound. 65 a 3, 4 2 7, 8 9,10 l o 1 a Supplemental spool pin a Turn on the machine, and - Brother International Innov-is 2800D | Users Manual - English - Page 27
the thread with your left hand, and then pass the thread through the thread guide. a 3 1 Note • Make sure that the thread between the spool under the pretension disk. a b a Pin b Pretension disk b a a Guide slit b Bobbin winder seat CAUTION • Be sure to follow the process described. - Brother International Innov-is 2800D | Users Manual - English - Page 28
on the bobbin winder seat, otherwise it may become loose, resulting in damage to the machine. a Turn on the machine. b Open the top cover. c Align the groove in the bobbin with the spring the lower notch in the thread guide plate, then through the upper notch. b a a Lower notch in the thread - Brother International Innov-is 2800D | Users Manual - English - Page 29
a b Getting Ready a Thread guide h Pass the thread under the pin on the bobbin winding pretension disk and guide, and then pass it around the This section describes how to set a bobbin wound with thread into the machine. You can begin sewing without pulling up the bobbin thread. If you - Brother International Innov-is 2800D | Users Manual - English - Page 30
d from the previous section to insert the bobbin into the bobbin case. b Guide the bobbin thread through the groove, following the arrow in the illustration. Note • presser foot toward the rear of the machine, making it even with the upper thread. a b a Upper thread b Bobbin thread - Brother International Innov-is 2800D | Users Manual - English - Page 31
,13 11 10 9 14,15 7 4, 5 6 3 2,16 1 Note If you try to thread the needle with the needle threader lever without raising it, damage to the machine may result. d Pivot the spool pin so that it angles upward, and then place the spool of thread on the spool pin. * Make sure that - Brother International Innov-is 2800D | Users Manual - English - Page 32
, hold the end of the thread with your left hand, and then guide the thread through the groove, following the arrows in the illustration. a lever check window to check the position of the take-up lever. Before threading the machine, make sure that the take-up lever is in the raised position. a b - Brother International Innov-is 2800D | Users Manual - English - Page 33
of thread after passing it through the thread guide disks (marked "7"). * If a loop was the presser a foot toward the rear of the machine. a 80 mm or more l Lower the needle can be used with home sewing machine needles 75/11 through 100/16. the needle bar thread guide (marked "6"). • Some - Brother International Innov-is 2800D | Users Manual - English - Page 34
end of this manual for patterns that can be used with the twin needle. CAUTION • Use only twin needles made for this machine (part code X59296-151 bar thread guide, and then thread the needle on the left side. a a Needle bar thread guide Note The needle threader cannot be used. Manually pass the - Brother International Innov-is 2800D | Users Manual - English - Page 35
needle mode when using the twin needle. Using the twin needle while the machine is in single needle mode could cause the needle to break, resulting in the presser foot lever. a Needle bar thread guide Note The needle threader cannot be used. Manually pass the thread through the eye of the needle - Brother International Innov-is 2800D | Users Manual - English - Page 36
foot is used, the needle may strike the presser foot and bend or break, and may cause injury. • Only use presser feet made for this machine. Using other presser feet may lead to accident or injury. Removing the Presser Foot c Raise the presser foot lever. a Press the "Needle Position" button to - Brother International Innov-is 2800D | Users Manual - English - Page 37
changing the needle. If is not pressed and the "Start/ Stop" button or another operation button is pressed accidentally, the machine will start and injury may result. • Use only sewing machine needles made for home use. Other needles may bend or break and may cause injury. • Never sew with a bent - Brother International Innov-is 2800D | Users Manual - English - Page 38
loosen it, and then remove the needle. Note Do not apply extreme force when loosening or tightening the needle clamp screw, otherwise damage to the machine may result. d With the flat side of the needle facing the back, insert the new needle until it touches the needle stopper. Use the - Brother International Innov-is 2800D | Users Manual - English - Page 39
machine needle is probably the most important part of the sewing machine. Choosing the proper needle for your sewing project will result in a beautiful finish and fewer problems needle 75/11 for embroidery. Ball point needles (gold colored) 90/14 are not recommended for embroidery, as they may bend - Brother International Innov-is 2800D | Users Manual - English - Page 40
CHANGING THE NEEDLE 38 - Brother International Innov-is 2800D | Users Manual - English - Page 41
2 Chapter Sewing Basics SEWING 40 Sewing a Stitch...40 ■ Using the Foot Controller 41 ■ Using the Knee Lifter...42 Sewing Reinforcement Stitches 42 Sewing Curves ...42 Changing Sewing Direction 42 ■ Sewing a Seam Allowance of 0.5 cm or Less 42 Sewing Heavyweight Fabric 43 ■ If the Fabric Does - Brother International Innov-is 2800D | Users Manual - English - Page 42
avoid injury, pay special attention to the needle while the machine is in operation. Keep your hands away from moving parts while the machine is in operation. • Do not stretch or pull g Lightly place your hands on the fabric to guide it, and then press the "Start/Stop" button to start sewing. 40 - Brother International Innov-is 2800D | Users Manual - English - Page 43
. a Pull the retractable cord out from the foot controller to the desired length, and then insert the foot controller plug into its jack on the machine. CAUTION • Do not press the "Thread Cutter" button after the threads have been cut. Doing so could tangle the thread or break the needle and - Brother International Innov-is 2800D | Users Manual - English - Page 44
sewn at a low speed in the opposite direction. In addition, this machine can be set to sew reinforcement stitches (or reverse stitches) automatically. Sew slowly while keeping the seam parallel with the fabric edge as you guide the fabric around the curve. Note When the presser foot is in raised - Brother International Innov-is 2800D | Users Manual - English - Page 45
, enabling the fabric to be fed. Once the trouble spot has been sewn, the 2 presser foot will mm (approx. 1/4 inch) thick through the sewing machine. This may cause the needle to break and cause starch or place thin paper or tear away embroidery stabilizer under thin fabrics to make sewing easier. - Brother International Innov-is 2800D | Users Manual - English - Page 46
. indicates no change is possible (see the "STITCH SETTING CHART" at the end of this manual). • If a stitch setting is changed, but not saved, the stitch setting returns to its default when the machine is turned off or a different stitch is selected. Adjusting the Stitch Width The stitch width - Brother International Innov-is 2800D | Users Manual - English - Page 47
ADJUSTING STITCH SETTINGS Adjusting the Thread Tension ■ Upper Thread Is Too Loose If the upper thread can be seen on the wrong side of The default thread tension, which is automatically set, can normally be used regardless of the type of thread or fabric being sewn. However, with some fabric and - Brother International Innov-is 2800D | Users Manual - English - Page 48
stitching, and then press the "Start/Stop" button. The machine will automatically sew reverse stitches (or reinforcement stitches), and then begin is selected. • The automatic thread cutting setting is already selected with embroidery patterns. a Select a stitch pattern. a a Reverse stitches ( - Brother International Innov-is 2800D | Users Manual - English - Page 49
such as the stitch width and stitch length, are locked and cannot be changed. This prevents screen settings from accidentally being changed or the machine from being stopped while large pieces of fabric or other projects are being sewn. The screen can be locked while sewing utility stitches and - Brother International Innov-is 2800D | Users Manual - English - Page 50
USEFUL FUNCTIONS 48 - Brother International Innov-is 2800D | Users Manual - English - Page 51
3 Chapter Utility Stitches SELECTING A UTILITY STITCH ...........50 ■ Stitch Selection Screens 50 Selecting a Stitch Pattern 51 ■ Using the Mirror Image Key 51 ■ Using the Image Key 51 Saving Stitch Settings 52 Using the Sewing Type Selection Key 53 SEWING THE STITCHES 54 Straight Stitches - Brother International Innov-is 2800D | Users Manual - English - Page 52
SELECTING A UTILITY STITCH SELECTING A UTILITY STITCH ■ Stitch Selection Screens Press to display the previous or next page. Straight/Overcasting/Quilting Stitches Decorative Stitches Heirloom Stitches Buttonholes/Bar tacks Multi-Directional Sewing 50 - Brother International Innov-is 2800D | Users Manual - English - Page 53
A UTILITY STITCH Selecting a Stitch Pattern a Turn on the machine, and then lightly press the display. → Depending on the details on the stitch patterns, refer to the "STITCH SETTING CHART" at the end of this manual. ■ Using the Mirror Image Key Press so that it appears as . A mirror image - Brother International Innov-is 2800D | Users Manual - English - Page 54
settings, press , and then press . Saving Stitch Settings This machine is preset with the default settings for the stitch width (zigzag stitch pattern is selected, the last settings saved are displayed even if the machine was turned off. If the settings are changed again and is pressed, or - Brother International Innov-is 2800D | Users Manual - English - Page 55
to display the next page. Utility Stitches → The advice screen is displayed. b Press . * Press or for that page. to view additional instructions e When you have finished sewing, press . → The upper part of the screen displays a selection of overcasting stitches with explanations. 53 - Brother International Innov-is 2800D | Users Manual - English - Page 56
Triple stretch stitch Stem stitch Decorative stitch Basting stitch Presser Foot Applications Stitch width [mm (inch.)] Auto. Manual General sewing, gather, pintuck, etc. Reverse stitch is sewn while 0.0 pressing "Reverse/ (0) Reinforcement Stitch" button. 0.0 - 7.0 (0 - 1/4) General sewing - Brother International Innov-is 2800D | Users Manual - English - Page 57
into the fabric at the starting point of the stitching. * If the automatic thread cutting setting is selected before sewing, the machine will automatically sew reverse stitches (or reinforcement stitches) at the beginning of stitching. When the "Reverse/ Reinforcement Stitch" button is pressed - Brother International Innov-is 2800D | Users Manual - English - Page 58
provides support for the fabric as the needle goes through the fabric. a a Bobbin case e Use the screwdriver included with the machine to turn the main power to OFF. b Remove the flat bed attachment or the embroidery unit if either are attached. c Grasp both sides of the needle plate cover, - Brother International Innov-is 2800D | Users Manual - English - Page 59
plate, the needle plate cover and the presser foot "J". a a Between 5 mm (approx. 3/16 inch) and 30 mm (approx. 1-3/16 inches) c Sew while lightly guiding the fabric. Memo To prevent puckering on fine fabrics, use a fine needle, size 75/11, and a short stitch length. For heavier fabrics, use - Brother International Innov-is 2800D | Users Manual - English - Page 60
SEWING THE STITCHES Darts Seams a Press , and then attach presser foot "J". b Press the "Reverse/Reinforcement Stitch" button to sew reverse stitches at the beginning of the stitching, and then sew from the wide end to the other end without stretching the fabric. * If the automatic reverse/ - Brother International Innov-is 2800D | Users Manual - English - Page 61
SEWING THE STITCHES e Pull the bobbin threads to create the desired amount of gathering, and then tie the threads. d Lay both seam allowances on the side of the shorter one (cut seam allowance) and iron them flat. a f Smooth the gathers by ironing them. a Wrong side of fabric e Fold the - Brother International Innov-is 2800D | Users Manual - English - Page 62
SEWING THE STITCHES Pintucks Use pin tucks to decorate blouses. a Mark the positions of the folds on the wrong side of the fabric. a a Wrong side of fabric b Turn the fabric over, and then iron only the folds with the tip of the iron. a a Surface of fabric c Press , and then attach - Brother International Innov-is 2800D | Users Manual - English - Page 63
be sure to attach presser foot "J". Stitch Key Stitch Name Presser Foot Applications Stitch Width [mm (inch)] Auto. Manual Stitch Length [mm (inch)] Auto. Manual Twin Needle Zigzag stitch (Middle) Zigzag stitch (Middle) Zigzag stitch (Right) For overcasting, mending. Reverse stitch is sewn - Brother International Innov-is 2800D | Users Manual - English - Page 64
slowly, keeping the seams parallel with the fabric edge as you guide the fabric around the curve. Elastic Zigzag Stitches Use elastic zigzag elastic zigzag Presser Foot Applications Stitch Width [mm (inch)] Auto. Manual Overcasting (medium weight and stretch fabrics), tape and elastic 5.0 - Brother International Innov-is 2800D | Users Manual - English - Page 65
stitch Presser Foot Applications Stitch Width [mm (inch)] Auto. Manual Reinforcing of light and medium weight fabrics 3.5 (1/8) 2.5 - cause injury. G a b Lower the presser foot so that the presser foot guide is flush against the edge of the fabric. a The needle should not touch - Brother International Innov-is 2800D | Users Manual - English - Page 66
Presser Foot Applications Reinforced seaming of stretch fabric Stitch width [mm (inch.)] Auto. Manual 5.0 (3/16) 0.0 - 7.0 (0 - 9/32) Stitch length [mm (inch.)] Auto. Manual 2.5 0.5 - 4.0 (3/32) (1/32 - 3/16) Reinforcing of medium stretch fabric and heavyweight fabric, decorative stitching - Brother International Innov-is 2800D | Users Manual - English - Page 67
foot and break, possibly causing injury. Memo Do not use the needle threader when the side cutter is attached. Thread the needle manually, or only attach the side cutter after threading the needle using the needle threader. Stitch Stitch name Presser foot Applications Stitch width Stitch - Brother International Innov-is 2800D | Users Manual - English - Page 68
the fabric so that the right side of the cut is on top of the guide plate and the left side of the cut is underneath the presser foot. a b a Guide plate (lower knife) b Presser foot g Thread the needle manually and pull out a long section of the upper thread. Pass it below the presser - Brother International Innov-is 2800D | Users Manual - English - Page 69
You can make beautiful quilts quickly and easily with this machine. When making a quilt, you will find it convenient ) right seam allowance Stitch width [mm (inch.)] Auto. Manual 5.5 (7/32) 0.0 - 7.0 (0 - 1/4) Stitch length [mm (inch.)] Auto. Manual Twin needle 2.0 0.2 - 5.0 (1/16) (1/64 - - Brother International Innov-is 2800D | Users Manual - English - Page 70
reverse feeding. • Always check to be sure that your quilting surface is securely basted before beginning to sew. Specialized machine quilt needles and threads are also available for machine quilting. c Set the operation lever of the walking foot so that the needle clamp screw is set between the - Brother International Innov-is 2800D | Users Manual - English - Page 71
SEWING THE STITCHES e Check the needle drop point, and then sew along the edge of the appliqué while making sure that the needle drops slightly off the edge of the fabric. a e Set "WIDTH CONTROL" to "ON". The sewing speed will be adjusted using the foot controller. J a Needle drop point - Brother International Innov-is 2800D | Users Manual - English - Page 72
the setting screen (see page 20). Test with a scrapped piece. e Lower the feed dog position switch, located at the rear of the base of the machine, to . a b a Select . b Remove the presser foot holder (see page 68). c Align the quilting foot with the lower-left side of the presser bar. Memo The - Brother International Innov-is 2800D | Users Manual - English - Page 73
Hemming stretch fabric Stitch Width [mm (inch)] Auto. Manual Stitch Length [mm (inch)] Auto. Manual 00 3← − →3 2.0 1.0 - 3.5 (1/16) Attach presser foot "R", and then lower the presser foot so that the presser foot guide is flush against the fold of the fabric. b Place the fabric wrong side - Brother International Innov-is 2800D | Users Manual - English - Page 74
an unattractive finish. If either of these occur, follow the instructions below to correct the problem. ■ If the Needle Does Not Catch the Fold Press stitch patterns, refer to the "STITCH SETTING CHART" at the end of this manual. c Attach presser foot "J", and then sew along the edge of the appliqu - Brother International Innov-is 2800D | Users Manual - English - Page 75
, refer to the "STITCH SETTING CHART" at the end of this manual. b Increase the thread tension for an attractive scalloped finish to the shell the automatic thread cutting setting is selected before sewing, the machine will automatically sew reinforcement stitches at the beginning of stitching. - Brother International Innov-is 2800D | Users Manual - English - Page 76
SEWING THE STITCHES b Leave a seam when sewing the scallop stitches so that the pattern is not sewn directly on the edge of the fabric. Note Sew test stitches on the fabric before sewing on your project. c Turn the fabric over so that the surface faces up, and then sew over the seam with the - Brother International Innov-is 2800D | Users Manual - English - Page 77
). J h Pull out the straight stitch threads. Memo For details on the stitch patterns, refer to the "STITCH SETTING CHART" at the end of this manual. c Attach presser foot "J", and then sew with the presser foot centered between the two pieces of fabric. Memo This stitch is more decorative when - Brother International Innov-is 2800D | Users Manual - English - Page 78
Bobbin Thread" on page 28). f Press or . Note For details on the stitch patterns, refer to the "STITCH SETTING CHART" at the end of this manual. g While pulling the elastic tape so that it is about the same length as the fabric, pull the fabric at the pin nearest the front - Brother International Innov-is 2800D | Users Manual - English - Page 79
the wing needle (130/705H, size 100/ 16). Note The needle threader cannot be used. Manually pass the thread through the eye of the needle from the front. If the needle threader is used, damage to the machine may result. 3 CAUTION • The "Automatic Threading" button cannot be used. Thread the wing - Brother International Innov-is 2800D | Users Manual - English - Page 80
unopened, as shown in the illustration. Memo For details on the stitch patterns, refer to the "STITCH SETTING CHART" at the end of this manual. c With the surface of the fabric facing up, sew along the right edge of the open area. N a b c a Pulled out thread b Pulled out area c Approximately - Brother International Innov-is 2800D | Users Manual - English - Page 81
Presser Foot Applications Buttonhole on light to medium weight fabrics Stitch Width [mm (inch)] Auto. Manual Stitch Length [mm (inch)] Auto. Manual 5.0 3.0 - 5.0 0.4 0.2 - 1.0 (3/16) (1/8 - 3/16) (1/64) (1/64 - 1/16) Twin Needle NO Wide round ended buttonhole Buttonholes with extra - Brother International Innov-is 2800D | Users Manual - English - Page 82
presser foot Note • Slide the outside frame of the buttonhole foot backward as far as possible, making sure that there is no gap behind the part of the foot marked "A", as shown in the illustration. If the buttonhole foot is not slid back as far as possible, the buttonhole will not - Brother International Innov-is 2800D | Users Manual - English - Page 83
with the seam ripper. a Buttonhole lever a a Metal bracket f Gently hold the end of the upper thread, and then start sewing. * Once sewing is completed, the machine automatically sews reinforcement stitches, then stops. * If the automatic thread cutting setting is selected before sewing, the - Brother International Innov-is 2800D | Users Manual - English - Page 84
thread under the presser foot. Pass the thread ends through the grooves at the front of the presser foot, and then temporarily tie them. * Use #5 embroidery thread or lace yarn for the gimp thread. ■ Buttons That Do Not Fit into the Button Holder Plate Use the markings on the presser foot - Brother International Innov-is 2800D | Users Manual - English - Page 85
weight fabric 7.0 (1/4) 2.5 - 7.0 (3/32 - 1/4) Stitch Length [mm (inch)] Auto. Manual 2.0 0.4 - 2.5 (1/16) (1/64 - 1/16) Darning of heavyweight fabric 7.0 2.5 - as far as possible, making sure that there is no gap behind the part of the foot marked "A", as shown in the illustration. If the - Brother International Innov-is 2800D | Users Manual - English - Page 86
If the automatic thread cutting setting is selected before sewing, the machine will automatically cut the thread at the end of stitching. a at opening of pocket, etc. Stitch Width [mm (inch)] Auto. Manual Stitch Length [mm (inch)] Auto. Manual 2.0 1.0 - 3.0 0.4 0.3 - 1.0 (1/16) (1/16 - - Brother International Innov-is 2800D | Users Manual - English - Page 87
If the automatic thread cutting setting is selected before sewing, the machine will automatically cut the thread at the end of stitching. backward as far as possible, making sure that there is no gap behind the part of the foot marked "A", as shown in the illustration. If the buttonhole foot - Brother International Innov-is 2800D | Users Manual - English - Page 88
Foot Applications Attaching buttons Stitch width [mm (inch.)] Auto. Manual Stitch length [mm (inch.)] Auto. Manual 3.5 2.5 - 4.5 (1/8) (3/32 - 3/16) - the automatic thread cutting setting is selected before sewing, the machine will automatically cut the thread at the end of stitching. Note - Brother International Innov-is 2800D | Users Manual - English - Page 89
holes on belts, etc. Stitch width [mm (inch.)] Auto. Manual Stitch length [mm (inch.)] Auto. Manual Twin needle 7.0 7.0 6.0 5.0 7.0 7.0 6.0 5.0 (1/4) If the automatic thread cutting setting is selected before sewing, the machine will automatically cut the thread at the end of stitching. 7 mm - Brother International Innov-is 2800D | Users Manual - English - Page 90
on the stitch patterns, refer to the "STITCH SETTING CHART" at the end of this manual. d Insert the needle into the fabric at the starting point of the stitching, and then 2. * The fabric will move sideways, so guide the fabric with your hands to sew straight. f Press , and then sew seam 3. 88 - Brother International Innov-is 2800D | Users Manual - English - Page 91
sew seam 4. * The fabric will move sideways, so guide the fabric with your hands to sew straight. SEWING details on the stitch patterns, refer to the "STITCH SETTING CHART" at the end of this manual. b Attach presser foot "J", sew straight stitches up to the zipper opening, and then sew basting - Brother International Innov-is 2800D | Users Manual - English - Page 92
from the end of the zipper opening, sew to a point about 50 mm (approx. 2 inches) from the edge of the fabric, then stop the machine. g Pull down the zipper slider, then continue sewing to the edge of the fabric. a b a b c e d a Zipper pull tab b Zipper teeth c End of zipper opening d 3 mm - Brother International Innov-is 2800D | Users Manual - English - Page 93
h Close the zipper, turn the fabric over so that the surface faces up, and then baste the other side of the zipper to the fabric. a c b d a Front of garment (wrong side of fabric) b Back of garment (surface of fabric) c Basting d Front of garment (surface of fabric) i Remove the presser foot - Brother International Innov-is 2800D | Users Manual - English - Page 94
SEWING THE STITCHES 92 - Brother International Innov-is 2800D | Users Manual - English - Page 95
Specifications can be Used 110 ■ Precautions on Using the Computer to Create and Save Data 111 ■ Trademarks ...111 Saving Stitch Patterns in the Machine's Memory 112 ■ If the Memory Is Full ...112 Saving Stitch Patterns to USB Media (Commercially Available 113 Saving Stitch Patterns to the - Brother International Innov-is 2800D | Users Manual - English - Page 96
f Utility decorative stitch patterns g Alphabet patterns (gothic font) h Alphabet patterns (handwriting font) i Alphabet patterns (outline style) j Patterns saved in the machine's memory (see page 115) k Patterns saved in USB media (see page 116) l Patterns saved on the computer (see page 117 - Brother International Innov-is 2800D | Users Manual - English - Page 97
Selecting Decorative Stitch Patterns/ 7 mm Decorative Stitch Patterns/ Satin Stitch Patterns/ 7 mm Satin Stitch Patterns/Cross Stitch Patterns/Utility Decorative Stitch Patterns SELECTING STITCH PATTERNS c To combine patterns, select the next pattern. * Press to check the selected pattern - Brother International Innov-is 2800D | Users Manual - English - Page 98
SELECTING STITCH PATTERNS b Press to display a selection screen of characters, and then select a character. Repeat this step until you have selected all of the characters. * If a wrong character was selected, press to erase the character, and then select the new character. * To select a - Brother International Innov-is 2800D | Users Manual - English - Page 99
be sure to affix stabilizer material to the fabric. • While sewing, guide the fabric with your hands so that it will be fed straight. Fabric , regular, or stretch fabrics: Brother ballpoint needle (golden colored) With heavyweight fabrics: home sewing machine needle 90/14 Monogramming foot "N". - Brother International Innov-is 2800D | Users Manual - English - Page 100
stop in the raised position while the fabric is fed due to the operation of the needle bar separation mechanism which is used in this machine. At such times, a clicking sound different from the sound generated during sewing will be heard. This sound is normal and is not the sign of - Brother International Innov-is 2800D | Users Manual - English - Page 101
d Press . SEWING STITCH PATTERNS e Sew the pattern again. If the pattern still is not sewn correctly, adjust it again. Continue making adjustments until the pattern is sewn correctly. Memo You can sew with the setting screen on the display. f After the pattern is sewn correctly, quit making - Brother International Innov-is 2800D | Users Manual - English - Page 102
d Automatic thread Press this key to select the automatic thread cutting setting. If you select this 46 cutting key setting before sewing, the machine will automatically cut the thread at the end of stitching. Press this key again to cancel the setting. e Horizontal mirror image Press this - Brother International Innov-is 2800D | Users Manual - English - Page 103
Changing the Pattern Size After selecting a stitch pattern, press desired size is selected. until the EDITING STITCH PATTERNS Creating a Vertical Mirror Image After selecting a stitch pattern, press pattern vertically. to flip the Memo • Stitch patterns entered after the pattern size was - Brother International Innov-is 2800D | Users Manual - English - Page 104
selecting a stitch pattern, press desired stitching density is selected. until the Memo If you press while sewing, the key changes to and the machine will sew one copy of the pattern, then automatically stop. CAUTION • If the stitches bunch when thread density is changed to , return the - Brother International Innov-is 2800D | Users Manual - English - Page 105
size of the selected stitch pattern. You can also check and change the colors of the image on the screen. a Press . c Use to view any part of the image that extends out of the viewable display area. → An image of the selected pattern is displayed. d Press to return to the original - Brother International Innov-is 2800D | Users Manual - English - Page 106
stitch patterns of different sizes, mirror image stitch patterns, and others. Before Combining Patterns Note • When stitch patterns are combined, the machine is automatically set to sew the pattern once. To repeatedly sew the combined stitch patterns, combine the patterns, and then press . • You - Brother International Innov-is 2800D | Users Manual - English - Page 107
d Press . e Press . COMBINING STITCH PATTERNS Memo • Press to erase the last pattern entered. Patterns are erased one at a time. • If the entire combined pattern cannot be displayed, press to view an image of the pattern. Press to return to the previous screen. 4 → The image of the - Brother International Innov-is 2800D | Users Manual - English - Page 108
COMBINING STITCH PATTERNS Combining Stitch Patterns of Different Sizes Example: c Press again, and then press it appears as . so that a Press . → The second pattern is displayed in the smaller size. d To repeatedly sew the pattern combination, press so that it appears as . b Press . → - Brother International Innov-is 2800D | Users Manual - English - Page 109
a Press . COMBINING STITCH PATTERNS d To repeatedly sew the pattern combination, press so that it appears as . b Press . → The combination appears as a repeating pattern. Combining Stitch Patterns of Different Lengths 4 Character/Decorative Stitches a Press . c Press again, and then - Brother International Innov-is 2800D | Users Manual - English - Page 110
COMBINING STITCH PATTERNS b Press , and then press it appears as . once so that Creating Step Patterns (7 mm Satin Stitch Patterns Only) Stitch patterns that are shifted to create a step-shaped pattern are called step patterns. Step patterns can be created by using and to shift 7 mm satin - Brother International Innov-is 2800D | Users Manual - English - Page 111
b Press , and then press . COMBINING STITCH PATTERNS ■ Examples of Pattern Combinations →→→→ → The next pattern is moved to the right. c Press again, and then press . 4 →→→ Character/Decorative Stitches d Press so that it appears as . →→→ → The combination appears as a repeating - Brother International Innov-is 2800D | Users Manual - English - Page 112
• USB CD-ROM, CD-R, CD-RW drives (recalling only) Memo Stitch/embroidery data cannot be saved using a USB CD-ROM, CD-R or CD-RW be usable with this machine. Please visit our web site for more details. • USB hubs cannot be used with this machine. The machine will not recognize the brother.com)). 110 - Brother International Innov-is 2800D | Users Manual - English - Page 113
trademark or a trademark of International Business Machines Corporation. • Microsoft and Windows are registered trademarks or trademarks of Microsoft Corporation. Each company whose software title is mentioned in this manual has a Software License Agreement specific to its proprietary programs - Brother International Innov-is 2800D | Users Manual - English - Page 114
Press to return to the previous screen without saving the stitch pattern. Memo • It takes a few seconds to save a stitch pattern in the machine's memory. • See page 115 for information on retrieving a saved stitch pattern. a Press . b Select a stitch pattern to be deleted. * Press pocket. to - Brother International Innov-is 2800D | Users Manual - English - Page 115
you decide not to delete the stitch pattern, press . 4 Character/Decorative Stitches b Insert the USB media into the USB port connector on the machine. → The old stitch pattern is deleted, and the new stitch pattern is automatically saved. a b a USB port connector for media b USB media Memo - Brother International Innov-is 2800D | Users Manual - English - Page 116
otherwise the USB media may be damaged or data may be lost. Note Do not turn off the machine while the "Saving" screen is displayed, otherwise you may lose the stitch pattern that you are saving USB port connector on the computer, refer to the instruction manual for the corresponding equipment. 114 - Brother International Innov-is 2800D | Users Manual - English - Page 117
b Press . USING THE MEMORY FUNCTION Retrieving Stitch Patterns from the Machine's Memory a Press . c Press . → Press to return to the previous screen holding saved stitch patterns Note Do not turn off the machine while the "Saving" screen is displayed, otherwise you may lose the data. 115 - Brother International Innov-is 2800D | Users Manual - English - Page 118
pattern is under the folder, move down layers of folders following a path to it. a Insert the USB Media into the USB port connector on the machine (see page 113). b Press . a Folder b Stitch patterns in a top folder ("key" shows only the first pattern over if the pattern is combined.) → Stitch - Brother International Innov-is 2800D | Users Manual - English - Page 119
or CD while the contents of the USB media, floppy disk or CD are displayed. → Stitch pattern data in "Removable Disk" is written to the machine. Note • While data is being written, do not disconnect the USB cable. • Do not create folders within "Removable Disk". Since folders are not displayed - Brother International Innov-is 2800D | Users Manual - English - Page 120
" icon in the taskbar of Windows® XP. Then, when the removable disk has been removed safely, disconnect the USB cable from the computer and the machine. With Windows 98SE, check that the Access lamp is not flashing before disconnecting the USB cable from the computer and the - Brother International Innov-is 2800D | Users Manual - English - Page 121
Frame Patterns 126 Embroidery Cards 127 ■ About Embroidery Cards (Sold Separately 127 Selecting Patterns from the Machine's Memory/ Restarting from the Beginning 147 Automatically Resuming Embroidery When the Power Goes Off 147 Manually Resuming Embroidery After Turning Off the Power 148 - Brother International Innov-is 2800D | Users Manual - English - Page 122
the fabric, and then hoop it in the embroidery frame. Turn on the machine, and then select the embroidery pattern. Attach the embroidery frame to the embroidery unit. Check and adjust the size and position of the embroidery pattern. Set up embroidery thread according to the pattern (upper threading - Brother International Innov-is 2800D | Users Manual - English - Page 123
always press in the operation panel. You may accidentally press the "Start/Stop" button and possibly cause injury. • Be sure to use embroidery foot "U" when doing embroidery. Using another presser foot may cause the needle to strike the presser foot, causing the needle to bend or break and possibly - Brother International Innov-is 2800D | Users Manual - English - Page 124
unit could fall off and cause injury. • Keep your hands and foreign objects away from the embroidery carriage and frame when the machine is embroidering. Otherwise, injury may result. • If the embroidery unit could not be initialized correctly, a buzzer will sound. If this happens, go through the - Brother International Innov-is 2800D | Users Manual - English - Page 125
not initialized correctly, the initial screen may not appear. This is not a sign of a malfunction. If this occurs, turn the machine off, then on again. Embroidery f The following message will disappear after 15 seconds or press to move to the next step. a Note • The confirmation message to - Brother International Innov-is 2800D | Users Manual - English - Page 126
is an infringement of copyright law and is strictly prohibited. ■ Pattern Selection Screens There are many character and decorative embroidery patterns programmed in the machine. When the carriage moves to its initial position, a screen appears so that you can select a pattern. If a different screen - Brother International Innov-is 2800D | Users Manual - English - Page 127
One-point Patterns/Floral Patterns a Select a type of embroidery pattern. SELECTING EMBROIDERY PATTERNS d Continue with "VIEWING THE SEWING SCREEN" on page 128. * To select a different embroidery pattern, press . (After a confirmation message to delete the selected pattern appears, the pattern - Brother International Innov-is 2800D | Users Manual - English - Page 128
characters once they have been combined. d Press * Press pattern. . to view an image of the embroidery a Press . b In the top part of the screen, select a frame shape. In the bottom part of the screen, select a frame pattern. a b a Frame shapes b Frame patterns → The sewing screen appears - Brother International Innov-is 2800D | Users Manual - English - Page 129
by the arrow on the card, do not insert the card with extreme force, and do not insert any object other than embroidery cards into the slot, otherwise the machine may be damaged. a With the side of the embroidery card marked with an arrow facing toward you, fully insert the card into the - Brother International Innov-is 2800D | Users Manual - English - Page 130
the correct frame q (see page 130). h Shows the order in which the colors are sewn. Embroider in order, starting from the top. i Shows the part of the embroidery that will be sewn. Function Press this key to save the pattern. Page 155 −158 k Image key Press this key to display a preview of - Brother International Innov-is 2800D | Users Manual - English - Page 131
surface of the towel. This will help to reduce the nap of the toweling and result in more attractive embroidery. Memo With this machine, the height of embroidery foot "U" is automatically set according to the thickness of the fabric being embroidered. When embroidering thicker fabric, for example - Brother International Innov-is 2800D | Users Manual - English - Page 132
PREPARING THE FABRIC Hooping Fabric in the Embroidery Frame ■ Types of Embroidery Frames Extra Large Large Medium Small (Sold Separately) Embroidering area: 26 cm × 16 cm (approx. 10 - 1/4 inches × 6 - 1/4 inches) Embroidering area: Embroidering area: 18 cm × 13 - Brother International Innov-is 2800D | Users Manual - English - Page 133
frame so that the fabric is not loose. In addition, be sure to work on a level surface when hooping the fabric in the embroidery frame. a Lift up and loosen the frame adjustment screw, and then remove the inner frame. PREPARING THE FABRIC d Gently stretch the fabric, and then securely - Brother International Innov-is 2800D | Users Manual - English - Page 134
, attach the fabric to the stabilizer with basting stitches. a a Inner frame b Guide lines c Stretch the fabric within the inner and outer frames so that there are no Small Fabrics and Fabric Edges Use embroidery stabilizer to provide extra support. After embroidering, carefully remove the - Brother International Innov-is 2800D | Users Manual - English - Page 135
frame is attached, press the "Presser Foot Lifter" button again to 5 c Align the embroidery frame guide with the right edge of the embroidery frame holder. lower the presser foot. a ■ Removing the Embroidery Frame Embroidery a Press the "Presser Foot Lifter" button to raise the presser foot - Brother International Innov-is 2800D | Users Manual - English - Page 136
and use only the indicated frames. If a frame other those indicated is used, the presser foot may strike the embroidery frame, possibly causing injuries. Changing the Embroidery Frame Display a b a Press . b Press or in the "EMBROIDERY FRAME DISPLAY" on P. 2 of the screen to select how the - Brother International Innov-is 2800D | Users Manual - English - Page 137
. b Press to move the pattern. b Press . * Press to move the pattern in the direction of the arrow on the key. * Press to center the pattern. 5 Embroidery a a Distance from the center c Press . → The sewing screen appears. 135 - Brother International Innov-is 2800D | Users Manual - English - Page 138
screen appears. Changing the Pattern Size a Press . a b Press . a Degree of rotation Note • With large patterns that extend out of the extra-large embroidery frame when rotated 90 degrees, each press of or rotates the pattern 180 degrees. • With large patterns that extend out of the - Brother International Innov-is 2800D | Users Manual - English - Page 139
be enlarged to a greater degree if they are rotated 90 degrees. • Some licence/copyright patterns cannot be enlarged 5 or reduced. Embroidery d Press . e Press . → The sewing screen appears. → The key appears as . c Press . → The sewing screen appears. Memo A horizontal mirror image - Brother International Innov-is 2800D | Users Manual - English - Page 140
. Changing the Color of Single Characters Combined alphabet patterns can be sewn with each letter in a different color. If "MULTI COLOR" is set, the machine stops after each character is sewn so that the thread can be changed to one of a different color. a Press . b Change the stitching density - Brother International Innov-is 2800D | Users Manual - English - Page 141
selected position. Memo To view the entire embroidering area, press . 5 The frame moves to indicate the entire embroidering area. Embroidery CAUTION • Make sure the needle is up when the embroidery frame is moving. If the needle is down, it could break and result in injury. c Press . 139 - Brother International Innov-is 2800D | Users Manual - English - Page 142
PATTERN Previewing the Pattern a Press . b Press in the preview. to select the frame used * Embroidery frame icons that appear in light gray cannot be selected. * Press to enlarge the preview of the embroidery pattern. Memo • Press the "Start/Stop" button to sew the pattern as it appears - Brother International Innov-is 2800D | Users Manual - English - Page 143
may not sew out correctly. Bobbin case Standard bobbin case (green marking on the screw) is in the machine for sewing and embroidery. The bobbin case originally installed in the machine has a green marking on the screw. Do not adjust green marked screw. Alternate bobbin case (no color on - Brother International Innov-is 2800D | Users Manual - English - Page 144
color in the embroidery color order moves to the top. a Embroidery color order a Thread the machine with thread for the first color, pass the thread through the hole in embroidery foot "U", pull out is finished, trim the excess thread jumps (thread linking parts of the pattern, etc.). 142 - Brother International Innov-is 2800D | Users Manual - English - Page 145
the appliqué piece. • The following design is not preprogrammed in the machine and is used for illustration purposes only. a Attach iron-on stabilizer c After sewing is finished, remove the appliqué fabric from the embroidery frame, and then carefully cut along the stitching. Note Carefully cut - Brother International Innov-is 2800D | Users Manual - English - Page 146
web to stabilize the fabric and to attach it to the base fabric. Do not remove the base fabric from the embroidery frame when ironing on the appliqué piece. g After the appliqué piece is attached, press the "Start/Stop" the glue. • For best results, trim all excess threads between pattern parts. - Brother International Innov-is 2800D | Users Manual - English - Page 147
If very little sewing remains, you can sew 10 final stitches without rethreading the machine by pressing . The machine will stop after sewing the 10 stitches. c Raise the frame-securing lever, and then remove the embroidery frame. * Be careful not apply strong force to the fabric at this time - Brother International Innov-is 2800D | Users Manual - English - Page 148
ADJUSTMENTS DURING THE EMBROIDERY PROCESS If the Thread Breaks During Sewing e Press . a Press the "Start/Stop" button to stop the machine. b If the upper thread broke, rethread the machine. If the bobbin thread broke, follow the instructions in steps a through f from the previous section - Brother International Innov-is 2800D | Users Manual - English - Page 149
out in the middle of embroidery, the machine returns to the point where embroidery was stopped when the machine is turned on again. Note Do not remove the embroidery unit or the memory will no longer remember your design. a Turn the main power to ON. b Follow the instructions shown on the screen - Brother International Innov-is 2800D | Users Manual - English - Page 150
ADJUSTMENTS DURING THE EMBROIDERY PROCESS d Press . Manually Resuming Embroidery After Turning Off the Power Example: lower the framesecuring lever appears. e Reattach the embroidery frame. → The previous sewing screen displayed before the machine was turned off appears. f Press the "Presser - Brother International Innov-is 2800D | Users Manual - English - Page 151
may stop during sewing. This is not a sign of a malfunction. Slightly increase the thread tension to begin sewing again. 5 Embroidery Memo • If the machine is turned off or a different pattern is selected, the thread tension setting returns to its default. • When a saved pattern is retrieved - Brother International Innov-is 2800D | Users Manual - English - Page 152
ADJUSTMENTS DURING THE EMBROIDERY PROCESS ■ If the Upper Thread Is Too Tight The c Press . Automatic Thread Cutting (End Color Trim) If the automatic thread cutting setting is selected, the machine will automatically cut the thread at the end of each color step sewn. To cancel the setting, press - Brother International Innov-is 2800D | Users Manual - English - Page 153
is turned off remains selected the next time that the machine is turned on. • Decrease the sewing speed to 600 spm when using a specialty thread like a metallic thread. THREAD NUMBER EMBROIDERY/POLYESTER THREAD# COUNTRY/COTTON THREAD# c Press . MADEIRA POLY THREAD# MADEIRA RAYON THREAD# SULKY - Brother International Innov-is 2800D | Users Manual - English - Page 154
PROCESS Example: Displaying the thread number of "EMBROIDERY" d Press . a Press . b Press or beside on P. 2 of the screen to select the "#123". → The thread color display is changed. → "EMBROIDERY" appears at the bottom. c Press to select the thread brand. Memo Colors on the - Brother International Innov-is 2800D | Users Manual - English - Page 155
Data that can be Used • Only .pes,.phc, and .dst embroidery data files can be used with this machine. Using data other than that saved using our data design systems or sewing machines may cause the embroidery machine to malfunction. ■ Types of USB Devices/Media that can be Used Stitch data - Brother International Innov-is 2800D | Users Manual - English - Page 156
.brother.com).) ■ Precautions on Using the Computer to Create and Save Data • If the name of the embroidery data Machines Corporation. • Microsoft and Windows are registered trademarks or trademarks of Microsoft Corporation. Each company whose software title is mentioned in this manual has a Software - Brother International Innov-is 2800D | Users Manual - English - Page 157
the Machine's Memory You can save embroidery patterns that you have customized and will use often, for example, your name or other pattern combinations, patterns that have been rotated or resized, or patterns that have had their embroidering position changed. Note Do not turn off the machine while - Brother International Innov-is 2800D | Users Manual - English - Page 158
by the pattern to be deleted b Total amount of machine memory available for saving patterns c Pattern keys holding saved embroidery patterns d Press . * If you decide not to delete the pattern, press . When sending embroidery patterns from the machine to USB media, plug the USB media into the - Brother International Innov-is 2800D | Users Manual - English - Page 159
to the original screen without Saving Embroidery Patterns to the Computer Using the included USB cable, connect the sewing machine to your computer so that embroidery patterns can be retrieved from and the computer (or USB hub), refer to the instruction manual for the corresponding equipment. 157 - Brother International Innov-is 2800D | Users Manual - English - Page 160
USING THE MEMORY FUNCTION b With the pattern that you want to save displayed in the sewing screen, press . Retrieving Embroidery Patterns from the Machine's Memory a Press . c Press . * Press to return to the previous screen without saving the pattern. → The pocket selection screen - Brother International Innov-is 2800D | Users Manual - English - Page 161
of folders following a path to it. a Insert the USB media into the USB port connector on the machine (see page 156). 5 b Press . Embroidery Memo Some USB media may not be usable with this machine. Please visit our web site for more details. → The sewing screen is displayed. Note Do not - Brother International Innov-is 2800D | Users Manual - English - Page 162
not write data to or delete data from "Removable Disk". e a PHC data b PES data c Large-size embroidery pattern data d DST data e Total amount of "Removable Disk" memory available for saving patterns Memo • For details on large-size embroidery patterns, refer to PE-DESIGN Instruction Manual. 160 - Brother International Innov-is 2800D | Users Manual - English - Page 163
may be damaged. • The pattern retrieved from the computer is only temporarily written to the machine. It is erased from the machine when the machine is turned off. If you wish to keep the pattern, store it in the machine (see "Saving Embroidery Patterns in the Machine's Memory" on page 155). 5 161 - Brother International Innov-is 2800D | Users Manual - English - Page 164
EMBROIDERY APPLICATIONS EMBROIDERY APPLICATIONS Using a Frame Pattern to Make an Appliqué (1) You can use frame patterns of the same size and shape to create an appliqué. Embroider one - Brother International Innov-is 2800D | Users Manual - English - Page 165
frame pattern, and then embroider the pattern onto the base fabric. d Remove the embroidery frame from the machine, and then cut around the outside of the stitching. Note Leave the fabric in the embroidery frame when cutting off the excess appliqué fabric. In addition, do not apply extreme - Brother International Innov-is 2800D | Users Manual - English - Page 166
EMBROIDERY APPLICATIONS 164 - Brother International Innov-is 2800D | Users Manual - English - Page 167
6 Chapter Embroidery Edit AVAILABLE EDITING FUNCTIONS 166 ■ Combined Patterns ...166 ■ Move Patterns ...166 ■ Rotate Patterns ...166 ■ Enlarge or Reduce Patterns 166 ■ Create Mirror Images ...166 ■ Change Character - Brother International Innov-is 2800D | Users Manual - English - Page 168
combinations of one-point patterns, frame patterns, character patterns, and patterns from separately sold embroidery cards. ■ Move Patterns Within the 26 cm × 16 cm (approx. 10 - 1/4 inches × 6 - 1/4 inches) embroidery area, you can change the position of patterns, and check their position on the - Brother International Innov-is 2800D | Users Manual - English - Page 169
SELECTING PATTERNS TO EDIT Attach the embroidery unit, prepare the machine for embroidering according to the instructions on page 120, and then Guide". 6 Embroidery Edit Selecting One-point Patterns/Floral Patterns/Frame Patterns a Select the category of the pattern. b Select an embroidery - Brother International Innov-is 2800D | Users Manual - English - Page 170
SELECTING PATTERNS TO EDIT c Press . Alphabet Patterns With the Embroidery Edit functions, you can edit the appearance of a character at the same time that you enter it. a Press . → The selected pattern appears in the screen. d - Brother International Innov-is 2800D | Users Manual - English - Page 171
The layout of the characters appears in the upper-left corner of the screen. d Select the layout. → The embroidery edit screen appears. g Continue with "EDITING PATTERNS" on page 170. 6 Embroidery Edit → The displayed character layout changes. e Press screen. to return to the previous 169 - Brother International Innov-is 2800D | Users Manual - English - Page 172
the number of colors in the selected design. ■ Key Functions No. Key Name f Image key Function Press this key to display a preview of the embroidery pattern. Page 140 g Pattern selection key Press this key to select the pattern to be edited when multiple patterns have been 173 combined - Brother International Innov-is 2800D | Users Manual - English - Page 173
when rotated 10 degrees, each press of or rotates the pattern so that it fits entirely within the embroidery frame. • With large patterns that extend out of the extra-large embroidery frame when rotated at 1 degree increments, each press of or rotates the pattern so that it fits entirely - Brother International Innov-is 2800D | Users Manual - English - Page 174
EDITING PATTERNS c Press . a a Degree of rotation Changing the Size of the Pattern a Press . b Select the direction in which the size is changed. * Press to reduce the pattern proportionately. * Press * Press to enlarge the pattern proportionately. to reduce the pattern vertically. * - Brother International Innov-is 2800D | Users Manual - English - Page 175
arc. . * After selecting an arc layout, press to reduce the arc. Memo When selecting , and change to and . You can increase or decrease the incline. 6 Embroidery Edit c Press * Press d Press to adjust the position. to center the pattern. . 173 - Brother International Innov-is 2800D | Users Manual - English - Page 176
EDITING PATTERNS Changing the Character Spacing a Press . Changing the Color of Each Character in a Pattern Press so that it appears as . The machine will stop after each character is embroidered so the thread can be changed. b Press * Press * Press * Press spacing. or . to widen the - Brother International Innov-is 2800D | Users Manual - English - Page 177
to change at the top of the sewing order. a Color palette → The selected color appears at the top of the sewing order. f Press . 6 Embroidery Edit d Press color palette or . a a Color palette → A cursor appears on the color palette. a a Color palette/Custom thread table change key → The - Brother International Innov-is 2800D | Users Manual - English - Page 178
table. Note You can download the data or the 300 color custom thread table. Visit our web site of www.brother.com c Use to select one of the thread brands in the machine. d Use to enter a color's 4-digit number. * If you make a mistake, press to erase the entered number, and then enter - Brother International Innov-is 2800D | Users Manual - English - Page 179
thread color palette screen displays. b Press or to put the color you want to change at the top of the sewing order. 6 b a Embroidery Edit a Thread list b Thread brand d Press . e Repeat the previous steps until all desired thread colors are specified. * To delete a specified color from - Brother International Innov-is 2800D | Users Manual - English - Page 180
by directly touching the color palette with the touch pen. b Press pattern. * Press screen. to embroider the edited to return to the embroidery edit b a a Custom thread b Custom thread table → The display shows the changed colors. e Press . Memo For details on combining patterns, see page 179 - Brother International Innov-is 2800D | Users Manual - English - Page 181
COMBINING PATTERNS COMBINING PATTERNS This section will describe how to combine characters and embroidery patterns. Editing Combined Patterns c Press . a Press . d Press . b Press on P. 1 of the screen. 6 Embroidery Edit 179 - Brother International Innov-is 2800D | Users Manual - English - Page 182
COMBINING PATTERNS e Press . f Press . g Enter "WELCOME". * For details on selecting characters, see page 125. * After entering "W", press to change the size to M, then enter the remaining characters. * Press characters. to view an image of all entered h Press . 180 - Brother International Innov-is 2800D | Users Manual - English - Page 183
i Press to change the layout of the characters. * For details, see page 173. k Press COMBINING PATTERNS . j Press l Press . to adjust the position of the characters. 6 Embroidery Edit 181 - Brother International Innov-is 2800D | Users Manual - English - Page 184
patterns are saved and retrieved in chapter 5, you can save edited embroidery patterns to the machine's memory and retrieve them later. In addition, these edited embroidery patterns can be saved to a computer, and embroidery patterns created and edited using other data design systems can be - Brother International Innov-is 2800D | Users Manual - English - Page 185
MY CUSTOM STITCH DESIGNING A STITCH 184 ■ Examples of Custom Stitches 185 ENTERING STITCH DATA 186 ■ Key Functions ...186 ■ Moving a Point ...188 ■ Moving Part or All of the Design 189 ■ Inserting New Points ...190 USING STORED CUSTOM STITCHES 191 Storing Custom Stitches in Your List 191 ■ If - Brother International Innov-is 2800D | Users Manual - English - Page 186
more easily with MY CUSTOM STITCH™ if you first draw the stitch on the included grid sheet. a Draw the stitch design on the grid sheet (part code SA507, X81277-050). b Decide the spacing of the stitch. * By adjusting the spacing of a stitch, you can create various patterns with one stitch. Memo - Brother International Innov-is 2800D | Users Manual - English - Page 187
DESIGNING A STITCH ■ Examples of Custom Stitches Stitch 1 0 2 3 4 5 6 7 8 9 10 11 12 13 14 15 12 18 22 23 21 17 14 12 9 6 3 1 3 6 0 0 3 6 10 13 14 13 11 13 14 13 10 6 3 Stitch 16 17 18 19 20 21 22 23 24 25 26 27 28 29 30 12 41 43 40 41 38 35 32 30 32 35 41 45 47 44 0 0 4 7 11 13 14 13 10 6 3 0 - Brother International Innov-is 2800D | Users Manual - English - Page 188
ENTERING STITCH DATA ENTERING STITCH DATA ■ Key Functions b c a e g d f i h l k j m o n a This area displays the stitch being created. b Displays the number of the present set point over the total number of points in the stitch. c Displays the y-coordinate of over the x-coordinate - Brother International Innov-is 2800D | Users Manual - English - Page 189
a Press . b Press . d Press ENTERING STITCH DATA to add the point indicated by . c Use to move to the coordinates of the first point on the grid sheet. * Press to change the direction of the grid sheet. * You can also move by using the touch pen. a b e Select whether one stitch or - Brother International Innov-is 2800D | Users Manual - English - Page 190
ENTERING STITCH DATA h Press . ■ Moving a Point a Press or to move that you want to move. to the point * To move to the first point, press . * To move to the last point, press . * You can also move by using the touch pen. Memo • If you have entered points that are too close together, - Brother International Innov-is 2800D | Users Manual - English - Page 191
■ Moving Part or All of the Design a Press or to move to the first point of the section that you want to move. * To move to the - Brother International Innov-is 2800D | Users Manual - English - Page 192
ENTERING STITCH DATA ■ Inserting New Points a Press or to move to a place on the design where you want to add a new point. * To move to the first point, press . * To move to the last point, press . * You can also move by using the touch pen. c Use to move the point. b Press . → A - Brother International Innov-is 2800D | Users Manual - English - Page 193
. The "Saving" screen appears and the stitch will be stored in the machine's memory. Before storing a custom stitch, press to sew a test-run of after is pressed, the stitch pattern cannot be stored because either the machine's memory is full or the stitch pattern being stored is larger than - Brother International Innov-is 2800D | Users Manual - English - Page 194
to the previous screen without retrieving the custom stitch. Saving the Retrieved Custom Stitches to USB Media/Computer A custom stitch stored in the machine's memory can be saved to USB media or the computer. a Follow steps a through c from "Retrieving Stored Custom Stitches" on page 191 - Brother International Innov-is 2800D | Users Manual - English - Page 195
194 ADJUSTING THE SCREEN 196 Screen Visibility Is Low 196 Touch Panel Is Malfunctioning 196 TROUBLESHOOTING 198 ERROR MESSAGES 201 ■ Alarm ...206 SPECIFICATIONS 207 UPGRADING YOUR MACHINE'S SOFTWARE 208 Upgrade Procedure Using USB Media 208 Upgrade Procedure Using Computer 209 ADJUSTING THE - Brother International Innov-is 2800D | Users Manual - English - Page 196
Position" button to raise the needle. b Lower the presser foot. c Turn off the machine. d Remove the needle (see page 35) and the presser foot holder (see page 68). e Remove the flat bed attachment or the embroidery unit if either is attached. f Grasp both sides of the needle plate cover - Brother International Innov-is 2800D | Users Manual - English - Page 197
tangled, the needle may break, or sewing performance may suffer. • For a new bobbin case (part code: XC3153251(green marking on the screw) (for sewing and embroidering with bobbin thread recommended by Brother) or XC8167-451 (no color on the screw) (for embroidering with bobbin threads from other - Brother International Innov-is 2800D | Users Manual - English - Page 198
performs a different operation), follow the procedure described below to make the proper adjustments. a Turn off the machine, hold your finger anywhere on the screen, and then turn the machine on. → The BRIGHTNESS OF LCD screen appears. Memo Continue touching the LCD until the screen shown below - Brother International Innov-is 2800D | Users Manual - English - Page 199
strong force to the display, otherwise damage to the display may result. ADJUSTING THE SCREEN d After making the necessary touch panel adjustment, turn the machine off, then on again. Note If you finish the touch panel adjustment and the screen still does not respond, or if you cannot complete - Brother International Innov-is 2800D | Users Manual - English - Page 200
, check the following solutions. If the solutions suggested do not correct the problem, contact your authorized dealer. Memo This machine is equipped with a simple troubleshooting feature that can be used in case minor problems occur during sewing. Press , and then press to display a list of - Brother International Innov-is 2800D | Users Manual - English - Page 201
TROUBLESHOOTING Problem Cause Solution Page High-pitched sound while Dust or lint is caught in the proper stabilizer. There was an object placed near the machine, If the frame bumps something during sewing, the − and the carriage or embroidery frame hit the pattern will turn out poorly. Do - Brother International Innov-is 2800D | Users Manual - English - Page 202
TROUBLESHOOTING Problem "Start/ Stop" button to operate the machine. Select a pattern. Turn the main power to on. Reattach the embroidery unit correctly. Perform the initialization process correctly machine. If you restart the machine, follow the instructions for operating the machine correctly. 200 - Brother International Innov-is 2800D | Users Manual - English - Page 203
is correctly set up or if an incorrect operation is performed, the machine stops and informs you of the error with an alarm and an error message. If an error message appears, correct the problem according to the instructions in the message. (The message that is displayed can be cancelled either - Brother International Innov-is 2800D | Users Manual - English - Page 204
message is displayed when using USB cable to download information from PC to machine. This message is displayed when the patterns you are editing take up "Start/Stop" button is pressed while a pattern is being edited in embroidery edit mode. This message is displayed when you try to use the needle - Brother International Innov-is 2800D | Users Manual - English - Page 205
"Reverse/ Reinforcement Stitch" button is pressed while the buttonhole lever is lowered. This message is displayed when the embroidery unit tries to initialize in embroidery mode while an embroidery frame is attached. This message is displayed when a previously saved pattern is being retrieved in - Brother International Innov-is 2800D | Users Manual - English - Page 206
. This message is displayed when the foot controller is pressed while the embroidery unit is attached. 204 This message is displayed when the machine is turned on while the needle is lowered and the embroidery unit is attached. This message is displayed when the combined character pattern - Brother International Innov-is 2800D | Users Manual - English - Page 207
. ERROR MESSAGES This message is displayed when the "Reverse/Reinforcement Stitch" button is pressed while the embroidery unit is attached. This message is displayed when the machine is in embroidery edit mode, and you try to use an editing function when the pattern is not completely within - Brother International Innov-is 2800D | Users Manual - English - Page 208
Edit mode. This message is displayed when the needle plate is removed with the machine on or when the singlehole needle plate is installed when the machine is turned on in the embroidery or embroidery edit mode. This message is displayed when an error occurs with the USB media. This message - Brother International Innov-is 2800D | Users Manual - English - Page 209
Case dimensions Weight Sewing speed Needle Dimensions Dimension of machine with embroidery unit attached Weight Specification 51.1 cm (W) × 30 lb.) (with case: 13.5 kg (29.8 lb.)) 70 to 1000 stitches per minute Home sewing machine needles (HA × 130) 45.8 cm (W) × 13.1 cm (H) × 42.3 cm (D) (approx - Brother International Innov-is 2800D | Users Manual - English - Page 210
upgrades (file extension .up1) for your sewing machine. • Memo • When the machine's software is upgraded, saved combinations of character and decorative stitches are erased. However, saved embroidery patterns are not erased. • While the software is being upgraded, the buzzer will not sound when - Brother International Innov-is 2800D | Users Manual - English - Page 211
Upgrade Procedure Using Computer UPGRADING YOUR MACHINE'S SOFTWARE e Press . a While holding the "Presser Foot Lifter" button pressed, turn on the machine. → The following screen appears. b Press . → The message "Saving the upgrade file. Do not turn main power to OFF." will appear. f When - Brother International Innov-is 2800D | Users Manual - English - Page 212
function mode, the alternate bobbin case (with no color on the screw) should be selected when substitute embroidery bobbin threads (other than what is accompanied with your machine) are being used. The alternate bobbin case (with no color on the screw) can be easily adjusted when bobbin tension - Brother International Innov-is 2800D | Users Manual - English - Page 213
stitch (Middle) Straight stitch (Middle) Triple stretch stitch Stretch stitch Presser Foot Applications Stitch Width [mm (inch)] Auto. Manual General sewing, gather, pintuck, etc. Reverse stitch is sewn while 0.0 pressing "Reverse/ (0) Reinforcement Stitch" button. General sewing, gather - Brother International Innov-is 2800D | Users Manual - English - Page 214
Overcasting stitch Presser Foot Applications Reinforcing of heavyweight fabric Stitch Width [mm (inch)] Auto. Manual Stitch Length [mm (inch)] Auto. Manual 5.0 2.5 - 5.0 2.5 1.0 - 4.0 (3/16) (3/32 - 3/16) (3/32) (1/16 - 3/16) Overcasting stitch Overcasting stitch Reinforcing of medium - Brother International Innov-is 2800D | Users Manual - English - Page 215
Name Blind hem stitch Presser Foot Applications Hemming woven fabrics Stitch Width [mm (inch)] Auto. Manual Stitch Length [mm (inch)] Auto. Manual 00 3← − →3 2.0 1.0 - 3.5 (1/16) (1/16 - 1/8) Blind hem stitch stretch Hemming stretch fabric 00 3← − →3 2.0 1.0 - 3.5 (1/16) (1/16 - Brother International Innov-is 2800D | Users Manual - English - Page 216
Decorative hems, triple straight at left Stitch Width [mm (inch)] Auto. Manual 1.0 1.0 - 7.0 (1/16) (1/16 - 1/4) Stitch Length [mm (inch)] Auto. Manual 2.5 1.5 - 4.0 (3/32) (1/16 - 3/16) Hemstitching Decorative hems, triple straight at center 3.5 (1/8) 1.0 - 7.0 2.5 1.5 - 4.0 (1/16 - Brother International Innov-is 2800D | Users Manual - English - Page 217
Decorative hems, smocking Decorative hems, smocking Stitch Width [mm (inch)] Auto. Manual 6.0 (15/ 64) 1.5 - 7.0 (1/16 - 1/4) Stitch Length [mm (inch)] Auto. Manual 1.6 1.0 - 4.0 (1/16) (1/16 - 3/16) 5.0 1.5 - 7.0 1.6 1.0 - 4.0 (3/16) (1/16 - 1/4) (1/16) (1/16 - 3/16) Narrow rounded - Brother International Innov-is 2800D | Users Manual - English - Page 218
right up (Straight) Sideways to left (Straight) Presser Foot Applications Stitch Width [mm (inch)] Auto. Manual Stitch Length [mm (inch)] Auto. Manual For making eyelets, holes on belts, etc. 7.0 7.0 6.0 5.0 7.0 (1/4) (1/4 15/64 3/16) (1/4) 7.0 6.0 5.0 (1/4 15/64 3/ 16) For attaching - Brother International Innov-is 2800D | Users Manual - English - Page 219
27 winding 24 bobbin winder 9 bobbin winding pretension disk and guide 9, 25, 27 button sewing 86 buttonhole lever 10, 81, 97 stitch selection screens 94 cleaning 194 combining character/decorative stitches 104 embroidery edit 179 crazy quilts 62 D daisy stitch 77 darning 83 darts 58 - Brother International Innov-is 2800D | Users Manual - English - Page 220
needle combinations 37 replacing 35 settings 17 twin needle 32 needle bar thread guide 10 30, 32 needle clamp screw 10 , needle mode selection key , character/decorative stitches 112 192 , computer 114 157 embroidery patterns 155 , machine's memory 112 155 , USB media 113 156 utility - Brother International Innov-is 2800D | Users Manual - English - Page 221
/thread/needle combinations 37 thread color display 151 , thread cutter 9 31 thread cutter button 11, 41, 47 thread density key 102 thread guide 9 25, 27, 32 thread guide plate 9 26, 30, 33 , thread settings key 138 150 , thread take-up lever check window 9 30 , thread tension 45 149 top - Brother International Innov-is 2800D | Users Manual - English - Page 222
- Brother International Innov-is 2800D | Users Manual - English - Page 223
- Brother International Innov-is 2800D | Users Manual - English - Page 224
English 882-U80 XD0954-1511 Printed in Taiwan
-
 1
1 -
 2
2 -
 3
3 -
 4
4 -
 5
5 -
 6
6 -
 7
7 -
8
-
9
-
10
-
11
-
12
-
13
-
14
-
15
-
16
-
17
-
18
-
19
-
20
-
21
-
22
-
23
-
24
-
25
-
26
-
27
-
28
-
29
-
30
-
31
-
32
-
33
-
34
-
35
-
36
-
37
-
38
-
39
-
40
-
41
-
42
-
43
-
44
-
45
-
46
-
47
-
48
-
49
-
50
-
51
-
52
-
53
-
54
-
55
-
56
-
57
-
58
-
59
-
60
-
61
-
62
-
63
-
64
-
65
-
66
-
67
-
68
-
69
-
70
-
71
-
72
-
73
-
74
-
75
-
76
-
77
-
78
-
79
-
80
-
81
-
82
-
83
-
84
-
85
-
86
-
87
-
88
-
89
-
90
-
91
-
92
-
93
-
94
-
95
-
96
-
97
-
98
-
99
-
100
-
101
-
102
-
103
-
104
-
105
-
106
-
107
-
108
-
109
-
110
-
111
-
112
-
113
-
114
-
115
-
116
-
117
-
118
-
119
-
120
-
121
-
122
-
123
-
124
-
125
-
126
-
127
-
128
-
129
-
130
-
131
-
132
-
133
-
134
-
135
-
136
-
137
-
138
-
139
-
140
-
141
-
142
-
143
-
144
-
145
-
146
-
147
-
148
-
149
-
150
-
151
-
152
-
153
-
154
-
155
-
156
-
157
-
158
-
159
-
160
-
161
-
162
-
163
-
164
-
165
-
166
-
167
-
168
-
169
-
170
-
171
-
172
-
173
-
174
-
175
-
176
-
177
-
178
-
179
-
180
-
181
-
182
-
183
-
184
-
185
-
186
-
187
-
188
-
189
-
190
-
191
-
192
-
193
-
194
-
195
-
196
-
197
-
198
-
199
-
200
-
201
-
202
-
203
-
204
-
205
-
206
-
207
-
208
-
209
-
210
-
211
-
212
-
213
-
214
-
215
-
216
-
217
-
218
-
219
-
220
-
221
-
222
-
223
-
224
 |
 |