Brother International Innov-is 6700D Operation Manual for Premium Pack III Opt - Page 11
to align the needle position with, the next pattern. When you are finished, press
 |
View all Brother International Innov-is 6700D manuals
Add to My Manuals
Save this manual to your list of manuals |
Page 11 highlights
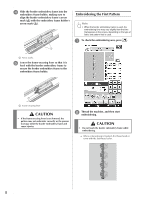
c Use to select the needle position that will align with the thread mark at the end of previous embroidery. For this example, align the needle position with the upper center of the next pattern. When you are finished, press . d Use to align the needle position with the point of the thread mark. a a Needle position Note • After turning the handwheel to check the needle position, press the "Needle Position" button to raise the needle. e After aligning the needle position for the beginning of embroidering, remove the thread mark. Note • Remove the thread mark before starting to embroider. Otherwise, the thread mark stitching may be combined with the pattern stitching and become difficult to remove. 10
-
 1
1 -
2
-
3
-
4
-
5
-
 6
6 -
 7
7 -
 8
8 -
 9
9 -
 10
10 -
 11
11 -
 12
12 -
 13
13 -
 14
14 -
 15
15 -
 16
16 -
17
-
18
-
19
-
20
-
21
-
22
-
23
-
24
-
25
-
26
-
27
-
28
-
29
-
30
-
31
-
32
-
33
-
34
-
35
-
36
-
37
 |
 |

10
c
Use
to select the needle position that
will align with the thread mark at the end of
previous embroidery. For this example, align
the needle position with the upper center of
the next pattern. When you are finished, press
.
d
Use
to align the needle position with
the point of the thread mark.
a
Needle position
e
After aligning the needle position for the
beginning of embroidering, remove the
thread mark.
Note
•
After turning the handwheel to check the needle
position, press the “Needle Position” button to raise
the needle.
Note
•
Remove the thread mark before starting to
embroider. Otherwise, the thread mark stitching may
be combined with the pattern stitching and become
difficult to remove.
a