Brother International IntelliFax-5750e Quick Setup Guide - English - Page 2
Setting Up the FAX and PC to Work Together - driver
 |
View all Brother International IntelliFax-5750e manuals
Add to My Manuals
Save this manual to your list of manuals |
Page 2 highlights
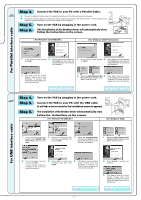
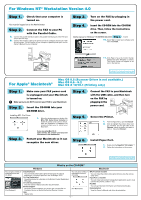
Setting Up the FAX and PC to Work Together Before You begin • You must set up the hardware and install the drivers before you can use your FAX as a printer and scanner with your applications. • Please see the README.WRI file in the root directory of the CD-ROM for last-minute important installation and troubleshooting information. • Please purchase the appropriate interface cable you intend to use. (Parallel, USB or Network) • If you have any problem with the installation, visit us at http://solutions.brother.com. Use only a shielded parallel interface cable that is IEEE 1284-compliant and/or a USB cable that is no longer than 6 feet long (1.8 meters). Follow the instructions in this guide for your operating system and interface. For Parallel and USB Users For Windows® 95/98/98SE/Me/2000 NOTE: If you are using Windows® XP, please see For Windows® XP Users Quick Setup Guide. Step 1. Unplug the FAX from the AC outlet. If you already connected an interface cable, disconnect your FAX from your computer. Step 2. Turn on your computer. For Windows® 2000 Professional, you must be logged on as the Administrator. Step 3. Insert the CD-ROM into the CD-ROM drive. If the model name appears on the screen, click on your model name. The CD-ROM main menu will appear. If the CD-ROM does NOT start automatically, open the executible program file on the CD-ROM from the root directory of your computer. 1. Click Install Software. 2. Click Multi-Function Link® Pro Suite 3. Click Install. in the Main Application. *1 4. The InstallShield Wizard Setup window will appear briefly, followed by the PaperPort® Setup window. Click Yes. 5. When the PaperPort® Setup window displays your Name and Company, either change or accept them, and then click Next. 9. When the Setup Type window appears, select Standard, and then click Next. The application files will be copied to your computer. 6. When the Choose Destination Location window displays the path where the PaperPort® files will be installed, either change or accept, and then click Next. 10. The Connect Cable window will appear. 7. When the Register Today screen 8. When the Brother MFL Pro Suite appears, click Next. This is registration Installation window appears, click for Paper Port®. Follow the instructions. Next to begin installing the Multi- For Parallel For USB Function Link® Pro Suite. *2 Please see NEXT PAGE 111111111111111111111111111222222222222222222222222222333333333333333333333333333444444444444444444444444444555555555555555555555555555666666666666666666666666666777777777777777777777777777888888888888888888888888888999999999999999999999999999000000000000000000000000000111111111111111111111111111222222222222222222222222222333333333333333333333333333444444444444444444444444444555555555555555555555555555666666666666666666666666666777777777777777777777777777888888888888888888888888888999999999999999999999999999000000000000000000000000000111111111111111111111111111222222222222222222222222222333333333333333333333333333444444444444444444444444444555555555555555555555555555666666666666666666666666666777777777777777777777777777888888888888888888888888888999999999999999999999999999000000000000000000000000000111111111111111111111111111222222222222222222222222222111111111111111111111111111222222222222222222222222222333333333333333333333333333444444444444444444444444444555555555555555555555555555666666666666666666666666666777777777777777777777777777888888888888888888888888888999999999999999999999999999000000000000000000000000000111111111111111111111111111222222222222222222222222222333333333333333333333333333444444444444444444444444444555555555555555555555555555666666666666666666666666666777777777777777777777777777888888888888888888888888888999999999999999999999999999000000000000000000000000000111111111111111111111111111222222222222222222222222222333333333333333333333333333444444444444444444444444444555555555555555555555555555661111111111111111111111111111111111111116666666666666666666666666772222222222222222222222222222222222222227777777777777777777777777883333333333333333333333333333333333333338888888888888888888888888994444444444444444444444444444444444444449999999999999999999999999005555555555555555555555555555555555555550000000000000000000000000116666666666666666666666666666666666666661111111111111111111111111227777777777777777777777777777777777777772222222222222222222222222888888888888888888888888888888888888888999999999999999999999999999999999999999000000000000000000000000000000000000000111111111111111111111111111111111111111222222222222222222222222222222222222222333333333333333333333333333333333333333444444444444444444444444444444444444444555555555555555555555555555555555555555666666666666666666666666666666666666666777777777777777777777777777777777777777888888888888888888888888888888888888888999999999999999999999999999999999999999000000000000000000000000000000000000000111111111111111111111111111111111111111 *1 Multi-Function Link® Pro Suite includes Printer Driver, Scanner Driver, ScanSoft™ PaperPort®, ScanSoft™Text Bridge®, PC-FAX software, Remote Setup and True Type fonts. PaperPort® is a document management application for viewing incoming faxes and scanned documents. ScanSoft™ TextBridge®, which is integrated into PaperPort®, is an OCR application that converts an image into text and inserts it into your default word processor. *2 If an error message appears during the installation process, or you have previously installed MFL Pro Suite, you will first have to uninstall it. From the Start menu, select Programs, Brother, Brother MFL Pro Suite, Uninstall, and then follow the instructions on the screen. - 2 -
-
 1
1 -
 2
2 -
 3
3 -
 4
4 -
 5
5 -
 6
6
 |
 |