Brother International LS-1217 Users Manual - English
Brother International LS-1217 Manual
 |
View all Brother International LS-1217 manuals
Add to My Manuals
Save this manual to your list of manuals |
Brother International LS-1217 manual content summary:
- Brother International LS-1217 | Users Manual - English - Page 1
Instruction Manual Manuel d'instructions Manual de instrucciones Manual de Instruções - Brother International LS-1217 | Users Manual - English - Page 2
the needle, changing the needle, threading the bobbin, or changing the presser foot. 15. Always unplug the sewing machine from the electrical outlet when removing covers, lubricating, or when making any other user service adjustments mentioned in this instruction manual. 16. This sewing machine is - Brother International LS-1217 | Users Manual - English - Page 3
instructions avant d'utiliser la machine." DANGER - Pour réduire le risque de décharge électrique: 1. Ne jamais laisser la machine sans surveillance lorsqu'elle est branchée. Toujours débrancher la machine . Retourner la machine à coudre auprès du revendeur autorisé ou du service technique le plus - Brother International LS-1217 | Users Manual - English - Page 4
especificados en este manual. 3. Nunca haga funcionar la máquina de coser si el cordón de alimentación ventilación de la máquina de coser y el pedal sin acumulacíon de polvo. Suciedad y restos de . 10. Mantener los dedos alejados de todas las partes movibles de la máquina. Tener un cuidado especial - Brother International LS-1217 | Users Manual - English - Page 5
ças. 2. Utilize esta máquina de costura somente para os fins a que se destina, conforme descrito neste manual. Use somente acessórios recomendados pelo fabricante, como especificado neste manual. 3. Nunca opere esta máquina de costura se o seu cabo ou plugue estiver danificado, o seu funcionamento - Brother International LS-1217 | Users Manual - English - Page 6
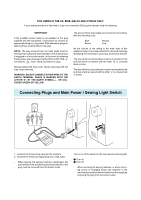
from the main leads must be destroyed as a plug with bared flexible cords is hazardous if engaged in a live socket outlet. In the event of power and sew-light. 1 Turn on 2 Turn off - When servicing the sewing machine, or when removing covers or changing lamps, the machine or the electrical set - Brother International LS-1217 | Users Manual - English - Page 7
KNOWING YOUR SEWING MACHINE PRINCIPAL PARTS 2 ACCESSORIES 3 OPERATING YOUR SEWING MACHINE 4 Connecting Plugs 4 Main Power and Sewing Light Switches 5 Foot Controller 5 Inserting the Needle 6 Checking the Needle 6 Changing the Presser Foot 7 Converting to Free-Arm Style 8 Steadying - Brother International LS-1217 | Users Manual - English - Page 8
de los enchufes 4 Interruptor principal y de luz 5 Pedal 5 Inserción de la aguja 6 Comprobación de la inferior (de la canilla 15 Enhebrado superior (de la aguja 17 Para sacar el hilo de la canilla 18 Costura con de rebatido (Overlock 49 Costura de cordón 50 Monogramas y bordados 52 - Brother International LS-1217 | Users Manual - English - Page 9
6 Changement de pied-de-biche 7 Couture bras libre 8 Stabiliser la machine 8 DIVERSES COMMANDES 9 Sélecteur de longueur de point 9 Levier de couture de point 11 Sélecteur de position de l'aiguille 12 ENFILAGE DE LA MACHINE 14 Remplissage de la canette 14 Mise en place du fil inférieur - Brother International LS-1217 | Users Manual - English - Page 10
SUA MÁQUINA DE COSTURA PRINCIPAIS PARTES DA SUA MÁQUINA 1 PARTES PRINCIPAIS 2 ACESSÓRIOS 3 OPERANDO da Bobina 15 Passagem da Linha Superior (da Agulha 17 Puxando para Cima a Linha da Bobina 18 Costura com ível 48 Ponto Chuleado 49 Costura de Cordão 50 Monogramas e Bordados 52 MANUTENÇÃO - Brother International LS-1217 | Users Manual - English - Page 11
CONTENTS KNOWING YOUR SEWING MACHINE STRAIGHT AND ZIGZAG STITCHING BUILT-IN STITCHES BUTTONHOLE AND BUTTON SEWING USING ATTACHMENTS AND APPLICATIONS MAINTENANCE INDEX N G L PRINCIPAIS PARTES DA SUA MÁQUINA F E C B IH J M K 5 7 6 MACHINE PIECES PRINCIPALES DE LA 12 ELEMENTOS - Brother International LS-1217 | Users Manual - English - Page 12
Table with Accessory Storage 5 Needle Thread Tension Control Dial 6 Stitch Length Knob 7 Reverse Sewing Lever 8 Thread Cutter 9 Presser Foot Screw 0 Presser Foot (Zigzag) A Needle Plate (Zigzag) B Shuttle Hook C Bobbin Case D Feed Dogs E Needle F Needle Clamp Screw G Thread Guide/Bobbin Winding - Brother International LS-1217 | Users Manual - English - Page 13
CONTENTS KNOWING YOUR SEWING MACHINE STRAIGHT AND ZIGZAG STITCHING BUILT-IN STITCHES ACCESSORIES 1 Zipper Foot (1 pc.) (See note.) 2 Bobbins (3 pcs.) 3 Needle Set (Regular #14) (3 pcs.) 4 Twin Needle (1 pc.) (See note.) 5 Extra Spool Pin (1 pc.) (See note.) 6 Darning Plate (1 pc.) - Brother International LS-1217 | Users Manual - English - Page 14
des prises 1. Insert the foot controller plug, located between the foot controller and the power supply plug on the cord, into the jack on the machine. 2. Insert the power supply plug into an electrical outlet. CAUTION: 1. When changing the light bulb or when the sewing machine is not in use, the - Brother International LS-1217 | Users Manual - English - Page 15
being used. 2. A new sewing machine or one that has not been in use for a long period of time should be oiled as described on page 45. After oiling, be sure to wipe off any excess oil. Note (For U.S.A. only): This foot controller can be used for sewing machine model LS1217. Lors d'une dépression - Brother International LS-1217 | Users Manual - English - Page 16
KNOWING YOUR SEWING MACHINE STRAIGHT AND ZIGZAG STITCHING BUILT-IN STITCHES Inserting the Needle Turn power switch to "O". 1. Remove the power supply plug from the electrical outlet. 2. Raise the needle bar to its highest position. 3. Lower the presser foot. 4. If a needle is already - Brother International LS-1217 | Users Manual - English - Page 17
foot according to your sewing needs. Il sera parfois nécessaire de changer le pied-de-biche selon les besoins. SNAP-ON TYPE Turn power switch to "O". MODELE A CLIQUET Mettre l'interrupteur principal sur "O". 1. Raise the needle Coloque la parte del prensatelas con ranura contra la parte llana de - Brother International LS-1217 | Users Manual - English - Page 18
Free-Arm Style Free-arm sewing is convenient for sewing tubular and hard-to-reach areas on garments. To change your machine to the free-arm style, lift up on the extension table and pull it out. (See fig. A.) 1 Lift the bottom de goma que se encuentra en la parte anterior derecha de la placa de base - Brother International LS-1217 | Users Manual - English - Page 19
CONTENTS KNOWING YOUR SEWING MACHINE STRAIGHT AND ZIGZAG STITCHING BUILT-IN STITCHES Satin Stitch may need to be adjusted according to the fabric and thread being used. To determine the correct knob position, first test the length settings on a fabric scrap. 1 Stitch length dial 2 Shorter 3 - Brother International LS-1217 | Users Manual - English - Page 20
SEWING MACHINE STRAIGHT AND ZIGZAG STITCHING BUILT-IN STITCHES Reverse Sewing Lever Levier de couture en marche arrière Reverse sewing is generally used for locking and reinforcing seams. To sew in reverse, hold down the reverse sewing lever while slowly sewing. To return to forward sewing - Brother International LS-1217 | Users Manual - English - Page 21
CONTENTS KNOWING YOUR SEWING MACHINE STRAIGHT AND ZIGZAG STITCHING BUILT-IN STITCHES point sera droit. NOTE: 1. Do not move the knob while the needle is in the fabric. 2. When using the twin needle, the knob should always be set below 3. REMARQUE : 1. Ne pas tourner le sélecteur lorsque l' - Brother International LS-1217 | Users Manual - English - Page 22
CONTENTS KNOWING YOUR SEWING MACHINE STRAIGHT AND ZIGZAG STITCHING BUILT-IN STITCHES Needle Position Selector By shifting this lever to L (left), M (middle) or R (right), you can sew straight and zigzag stitches on the baseline. When you sew close to the edge of the fabric, select L or R so - Brother International LS-1217 | Users Manual - English - Page 23
CONTENTS KNOWING YOUR SEWING MACHINE STRAIGHT AND ZIGZAG STITCHING BUILT-IN STITCHES BUTTONHOLE AND BUTTON SEWING USING ATTACHMENTS AND APPLICATIONS MAINTENANCE INDEX 13 - Brother International LS-1217 | Users Manual - English - Page 24
SEWING MACHINE STRAIGHT AND ZIGZAG STITCHING BUILT-IN STITCHES THREADING THE MACHINE Winding the Bobbin ENFILAGE DE LA MACHINE Remplissage de la canette 1. Place the spool of thread on the spool pin and pass the thread around the bobbin winding tension disc. 1 Bobbin el pedal para que - Brother International LS-1217 | Users Manual - English - Page 25
CONTENTS KNOWING YOUR SEWING MACHINE STRAIGHT AND ZIGZAG STITCHING BUILT-IN STITCHES Lower (bobbin) Threading Mise en place du fil inférieur (canette) Turn power switch to "O". Mettre l'interrupteur principal sur "O". 1. Raise the needle to its highest position by turning the balance - Brother International LS-1217 | Users Manual - English - Page 26
4 5 4 BUTTONHOLE AND BUTTON SEWING USING ATTACHMENTS AND APPLICATIONS 6 C D Upper (Needle) Threading 1 Spool pin 2 Thread guide 3 Thread Take Up Lever 4 Upper (needle) Tension 5 Thread Check Spring 6 Lower Thread Guide 1. Raise the presser foot using the presser foot lever and turn the balance - Brother International LS-1217 | Users Manual - English - Page 27
SEWING MACHINE STRAIGHT AND ZIGZAG STITCHING BUILT-IN STITCHES 1 2 4 2 1 3 A B 4 5 4 BUTTONHOLE AND BUTTON SEWING través de la ranura derecha situada en la parte anterior de la máquina. 4. Tire del se salten puntadas o se frunza el tejido. 17 Passagem da Linha Superior (da Agulha) 1 - Brother International LS-1217 | Users Manual - English - Page 28
SEWING MACHINE STRAIGHT AND ZIGZAG STITCHING BUILT-IN STITCHES Drawing Up The Bobbin Thread Remontée du fil inférieur 1. Raise the presser foot and the needle to their highest positions. 2. With your left hand, hold the end of the upper thread colóquelos hacia la parte posterior de la má - Brother International LS-1217 | Users Manual - English - Page 29
. B. 2 Right needle thread passes through this guide. 3 Left needle thread passes in front of this guide. NOTE: 1. Use the zigzag presser foot. 2. Use a setting of less than 3 on the stitch width knob. 3. Set the needle position selector to M. Couture avec l'aiguille jumelée Cette machine à coudre - Brother International LS-1217 | Users Manual - English - Page 30
CONTENTS KNOWING YOUR SEWING MACHINE STRAIGHT AND ZIGZAG STITCHING BUILT-IN STITCHES Costura con PARA INSTALAR EL PORTACARRETES EXTRA Coloque el portacarretes vertical extra en el orificio previsto en la parte superior derecha de la máquina. Coloque el segundo carrete de hilo en el eje tal - Brother International LS-1217 | Users Manual - English - Page 31
CONTENTS KNOWING YOUR SEWING MACHINE STRAIGHT AND ZIGZAG STITCHING BUILT-IN STITCHES 32 Thread Tension Tension du fil Thread tension will affect the quality of your stitches. It may need to be adjusted when you change fabric or thread type. La tension du fil aura un effet sur la qualité - Brother International LS-1217 | Users Manual - English - Page 32
KNOWING YOUR SEWING MACHINE STRAIGHT AND ZIGZAG STITCHING BUILT-IN STITCHES NOTE: The bobbin thread tension has already been adjusted at the factory for general use. For most sewing applications, no adjustment is needed. When sewing with thin thread on thin fabrics, the thread tension may - Brother International LS-1217 | Users Manual - English - Page 33
needle and thread size from the above chart. 2. Use the same size thread for the upper (spool) and lower (bobbin) threads. BUTTONHOLE AND BUTTON SEWING fin, tissus de confection, lin, mousseline #90/14 (Livrées avec la machine.) Coton : 50~60 Soie : "A" Synthétique/ Polyester longues fibres Mercé - Brother International LS-1217 | Users Manual - English - Page 34
CONTENTS KNOWING YOUR SEWING MACHINE STRAIGHT AND ZIGZAG STITCHING BUILT-IN STITCHES TABLA DE ño de hilo para los hilos superior (carrete) e inferior (canilla). BUTTONHOLE AND BUTTON SEWING USING ATTACHMENTS AND APPLICATIONS QUADRO DE COMBINAÇÕES DE TECIDOS DE COSTURA, AGULHAS E LINHAS - Brother International LS-1217 | Users Manual - English - Page 35
FOOT NEEDLE F-4 0 M, L, R (For twin needle sewing, always set at M.) Zigzag Single Starting Sewing 1. Raise the needle to its highest position and lift the presser foot lever. 2. Pull up the bobbin thread by turning the balance wheel toward you (counterclockwise) and place both the upper and lower - Brother International LS-1217 | Users Manual - English - Page 36
new direction using the needle as a pivot point. 3. Lower the presser foot and start sewing in the new direction. NOTE: For twin needle sewing, raise the needle when changing the sewing direction. Finishing Sewing (fig. B) Reverse stitching is used to lock the threads ligeramente el pedal para coser - Brother International LS-1217 | Users Manual - English - Page 37
needle and bobbin threads toward the back of the machine, start sewing at a slow speed. Les tissus légers Tout en tirant les fils de l'aiguille et de la canette vers l'arrière de la machine, commencer à coudre lentement. For sewing thick fabric: The fabric does not feed bajo la parte posterior del - Brother International LS-1217 | Users Manual - English - Page 38
IN STITCHES For sewing denim Le denim When sewing more than two layers of denim, help feed the fabric by carefully guiding it over the feed dogs with your hands. (Feeding will be easier if the fabric is slightly stretched, or if the sewing machine is stopped, the presser foot lever raised and - Brother International LS-1217 | Users Manual - English - Page 39
SEWING MACHINE STRAIGHT AND ZIGZAG STITCHING BUILT-IN STITCHES Removing the Fabric from the Machine 1. Stop the machine. 2. Turn the balance wheel toward you (counterclockwise) to bring the needle and thread take-up lever to their highest position. 3. Lift the presser foot parte posterior de - Brother International LS-1217 | Users Manual - English - Page 40
in front of the presser foot as shown in fig.A. Do not pull the fabric; let the machine do the work. If you pull the fabric, the needle may either bend or break. However, when sewing on special fabrics, such as tricot, crepes, knits, etc., we recommend that you support the fabric both in front - Brother International LS-1217 | Users Manual - English - Page 41
SEWING MACHINE STRAIGHT AND ZIGZAG STITCHING BUILT-IN STITCHES Zigzag Stitching STITCH LENGTH STITCH WIDTH NEEDLE POSITION PRESSER FOOT NEEDLE 1-4 (For the Satin Stitch, set at F.) 1-5 (For twin needle sewing, always use a setting of less than 3.) M, L, R (For twin needle sewing, always set - Brother International LS-1217 | Users Manual - English - Page 42
CONTENTS KNOWING YOUR SEWING MACHINE STRAIGHT AND ZIGZAG STITCHING BUILT-IN STITCHES Puntada zigzag Larga de puntada Ancho de puntada de amostra num pedaço de tecido antes de costurar no seu projeto. BUTTONHOLE AND BUTTON SEWING USING ATTACHMENTS AND APPLICATIONS MAINTENANCE INDEX 32 - Brother International LS-1217 | Users Manual - English - Page 43
SEWING MACHINE STRAIGHT AND ZIGZAG STITCHING BUILT-IN STITCHES Decorative Stitches STITCH LENGTH STITCH WIDTH NEEDLE POSITION PRESSER FOOT NEEDLE Set obtenus en cousant à l'aide du point bourdon conformément aux instructions de la page suivante. REMARQUE : Lors de l'utilisation d'une - Brother International LS-1217 | Users Manual - English - Page 44
SEWING MACHINE STRAIGHT AND ZIGZAG STITCHING BUILT-IN STITCHES Needle Needle position L Single needle M R Twin needle M L Single needle M R Twin needle M L Single needle M R Twin needle depressing the foot control at an even speed. NOTE: For twin needle sewing, repeatedly - Brother International LS-1217 | Users Manual - English - Page 45
CONTENTS KNOWING YOUR SEWING MACHINE STRAIGHT AND ZIGZAG STITCHING BUILT-IN STITCHES Aguja Posición de la una velocidad constante entre 0 y 5, y luego entre 5 y 0 mientras presiona el pedal a una velocidad constante. NOTA: Para costuras con la aguja doble, mueva repetidamente el selector - Brother International LS-1217 | Users Manual - English - Page 46
CONTENTS KNOWING YOUR SEWING MACHINE STRAIGHT AND ZIGZAG STITCHING BUILT-IN STITCHES Buttonhole Sewing STITCH LENGTH STITCH WIDTH NEEDLE POSITION PRESSER FOOT NEEDLE Set between 0 and 1 (F) for the Satin Stitch. See the instructions below. R (right position) Zigzag Single Making a - Brother International LS-1217 | Users Manual - English - Page 47
CONTENTS KNOWING YOUR SEWING MACHINE STRAIGHT AND ZIGZAG STITCHING BUILT-IN STITCHES Para coser ojales Largo de puntada Ancho de casas. Tenha cuidado para não cortar nenhum ponto. A BUTTONHOLE AND BUTTON SEWING USING ATTACHMENTS AND APPLICATIONS MAINTENANCE INDEX BC D (E) 37 - Brother International LS-1217 | Users Manual - English - Page 48
YOUR SEWING MACHINE STRAIGHT AND ZIGZAG STITCHING BUILT-IN STITCHES OPTIONAL PROCEDURE FOR BUTTONHOLES Step A: Bar Tack 1. Set the needle position at "L", stitch width at "5" and stitch length at "0". 2. Lower the presser foot and sew 3 to 4 stitches. 3. Stop the machine when the needle is - Brother International LS-1217 | Users Manual - English - Page 49
CONTENTS KNOWING YOUR SEWING MACHINE STRAIGHT AND ZIGZAG STITCHING BUILT-IN STITCHES Método alternativo para rio e costure 5 - 6 pontos retos. (ilustração E) 2. Remova o tecido da máquina. BUTTONHOLE AND BUTTON SEWING USING ATTACHMENTS AND APPLICATIONS MAINTENANCE B A 39 C (E) D INDEX - Brother International LS-1217 | Users Manual - English - Page 50
SEWING MACHINE STRAIGHT AND ZIGZAG STITCHING BUILT-IN STITCHES Button Sewing STITCH LENGTH STITCH WIDTH NEEDLE POSITION PRESSER FOOT NEEDLE OTHEr 0 Set according to the distance between the holes. L or R Zigzag Single Darning Plate 1. Set the darning plate on the needle plate over the feed - Brother International LS-1217 | Users Manual - English - Page 51
CONTENTS KNOWING YOUR SEWING MACHINE STRAIGHT AND ZIGZAG STITCHING BUILT-IN STITCHES Costura revés del tejido y anúdelos para asegurar el botón. 8. Quite la placa de zurcir levantando la parte delantera, para poder seguir con una costura normal. 1 Ranura delantera de la placa de zurcir Para - Brother International LS-1217 | Users Manual - English - Page 52
CONTENTS KNOWING YOUR SEWING MACHINE STRAIGHT AND ZIGZAG STITCHING BUILT-IN STITCHES Zipper Insertion STITCH LENGTH STITCH WIDTH NEEDLE POSITION PRESSER FOOT NEEDLE 2-3 0 M Zipper Foot Single The zipper foot is used to sew on various types of zippers and can easily be positioned to the - Brother International LS-1217 | Users Manual - English - Page 53
CONTENTS KNOWING YOUR SEWING MACHINE STRAIGHT AND ZIGZAG STITCHING BUILT-IN STITCHES Inserci del tejido 2 cm (3/4") y coloque la cremallera debajo de la parte doblada. Para lograr mejores resultados, se recomienda coser ambas partes de la cremallera de abajo a arriba. 4. Conviene colocar la - Brother International LS-1217 | Users Manual - English - Page 54
SEWING MACHINE STRAIGHT AND ZIGZAG STITCHING BUILT-IN STITCHES Gathering Fronces STITCH LENGTH STITCH WIDTH NEEDLE POSITION PRESSER FOOT NEEDLE côté envers du tissu. 2. Sew a single row or evenly-spaced multiple rows of Straight Stitches. 3. Pull the lower thread(s) to gather the fabric. - Brother International LS-1217 | Users Manual - English - Page 55
foot, then lower the presser foot lifter. 4. Begin sewing alternating between gently drawing the work away from you and pulling it toward you. With the darning plate on the machine, the feed con las manos. 5. Repita este movimiento hasta que la parte que va a zurcirse se llene con líneas paralelas de - Brother International LS-1217 | Users Manual - English - Page 56
CONTENTS KNOWING YOUR SEWING MACHINE STRAIGHT AND ZIGZAG STITCHING BUILT-IN STITCHES Attaching Lace Coudre de la dentelle STITCH LENGTH STITCH WIDTH NEEDLE POSITION PRESSER FOOT NEEDLE 2-4 0 M Zigzag Single Longueur de point Largeur de point Position de l'aiguille Pied-de-biche Aiguille - Brother International LS-1217 | Users Manual - English - Page 57
SEWING MACHINE STRAIGHT AND ZIGZAG STITCHING BUILT-IN STITCHES Appliques Appliques STITCH LENGTH STITCH WIDTH NEEDLE POSITION PRESSER FOOT NEEDLE the cut design to the fabric in the location where desired. 2. Carefully sew around the edge of the cutout design with a Zigzag Stitch in the - Brother International LS-1217 | Users Manual - English - Page 58
SEWING MACHINE STRAIGHT AND ZIGZAG STITCHING BUILT-IN STITCHES Blind Hem Stitch Point d'ourlet invisible STITCH LENGTH STITCH WIDTH NEEDLE POSITION PRESSER FOOT NEEDLE project, like the bottom of a pair of pants, without the stitch showing. 1. Both the upper and lower threads should be the - Brother International LS-1217 | Users Manual - English - Page 59
SEWING MACHINE STRAIGHT AND ZIGZAG STITCHING BUILT-IN STITCHES Over Edge Stitch Points sur le bord STITCH LENGTH STITCH WIDTH NEEDLE POSITION PRESSER FOOT NEEDLE el tejido al coser la parte izquierda de la puntada zigzag y sobrepase la orilla al coser la parte derecha. Cosa con la aguja - Brother International LS-1217 | Users Manual - English - Page 60
KNOWING YOUR SEWING MACHINE STRAIGHT AND ZIGZAG STITCHING BUILT-IN STITCHES Cording Pose de ganses STITCH LENGTH STITCH WIDTH NEEDLE POSITION PRESSER FOOT NEEDLE F-2 Set according to the thickness of the cord being used. M Zigzag Single 1. Set the stitch width knob so the needle will just - Brother International LS-1217 | Users Manual - English - Page 61
an embroidery hoop as firmly as possible with the underside of the fabric on the bottom of the inside hoop. 4. Place the work under the needle and lower the presser bar with the foot removed. 5. Pull the lower thread up through the work at the starting position by turning the balance wheel and make - Brother International LS-1217 | Users Manual - English - Page 62
CONTENTS KNOWING YOUR SEWING MACHINE STRAIGHT AND ZIGZAG STITCHING BUILT-IN STITCHES Monogramas y bordados Estire el tejido en un bastidor tan firmemente como pueda con el revés del tejido en la parte inferior del círculo interior. 4. Coloque la tela debajo de la aguja y baje la barra del - Brother International LS-1217 | Users Manual - English - Page 63
CONTENTS KNOWING YOUR SEWING MACHINE STRAIGHT AND ZIGZAG STITCHING BUILT-IN STITCHES Changing the Bulb Remplacement de l'ampoule 1. Remove the power supply plug from the outlet. 2. Loosen the face plate screw as shown in fig. A. 3. Remove the face plate from the machine as illustrated in - Brother International LS-1217 | Users Manual - English - Page 64
used more than one hour a day. If the machine is used more often, oil every day. Sewing machine oil is available from your local sewing machine dealer or service center. Do not apply too much oil as it may get on your thread and fabric. REMARQUE: La machine doit être huilée une fois par semaine si - Brother International LS-1217 | Users Manual - English - Page 65
the needle to its highest position. 2. Open the shuttle cover on the front of the free arm. 3. Take out the bobbin case by opening its latch and pulling it out from the shuttle race. 4. Slide the latch levers out from the retaining ring and remove the retaining ring. See fig. A. 1 Retaining ring - Brother International LS-1217 | Users Manual - English - Page 66
CONTENTS KNOWING YOUR SEWING MACHINE STRAIGHT AND ZIGZAG STITCHING BUILT-IN STITCHES Limpieza Limpeza Para sacar el garfio de la lanzadera 1. Levante la aguja a su posición más alta. 2. Abra la cubierta de la lanzadera ubicada en la parte delantera del brazo libre. 3. Saque el portacanilla - Brother International LS-1217 | Users Manual - English - Page 67
instruction manual that details the operation you are performing to make sure you are correctly using the machine. If the problem continues, the following checklist may help you to improve the operation. If you still have difficulties, contact your nearest service center. UPPER THREAD BREAKS LOWER - Brother International LS-1217 | Users Manual - English - Page 68
NEEDLE BREAKS MACHINE IS NOISY OR SLOW MACHINE DOES NOT START Stitch length dial is set at no feeding. Needle is not correctly inserted. Lint is clinging to the bottom of the needle plate. Power supply plug is removed from outlet. M Page 9 No M The combination of needle size/ thread size - Brother International LS-1217 | Users Manual - English - Page 69
correctement. Si le problème persiste, la liste de vérifications suivante permettra d'améliorer le fonctionnement de la machine. Si les problèmes persistent, contacter le centre de service le plus proche. LE FIL SUPERIEUR SE CASSE LE FIL INFERIEUR SE CASSE POINTS MANQUES BOUCLE DANS LA COUTURE - Brother International LS-1217 | Users Manual - English - Page 70
SEWING MACHINE STRAIGHT AND ZIGZAG STITCHING BUILT-IN STITCHES LE TISSU NE PASSE PAS CORRECTEMENT L'AIGUILLE SE CASSE LA MACHINE FAIT DU BRUIT OU FONCTIONNE LENTEMENT LA MACHINE CENTRE DE SERVICE LOCAL BUTTONHOLE AND BUTTON SEWING USING ATTACHMENTS AND APPLICATIONS MAINTENANCE INDEX 60 - Brother International LS-1217 | Users Manual - English - Page 71
SEWING MACHINE STRAIGHT AND ZIGZAG STITCHING BUILT-IN STITCHES Listado de posibles incidencias Cada vez que se encuentre con dificultades al coser, vuelva a consultar la parte de este manual aguja/ grueso de hilo/tejido no es correcta. M Pagina 17 No M La aguja está doblada o gastada. M - Brother International LS-1217 | Users Manual - English - Page 72
SEWING MACHINE ada o gastada. M Pagina 6 No M El hilo está enredado. M Pagina 17 No M Los alimentadores están bajados. La aguja está mal colocada. Hay pelusa principal está apagado. M Pagina 5 No M No se usa bien el pedal. M Pagina 5 No M El eje del portabobinas se sitúa en el - Brother International LS-1217 | Users Manual - English - Page 73
SEWING MACHINE STRAIGHT AND ZIGZAG STITCHING BUILT-IN STITCHES Lista de Inspeção do Desempenho Sempre que encontrar dificuldades durante a costura, reveja a seção neste manual Não M A passagem da linha não está correta. M Página 17 Não M A linha superior está muito esticada. M Página 21 - Brother International LS-1217 | Users Manual - English - Page 74
YOUR SEWING MACHINE STRAIGHT ou gasta. M Página 6 Não M A linha está emaranhada. M Página 17 Não M M Página 6 Não M A agulha em uso está danificada ou M O eixo de enrolamento da bobina está deslizado em direção ao pedal da bobina. M Página 14 Não Os dentes impelentes estão abaixados - Brother International LS-1217 | Users Manual - English - Page 75
fabrics for future use. It may become necessary to reship the sewing machine. Improper packing or improper packing fabric could result in damage during shipping. Instructions for repacking the machine are illustrated. Remballage de la machine Garder le carton et le matériel d'emballage pour un - Brother International LS-1217 | Users Manual - English - Page 76
4 Cording 50 D Darning 45 Drawing Up The Bobbin Thread 18 E Embroidering 51 F Feed Dog Cleaning 55 Finishing a Seam 26 Foot Controller Connecting 5 Operating 5 Free-Arm Sewing 8 G Gathering 44 Guiding the Fabric 30 L Light Bulb Replacement 53 Lower (bobbin) Threading 15 M Main Power - Brother International LS-1217 | Users Manual - English - Page 77
de la couture 26 Sélecteur de largeur de point 11 Sélecteur de longueur de point 9 Sélecteur de tension supérieure 21 Stabiliser la machine 8 T Tableau des combinaisons tissus/aiguilles/ fils 23 Tension de fil 21 V Vérification de fonctionnement 59-60 L Lampe Interrupteur 5 Remplacement de - Brother International LS-1217 | Users Manual - English - Page 78
cordón 50 Costura de encaje 46 Costura de ojales 37 Costura de tejidos elásticos 30 D Disco de control de la tensión superior 21 E Elementos principales 2 Engrasado 54 Enhebrado Aguja 17 de la canilla 18 Para terminar las costuras 26 Pedal Conexión 5 Uso 5 Puntada de enlace 11 Puntada - Brother International LS-1217 | Users Manual - English - Page 79
Bordas do Tecido 27 Costura de Casas para Botões 37 Costura de Cordões 50 Costura de Tecidos Elásticos 30 Costura de Tecidos Muito Finos gina P Partes Principais 2 Passagem da Linha Agulha 17 Bobina 15 Passagem da Linha Inferior (da Bobina 15 Passagem da Linha Superior 17 Ponto Chuleado - Brother International LS-1217 | Users Manual - English - Page 80
ENGLISH FRANÇAIS ESPAÑOL PORTUGUESE 194402-011 Printed in China - Brother International LS-1217 | Users Manual - English - Page 81
exposer l'adhésif. 2. Seleccíone el panel deseado. Remueva el papel que cubre la parte de atrás del panel seleccionado para exponer el adhesivo. 3. Carefully align left edge of back of new panel to the machine, making certain to cover the existing panel. Working to the right, continue to affix the
-
 1
1 -
 2
2 -
 3
3 -
 4
4 -
 5
5 -
 6
6 -
 7
7 -
8
-
9
-
10
-
11
-
12
-
13
-
14
-
15
-
16
-
17
-
18
-
19
-
20
-
21
-
22
-
23
-
24
-
25
-
26
-
27
-
28
-
29
-
30
-
31
-
32
-
33
-
34
-
35
-
36
-
37
-
38
-
39
-
40
-
41
-
42
-
43
-
44
-
45
-
46
-
47
-
48
-
49
-
50
-
51
-
52
-
53
-
54
-
55
-
56
-
57
-
58
-
59
-
60
-
61
-
62
-
63
-
64
-
65
-
66
-
67
-
68
-
69
-
70
-
71
-
72
-
73
-
74
-
75
-
76
-
77
-
78
-
79
-
80
-
81
 |
 |

Instruction Manual
Manuel d’instructions
Manual de instrucciones
Manual de Instruções