Brother International MFC 685CW Quick Setup Guide - English - Page 47
WPA/WPA2-PSK TKIP or AES, Setting Up the, Machine, For example
 |
UPC - 012502618225
View all Brother International MFC 685CW manuals
Add to My Manuals
Save this manual to your list of manuals |
Page 47 highlights
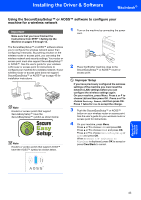
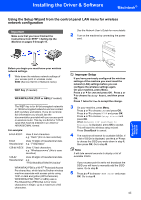
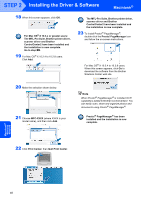
Installing the Driver & Software Macintosh® Using the Setup Wizard from the control panel LAN menu for wireless network configuration Important Make sure that you have finished the instructions from STEP 1 Setting Up the Machine on pages 5 through 15. See the Network User's Guide for more details. 2 Turn on the machine by connecting the power cord. Macintosh® Wireless Network Before you begin you must know your wireless network settings. 1 Write down the wireless network settings of your access point or wireless router. SSID (Service Set ID or Network name) WEP Key (if needed) WPA/WPA2-PSK (TKIP or AES) (if needed) The WEP key is for 64-bit encrypted networks or 128-bit encrypted networks and can contain both numbers and letters. If you do not know this information you should see the documentation provided with your access point or wireless router. This key is a 64-bit or 128-bit value that must be entered in an ASCII or HEXADECIMAL format. For example: 64-bit ASCII: Uses 5 text characters. e.g. "Hello" (this is case sensitive) 64-bit Uses 10 digits of hexadecimal data. Hexadecimal: e.g. "71f2234aba" 128-bit ASCII: Uses 13 text characters. e.g. "Wirelesscomms" (this is case sensitive) 128-bit Uses 26 digits of hexadecimal data. Hexadecimal: e.g. "71f2234ab56cd709e5412aa3ba" WPA/WPA2-PSK is a Wi-Fi® Protected Access Pre-shared key, which lets the Brother wireless machine associate with access points using TKIP or AES encryption (WPA-Personal). WPA/WPA2-PSK (TKIP or AES) uses a Pre-Shared Key (PSK) that is 8 or more characters in lengtn, up to a maximum of 63 characters. Improper Setup If you have previously configured the wireless settings of the machine you must reset the network (LAN) settings before you can configure the wireless settings again. On your machine, press Menu. Press a or b for LAN and press OK. Press a or b to choose Factory Reset, and then press OK. Press 1 twice for Yes to accept the change. 3 On your machine, press Menu. Press a or b to choose LAN and press OK. Press a or b to choose WLAN and press OK. Press a or b to choose Setup Wizard and press OK. When Network I/F switched to Wireless is displayed, press OK to accept. This will start the wireless setup wizard. Press Clear/Back to cancel. 4 The machine will search for available SSIDs. If a list of SSIDs is displayed, use the a or b keys to choose the SSID you wrote down in step 1, then press OK. Go to step 8. Note It will take several seconds to display a list of available SSIDs. If your access point is set to not broadcast the SSID you will have to manually add the SSID name. Go to step 5. 5 Press a or b to choose and press OK. Go to step 6. 45
-
 1
1 -
2
-
3
-
4
-
5
-
6
-
7
-
8
-
9
-
10
-
11
-
12
-
13
-
14
-
15
-
16
-
17
-
18
-
19
-
20
-
21
-
22
-
23
-
24
-
25
-
26
-
27
-
28
-
29
-
30
-
31
-
32
-
33
-
34
-
35
-
36
-
37
-
38
-
39
-
40
-
41
-
 42
42 -
 43
43 -
 44
44 -
 45
45 -
 46
46 -
 47
47 -
 48
48 -
 49
49 -
 50
50 -
 51
51 -
 52
52 -
53
-
54
-
55
-
56
-
57
-
58
 |
 |
