Brother International MFC-820CW Users Manual - English - Page 69
Changing Group name, Deleting a Group, Stop/Exit, Clear
 |
View all Brother International MFC-820CW manuals
Add to My Manuals
Save this manual to your list of manuals |
Page 69 highlights
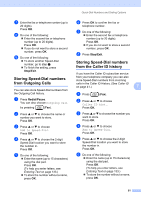
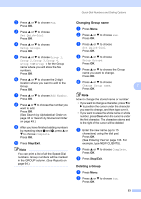
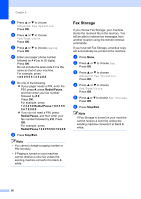
b Press a or b to choose Fax. Press OK. c Press a or b to choose Set Quick-Dial. Press OK. d Press a or b to choose Setup Groups. Press OK. e Press a or b to choose Group 1, Group 2, Group 3, Group 4, Group 5 or Group 6 for the Group name where you will store the fax numbers. Press OK. f Press a or b to choose the 2-digit location where you want to add to the Group. Press OK. g Press a or b to choose Add Number. Press OK. h Press a or b to choose the number you want to add. Press OK. (See Search by Alphabetical Order on page 48 or Search by Numerical Order on page 49.) i After you have finished adding numbers by repeating steps g and h, press a or b to choose Complete. Press OK. j Press Stop/Exit. Note You can print a list of all the Speed-Dial numbers. Group numbers will be marked in the GROUP column. (See Reports on page 64.) Quick-Dial Numbers and Dialing Options Changing Group name 7 a Press Menu. b Press a or b to choose Fax. Press OK. c Press a or b to choose Set Quick-Dial. Press OK. d Press a or b to choose Setup Groups. Press OK. e Press a or b to choose the Group name you want to change. Press OK. f Press a or b to choose Change Group name. 7 Press OK. Note How to change the stored name or number: • If you want to change a character, press d or c to position the cursor under the character you want to change, and then type over it. • If you want to erase the whole name or whole number, press Clear when the cursor is under the first character. The characters above and to the right of the cursor will be deleted. g Enter the new name (up to 15 characters) using the dial pad. Press OK. (See Entering Text on page 133. For example, type NEW CLIENTS). h Press a or b to choose Complete. Press OK. i Press Stop/Exit. Deleting a Group 7 a Press Menu. b Press a or b to choose Fax. Press OK. 53
-
 1
1 -
2
-
3
-
4
-
5
-
6
-
7
-
8
-
9
-
10
-
11
-
12
-
13
-
14
-
15
-
16
-
17
-
18
-
19
-
20
-
21
-
22
-
23
-
24
-
25
-
26
-
27
-
28
-
29
-
30
-
31
-
32
-
33
-
34
-
35
-
36
-
37
-
38
-
39
-
40
-
41
-
42
-
43
-
44
-
45
-
46
-
47
-
48
-
49
-
50
-
51
-
52
-
53
-
54
-
55
-
56
-
57
-
58
-
59
-
60
-
61
-
62
-
63
-
 64
64 -
 65
65 -
 66
66 -
 67
67 -
 68
68 -
 69
69 -
 70
70 -
 71
71 -
 72
72 -
 73
73 -
 74
74 -
75
-
76
-
77
-
78
-
79
-
80
-
81
-
82
-
83
-
84
-
85
-
86
-
87
-
88
-
89
-
90
-
91
-
92
-
93
-
94
-
95
-
96
-
97
-
98
-
99
-
100
-
101
-
102
-
103
-
104
-
105
-
106
-
107
-
108
-
109
-
110
-
111
-
112
-
113
-
114
-
115
-
116
-
117
-
118
-
119
-
120
-
121
-
122
-
123
-
124
-
125
-
126
-
127
-
128
-
129
-
130
-
131
-
132
-
133
-
134
-
135
-
136
-
137
-
138
-
139
-
140
-
141
-
142
-
143
-
144
-
145
-
146
-
147
-
148
-
149
-
150
-
151
-
152
-
153
-
154
-
155
-
156
-
157
-
158
-
159
-
160
-
161
-
162
-
163
-
164
-
165
-
166
-
167
-
168
-
169
-
170
-
171
 |
 |