Brother International MFC 9120CN Quick Setup Guide - English - Page 11
Set the telephone line type, Initial Setup, Phone Line Set
 |
UPC - 012502622390
View all Brother International MFC 9120CN manuals
Add to My Manuals
Save this manual to your list of manuals |
Page 11 highlights
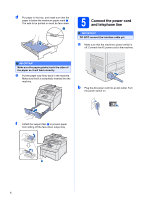
12 Set the telephone line type If you are connecting the machine to a line that features a PABX (PBX) or ISDN to send and receive faxes, it is also necessary to change the phone line type accordingly by completing the following steps. a Press Menu, 0, 6. Initial Setup 6.Phone Line Set b Press a or b to choose PBX, ISDN or Normal. Press OK. Do one of the following: „ If you choose ISDN or Normal, go to step f. „ If you choose PBX, go to step c. c Do one of the following: „ If you want to change the current prefix number, press 1 and go to step d. „ If you do not want to change the current prefix number, press 2 and go to step f. Note The default setting is "!". When you press Tel/R, "!" will be displayed on the LCD. d Enter the Prefix number (up to 5 digits) on the dial pad, and then press OK. Note You can use the number 0 to 9, #, l and !. (Press Tel/R to display "!".) You cannot use ! with any other numbers or characters. If your telephone system requires a timed break recall, press Tel/R to enter the break. e Press a or b to choose On or Always and press OK. Note • If you choose On, pressing Tel/R (the screen displays "!") will let you access an outside line. • If you choose Always, you can access an outside line without pressing Tel/R. f Press Stop/Exit. Note PBX and TRANSFER The machine is initially set to Normal, which lets the machine connect to a standard PSTN (Public Switched Telephone Network) line. However, many offices use a central telephone system or Private Automatic Branch Exchange (PABX). Your machine can be connected to most types of PABX (PBX). The machine's recall feature supports timed break recall only (TBR). TBR will work with most PABX (PBX) systems allowing you to gain access to an outside line, or transfer calls to another extension. The feature works when Tel/R is pressed. 11
-
 1
1 -
2
-
3
-
4
-
5
-
 6
6 -
 7
7 -
 8
8 -
 9
9 -
 10
10 -
 11
11 -
 12
12 -
 13
13 -
 14
14 -
 15
15 -
 16
16 -
17
-
18
-
19
-
20
-
21
-
22
-
23
-
24
-
25
-
26
-
27
-
28
-
29
-
30
-
31
 |
 |
