Brother International MFC-9840CDW Quick Setup Guide - English - Page 24
For Wireless Network Interface Users (For Windows® 2000 Professional/XP/ XP Professional x64 Edition/Windows Vista™) in infrastructure mode, Connecting your wireless machine and wireless network together and installing the printer driver in infrastructure - wireless setup
 |
UPC - 012502618744
View all Brother International MFC-9840CDW manuals
Add to My Manuals
Save this manual to your list of manuals |
Page 24 highlights
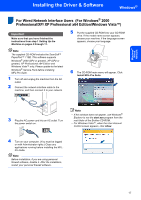
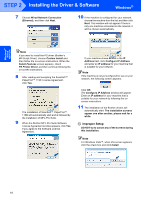
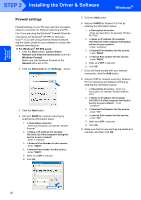
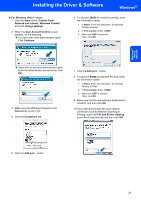
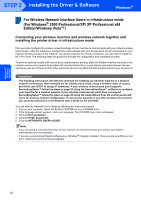
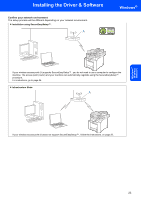
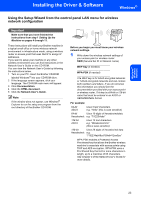
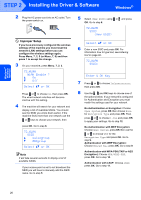
Windows® Wireless Network STEP 2 Installing the Driver & Software Windows® For Wireless Network Interface Users in infrastructure mode 3 (For Windows® 2000 Professional/XP/ XP Professional x64 Edition/Windows Vista™) Connecting your wireless machine and wireless network together and installing the printer driver in infrastructure mode First you must configure the wireless network settings of your machine to communicate with your network access point (router). After the machine is configured to communicate with your access point (router) computers on your network will have access to the machine. To use the machine from these computers, you will need to install the MFL-Pro Suite. The following steps will guide you through the configuration and installation process. To achieve optimum results with normal every day document printing, place the Brother machine as close to the network access point (router) as possible with minimal obstructions. Large objects and walls between the two devices as well as interference from other electronic devices can affect the data transfer speed of your documents. Important The following instructions will offer two methods for installing your Brother machine in a wireless network environment. Both methods are for infrastructure mode, using a wireless router or access point that uses DHCP to assign IP addresses. If your wireless router/access point supports SecureEasySetup™ follow the steps on page 24 Using the SecureEasySetup™ software to configure your machine for a wireless network. If your wireless router/access point does not support SecureEasySetup™ follow the steps on page 25 Using the Setup Wizard from the control panel LAN menu for wireless network configuration. To set up your machine in any other wireless environment you can find instructions in the Network User's Guide on the CD-ROM. You can view the Network User's Guide by following the instructions below. 1 Turn on your computer. Insert the Brother CD-ROM into your CD-ROM drive. 2 If the language screen appears, click your language. The CD-ROM main menu will appear. 3 Click the Documentation. 4 Click the HTML documents. 5 Click the NETWORTK USER'S GUIDE. Note • If you are going to connect the printer to your network, we recommend that you contact your system administrator prior to installation. • If you are using personal firewall software (e.g. Windows® Firewall), disable it. Once you are sure that you can print, restart your personal firewall software. 22
-
 1
1 -
2
-
3
-
4
-
5
-
6
-
7
-
8
-
9
-
10
-
11
-
12
-
13
-
14
-
15
-
16
-
17
-
18
-
 19
19 -
 20
20 -
 21
21 -
 22
22 -
 23
23 -
 24
24 -
 25
25 -
 26
26 -
 27
27 -
 28
28 -
 29
29 -
30
-
31
-
32
-
33
-
34
-
35
-
36
-
37
-
38
-
39
-
40
-
41
-
42
-
43
-
44
-
45
-
46
-
47
-
48
-
49
-
50
-
51
-
52
-
53
 |
 |