Brother International PE-DESIGN 8 Users Manual - English - Page 187
Saving the design, Writing the design to an original, Tutorial Advanced
 |
View all Brother International PE-DESIGN 8 manuals
Add to My Manuals
Save this manual to your list of manuals |
Page 187 highlights
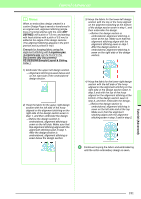
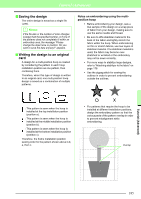
Tutorial (Advanced) ■ Saving the design The entire design is saved as a single file (.pes). b Memo: If the file size or the number of color changes is larger than the specified number, or if one of the patterns does not completely fit within an embroidery area, the message "Please change the object size or position. Do you want to save the data anyway?" appears. ■ Writing the design to an original card A design for a multi-position hoop is created by considering the pattern in each hoop installation position as one pattern, then combining them. Therefore, when this type of design is written to an original card, one multi-position hoop design is saved as a combination of multiple patterns. Notes on embroidering using the multiposition hoop • Before embroidering your design, sew a trial sample of the design on a scrap piece of fabric from your design, making sure to use the same needle and thread. • Be sure to affix stabilizer material to the back of the fabric and tightly stretch the fabric within the hoop. When embroidering on thin or stretch fabrics, use two layers of stabilizer material. If no stabilizer material is used, the fabric may become overstretched or wrinkled or the embroidery may not be sewn correctly. • For more ways to stabilize large designs, refer to "Attaching stabilizer to the fabric" on page 178 • Use the zigzag stitch for sewing the outlines in order to prevent embroidering outside the outlines. : This pattern is sewn when the hoop is installed at the top installation position (position a). : This pattern is sewn when the hoop is installed at the middle installation position (position b). : This pattern is sewn when the hoop is installed at the bottom installation position (position c). Therefore, the frame installation position sewing order for the pattern shown above is b, a, then c. • For patterns that require the hoop to be installed at different installation positions, design the embroidery pattern so that the various parts of the pattern overlap in order to prevent misalignment while embroidering. Overlap Tutorial (Advanced) 185
-
 1
1 -
2
-
3
-
4
-
5
-
6
-
7
-
8
-
9
-
10
-
11
-
12
-
13
-
14
-
15
-
16
-
17
-
18
-
19
-
20
-
21
-
22
-
23
-
24
-
25
-
26
-
27
-
28
-
29
-
30
-
31
-
32
-
33
-
34
-
35
-
36
-
37
-
38
-
39
-
40
-
41
-
42
-
43
-
44
-
45
-
46
-
47
-
48
-
49
-
50
-
51
-
52
-
53
-
54
-
55
-
56
-
57
-
58
-
59
-
60
-
61
-
62
-
63
-
64
-
65
-
66
-
67
-
68
-
69
-
70
-
71
-
72
-
73
-
74
-
75
-
76
-
77
-
78
-
79
-
80
-
81
-
82
-
83
-
84
-
85
-
86
-
87
-
88
-
89
-
90
-
91
-
92
-
93
-
94
-
95
-
96
-
97
-
98
-
99
-
100
-
101
-
102
-
103
-
104
-
105
-
106
-
107
-
108
-
109
-
110
-
111
-
112
-
113
-
114
-
115
-
116
-
117
-
118
-
119
-
120
-
121
-
122
-
123
-
124
-
125
-
126
-
127
-
128
-
129
-
130
-
131
-
132
-
133
-
134
-
135
-
136
-
137
-
138
-
139
-
140
-
141
-
142
-
143
-
144
-
145
-
146
-
147
-
148
-
149
-
150
-
151
-
152
-
153
-
154
-
155
-
156
-
157
-
158
-
159
-
160
-
161
-
162
-
163
-
164
-
165
-
166
-
167
-
168
-
169
-
170
-
171
-
172
-
173
-
174
-
175
-
176
-
177
-
178
-
179
-
180
-
181
-
 182
182 -
 183
183 -
 184
184 -
 185
185 -
 186
186 -
 187
187 -
 188
188 -
 189
189 -
 190
190 -
 191
191 -
 192
192 -
193
-
194
-
195
-
196
-
197
-
198
-
199
-
200
-
201
-
202
-
203
-
204
-
205
-
206
-
207
-
208
-
209
-
210
-
211
-
212
-
213
-
214
-
215
-
216
-
217
-
218
-
219
-
220
-
221
-
222
-
223
-
224
-
225
-
226
-
227
-
228
-
229
-
230
-
231
-
232
-
233
-
234
-
235
-
236
-
237
-
238
-
239
-
240
-
241
-
242
-
243
-
244
-
245
-
246
-
247
-
248
-
249
-
250
-
251
-
252
-
253
-
254
-
255
-
256
-
257
-
258
-
259
-
260
-
261
-
262
-
263
-
264
-
265
-
266
-
267
-
268
-
269
 |
 |
