Brother International PEDESIGN PLUS Users Manual - English
Brother International PEDESIGN PLUS Manual
 |
View all Brother International PEDESIGN PLUS manuals
Add to My Manuals
Save this manual to your list of manuals |
Brother International PEDESIGN PLUS manual content summary:
- Brother International PEDESIGN PLUS | Users Manual - English - Page 1
PERSONAL EMBROIDERY DESIGN SOFTWARE SYSTEM Operation Manual Please visit us at http://solutions.brother.com where you can get product support and answers to frequently asked questions (FAQs). - Brother International PEDESIGN PLUS | Users Manual - English - Page 2
product Product Name: Model Number: Brother USB Writer PE-Design complies with Part 15 of the installed and used in accordance with the instructions, may cause harmful interference to radio communications by the manufacturer or local sales distributor could void the user's authority to operate the - Brother International PEDESIGN PLUS | Users Manual - English - Page 3
on the enclosed CD-ROM. The Operation Manual is also installed during software installation. Click All Programs, then PE-DESIGN PLUS, then Operation Manual. Otherwise, with PE-DESIGN PLUS, click , then Operation Manual. With PES-Writer, click Help, then Operation Manual. b Memo: • Adobe® Reader® is - Brother International PEDESIGN PLUS | Users Manual - English - Page 4
, please read this Operation Manual carefully, and then keep it in a safe place together with your warranty. Please read before using this product For designing beautiful embroidery designs • This system allows you to create a wide variety of embroidery designs and supports a wider range of sewing - Brother International PEDESIGN PLUS | Users Manual - English - Page 5
61 Understanding Windows 61 PE-DESIGN PLUS Window 61 Menus 65 Tips and Techniques 67 Sewing Direction 67 Sewing Order 67 Sewing Wide Areas 67 Reference 68 Sewing Attributes 68 Font List 70 PES-Writer 72 Writing Multiple Embroidery Files to an Original Card 72 Troubleshooting 75 Index - Brother International PEDESIGN PLUS | Users Manual - English - Page 6
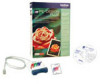
are included. If anything is missing or damaged, contact your authorized dealer or Brother Customer Service. USB Card Writer Module CD-ROM Original card Operation Manual a Contains the software b and Operation Manual (PDF format). c a LED indicator This indicator lights up when the unit is - Brother International PEDESIGN PLUS | Users Manual - English - Page 7
with administrator privileges, refer to the Windows® manual. ● The installation procedure is described for Windows® 7. The procedure and dialog boxes for computer, be sure to disconnect the USB Card Writer Module. System Requirements Before installing the software on your computer, make sure that - Brother International PEDESIGN PLUS | Users Manual - English - Page 8
Card Writer Module is DISCONNECTED. • In order to install the software, you must log on to the computer using an account with administrator privileges. If you are not logged on with the Administrator account, the password for the Administrator account (Administrators) may be requested with Windows - Brother International PEDESIGN PLUS | Users Manual - English - Page 9
Click Run setup.exe. The User Account Control dialog box appears. 3. Click Yes. 6. Check the installation location, and then click Next. Before Use After a appears, allowing you to select the folder where the software will be installed. When the installation is completed, the following dialog - Brother International PEDESIGN PLUS | Users Manual - English - Page 10
the message shown below appears, the latest version of the software is being used. a Note: This procedure also automatically installs the card writer driver. The card writer may now be connected to your computer. Make sure that PE-DESIGN PLUS starts up correctly. b Memo: If the dialog box calling - Brother International PEDESIGN PLUS | Users Manual - English - Page 11
Use Before Use Technical Support Uninstallation Contact Technical Support if you have a problem. Please check the company web site (http://www.brother.com/) to find the technical Support in your area. To view the FAQ and information for software updates, visit the Brother Solutions Center at - Brother International PEDESIGN PLUS | Users Manual - English - Page 12
the Photo Stitch 1 function to create an embroidery pattern from an image" on page 11 (4) Most Recently Used Files Click the name of a file from the list, and then click Open. (5) Always show Wizard at Startup Select this check box to start up the wizard each time PE-DESIGN PLUS is started up. 10 - Brother International PEDESIGN PLUS | Users Manual - English - Page 13
Embroidery Patterns Creating Embroidery Patterns From Photos (Photo Stitch 1) Creating Embroidery Patterns The sample file for this tutorial can be found at the following location. Documents (My Documents)\PE-DESIGN PLUS\Tutorial Step 1 Step 2 Step 3 Step 4 Step 5 Step 6 Using the Photo Stitch - Brother International PEDESIGN PLUS | Users Manual - English - Page 14
then click Next. 1 Embroidery pattern size b Memo: • The size of the embroidery pattern appears in the lower left corner of the dialog box. The user can change click Next. 7. Click Select from Candidates. c "Select Mask dialog box" on page 30 c "Photo Stitch 1 Parameters dialog box" on page 19 - Brother International PEDESIGN PLUS | Users Manual - English - Page 15
, and then click Finish. 1 2. Click 1 in the Color tab to change the color of the circle. Creating Embroidery Patterns 1 Stitches are automatically input. b Memo: If the created embroidery pattern contains colors that you do not wish to emphasize (for example, grays in the face), change the - Brother International PEDESIGN PLUS | Users Manual - English - Page 16
Creating Embroidery Patterns Step 3 Adding text and setting character spacing 1. Click , then . 7. Click the Text Attributes tab, and then set Character Spacing (1) to 3.0 mm. 2. Click below the girl in the Design Page. 1 A vertical dashed line will appear on the Design Page. 3. From the - Brother International PEDESIGN PLUS | Users Manual - English - Page 17
, hold down the left mouse button and drag the pattern to the desired location. c "Editing Embroidery Designs" on page 37 Step 5 Importing and rotating an embroidery pattern Now, we will import the embroidery pattern for the rose. 1. Click then , then , . 3. Move the pointer over the rose, and - Brother International PEDESIGN PLUS | Users Manual - English - Page 18
a USB media (☞p. 17) Data can be transferred to embroidery machines equipped with a USB-B connector. ■ Transferring the design to an original card 1. Insert an original card into the USB Card Writer Module. a Note: When imported stitch patterns are enlarged or reduced, the embroidering quality may - Brother International PEDESIGN PLUS | Users Manual - English - Page 19
data to embroidery machines via a USB media 1. Plug the USB media into the computer. 2. Click then , then , , then . Data transfer begins. 3. When the transferring is finished, the following message appears. Click OK. a Note: Precautions for using the Card Writer Module/original cards • The - Brother International PEDESIGN PLUS | Users Manual - English - Page 20
Creating Embroidery Patterns Saving Overwriting Click 1, then 2. 1 2. Select Click Save to save the data. The new file name appears in the title bar of the PE-DESIGN PLUS window. Exporting The data shown in the Design Page can be exported as a file of a different format (.dst, .hus, .exp, .pcs, - Brother International PEDESIGN PLUS | Users Manual - English - Page 21
in the file name. Photo Stitch 1 Parameters dialog box With Color, Sepia or Gray: (1) (2) 3. Select a format (.dst, .hus, .exp, .pcs, .vip, .sew, .jef, .csd, .xxx, or .shv) that the file will be exported as. a Note: Some patterns imported from embroidery cards cannot be exported. c "Specifying - Brother International PEDESIGN PLUS | Users Manual - English - Page 22
stitch length) will be shortened, resulting in finer stitching. If this check box is cleared, the parts of the pattern that are the same color as the Design : About the Manual Select dialog box • From this dialog box, the thread color to be used with Photo Stitch 1 can be selected manually. • To - Brother International PEDESIGN PLUS | Users Manual - English - Page 23
its size and position Changing the sewing angle Step 1 Starting the Photo Stitch 2 wizard Click , then , then . Step 2 Importing photo data into PEDESIGN PLUS 1. Double-click the Documents (My Documents)\ PE-DESIGN PLUS\Tutorial folder to open it. b Memo: When this application is installed - Brother International PEDESIGN PLUS | Users Manual - English - Page 24
Creating Embroidery Patterns Step 3 Applying an image mask and adjusting its size and position 1. Click 1 to select the circle mask. Drag handle 2 to adjust the size of the mask, and drag the mask to adjust its position. Click Next. Step 4 Changing the sewing angle 1. In the Direction box, type " - Brother International PEDESIGN PLUS | Users Manual - English - Page 25
Creating Embroidery Patterns Creating Embroidery Patterns ■ Photo Stitch 2 Parameters dialog box With Color: (1) (2) (3) (4) With Mono: (1) (2) (3) (4) Specify the desired settings under Sewing Option (1) and Color Option (2), and then click Update Preview (3) to preview the - Brother International PEDESIGN PLUS | Users Manual - English - Page 26
was installed) at: C:\Program Files (Program Files (x86)) \Brother\PE-DESIGN PLUS\ClipArt Step 2 Importing image data into PE-DESIGN PLUS Select the Tutorial folder, and then select penguin.bmp as the image. c "Importing photo data into PE-DESIGN PLUS" on page 21 Step 3 Applying an image mask and - Brother International PEDESIGN PLUS | Users Manual - English - Page 27
Creating Embroidery Patterns Creating Embroidery Patterns 2. 1 indicates the Design Page. Drag the image to adjust its output location and size. Click Next. embroidery pattern Select the Add mask outline check box, check the preview image, and then click Finish. (4) (6) (5) (7) (9) (8) (10) - Brother International PEDESIGN PLUS | Users Manual - English - Page 28
Creating Embroidery Patterns (4) Create Lines Click this button to display the Select Regions dialog box, where the areas Sets the sensitivity for the image analysis. (9) Max. Number of Colors Sets the number of colors used. (10) Retry To view the results of the changes, click this button. 26 - Brother International PEDESIGN PLUS | Users Manual - English - Page 29
from images. Creating Embroidery Patterns Step 1 Step 2 Starting the Cross Stitch wizard Importing image data into PE-DESIGN PLUS Step 1 Starting the Cross Stitch wizard 2. Click Next. 1. Click , then , then . Step 2 Importing image data into PE-DESIGN PLUS Select the Tutorial folder, and - Brother International PEDESIGN PLUS | Users Manual - English - Page 30
Creating Embroidery Patterns 4. Click Next. ■ Cross Stitch Parameters dialog box (1) (3) (2) In this dialog box, the cross size and the number of colors can be specified. For this example, we will use the default settings. 5. Click Finish. In this dialog box, stitches can be added, deleted or - Brother International PEDESIGN PLUS | Users Manual - English - Page 31
Embroidery Patterns ■ Edit Cross Stitch dialog box Click a button in (1) to select the type of stitch, select a thread color in (2), and then click or drag in (3) to edit the stitches. (1) (4) (3) (2) (7) (6) (5) (1) Selecting stitches Selecting stitches to be added/deleted (cross-stitches - Brother International PEDESIGN PLUS | Users Manual - English - Page 32
Creating Embroidery Patterns Common dialog boxes ■ Image To Stitch Wizard ■ Select Mask dialog box The Select Mask dialog box appears no matter which conversion method was selected. (2) (4) When a conversion method is selected, a dialog box - Brother International PEDESIGN PLUS | Users Manual - English - Page 33
Page to adjust the image to the size of the Design Page. ■ Gray Balance / Set Output Size dialog box If Mono was selected for Photo Stitch 1 or Photo Stitch 2: The following dialog box appears. Creating Embroidery Patterns (6) To exit the Stitch Wizard, close the Select Mask dialog box. To select - Brother International PEDESIGN PLUS | Users Manual - English - Page 34
sample file for this tutorial can be found at the following location. Documents (My Documents)\PE-DESIGN PLUS\Tutorial Step 1 Step 2 Step available with the selected font or if the character cannot be converted to an embroidery pattern, the character appears as in the Design Page. If this occurs - Brother International PEDESIGN PLUS | Users Manual - English - Page 35
Patterns 4. Press the Enter key. The text appears in the Design Page. 3. Drag , and to transform the text. b Memo: The character font, size, color and sew type can be changed. c "Setting text attributes" on page 35 and "Embroidery attributes for text" on page 36 Step 2 Transforming text 1. Click - Brother International PEDESIGN PLUS | Users Manual - English - Page 36
Creating Embroidery Patterns :Adjusts the radius of the circle. Step 3 Specifying character spacing Sets the spacing between all characters. 1. Click the text to select it. 2. Change the - Brother International PEDESIGN PLUS | Users Manual - English - Page 37
, click the View tab in the Ribbon, and then click Text Attributes. ■ Font Click in the Font selector, and then click the desired font. 4. Edit the text as needed. Press the Enter key or click the Design Page. c Memo of "Font List" on page 70 ■ Text size Click in the Text Size selector. Type - Brother International PEDESIGN PLUS | Users Manual - English - Page 38
Creating Embroidery Patterns Embroidery attributes for text When text is selected, settings can be specified for the following. The Color pane allows you to set the thread color. c "Color" on page 47 The Sewing Attributes pane allows you to set the embroidery attributes. c "Sew type" on page 45 36 - Brother International PEDESIGN PLUS | Users Manual - English - Page 39
Embroidery Designs Arranging Embroidery Designs Editing Embroidery Designs Selecting patterns ■ Selecting all embroidery . • Press the Tab key to select the next pattern in the order that they were created. while clicking the pattern. ■ Moving manually Drag the selected pattern(s) to the - Brother International PEDESIGN PLUS | Users Manual - English - Page 40
Arranging Embroidery Designs Scaling patterns 1. Select the pattern(s). Handles a Note: Greatly Enlarging/Reducing Stitch Patterns 2. Drag the handle to adjust the selected pattern(s) to the desired size. a Note: Some patterns imported from embroidery cards cannot be scaled. b Memo: • If the - Brother International PEDESIGN PLUS | Users Manual - English - Page 41
right-click them, and then select Group in the pop-up menu that appears. Arranging Embroidery Designs a Note: Some patterns imported from embroidery cards cannot be flipped. ■ Ungrouping patterns Select a grouped embroidery pattern, right-click it, and then select Ungroup in the pop-up menu that - Brother International PEDESIGN PLUS | Users Manual - English - Page 42
Arranging Embroidery Designs Checking Embroidery Patterns Zooming Using the Pan tool Click Fit selected objects to window : Fit Design Page to window b Memo: • Zooming is also possible by dragging the Zoom slider in the status bar or clicking the Zoom ratio. c "PE-DESIGN PLUS Window" on page 61 - Brother International PEDESIGN PLUS | Users Manual - English - Page 43
, specify settings for Thread Width (1), Contrast (2) and Brightness (3), then click Apply (OK). (1) (2) (3) Arranging Embroidery Designs You can display a stitch view of it in order to see how the stitching is connected. ■ Realistic View You can display a realistic view of it in order to see how - Brother International PEDESIGN PLUS | Users Manual - English - Page 44
Arranging Embroidery Designs Checking the stitching with the Stitch Simulator 1. Click 1, then 2. 1 2 2. Click the buttons to view a simulation of the stitching. (3) (1) (2) (4) (5) (7) (8) (6) (1) Starts the stitching simulation. During stitching simulation, this button changes to , - Brother International PEDESIGN PLUS | Users Manual - English - Page 45
and Editing the Sewing Order Click , then . Arranging Embroidery Designs ■ Selecting a pattern 1. Click a frame containing the Click at the top of the Sewing Order pane to select the pattern in the Design Page corresponding to the frame selected in the Sewing Order pane. The pattern can also - Brother International PEDESIGN PLUS | Users Manual - English - Page 46
Arranging Embroidery Designs ■ Editing the sewing order The sewing order can be changed by order. :Click to move the selected pattern to the end of the sewing order. a Note: Check the stitching after changing the sewing order to be sure that overlapping patterns will not be sewn in the wrong order. - Brother International PEDESIGN PLUS | Users Manual - English - Page 47
View tab in the Ribbon, and then click Sewing Attributes. Region sew Region sew type Region sewing on: Region sewing off: ■ Sew type Arranging Embroidery Designs switches on/off line sewing, off region sewing. switches on/ b Memo: When line sewing or region sewing is switched off, it is not - Brother International PEDESIGN PLUS | Users Manual - English - Page 48
Arranging Embroidery Designs Specifying sewing attributes 1. Select an embroidery pattern or the Text tool. 2. Click the Sewing Attributes tab. Adjust with slider. Changing the pattern of programmable fill stitch 1. Select an embroidery pattern. 2. Display the Sewing Attributes pane. 3. From the - Brother International PEDESIGN PLUS | Users Manual - English - Page 49
on the backing material where the appliqué must be sewn. (9) APPLIQUE: sews the appliqué on the backing material. Arranging Embroidery Designs (3) (4) (5) (1) Select the type of stitching (Line, Region) whose color is being selected. Line: Line color Region: Region color (2) From the Thread Chart - Brother International PEDESIGN PLUS | Users Manual - English - Page 50
than the .pes format, the message "Unexpected file format" appears in the Preview box. b Memo: A file can be opened in any of the following ways. • Drag the embroidery design from file Windows Explorer into the PE-DESIGN PLUS window. • Double-click the embroidery design file in Windows Explorer. 48 - Brother International PEDESIGN PLUS | Users Manual - English - Page 51
PE-DESIGN PLUS. In addition, data can be copied and pasted between files that are open at the same time. a Note: If a .pes file created with PE-DESIGN NEXT or earlier is opened with this software, the message "This file will be imported into a new Design Page." appears before the embroidery design - Brother International PEDESIGN PLUS | Users Manual - English - Page 52
Arranging Embroidery Designs 3. Select a folder, and then click OK. ■ From an embroidery card 1. Insert an embroidery card into the USB Card Writer Module. c Refer to "Transferring to a machine by using an original card" on page 52 2. Click then , then , . 4. From the File Type box, select a - Brother International PEDESIGN PLUS | Users Manual - English - Page 53
embroidery design information Click 1, then 2. 1 2 Arranging Embroidery Designs Arranging Embroidery Designs You can enter comments and information about the pattern to a saved .pes file. b Memo: • You can select and check the properties of individual patterns within the embroidery design - Brother International PEDESIGN PLUS | Users Manual - English - Page 54
no necessary data remains on the card. c "From an embroidery card" on page 50 c For details on writing multiple embroidery designs, refer to "Writing Multiple Embroidery Files to an Original Card" on page 72. 1. Insert an original card into the USB Card Writer Module. 3. When the following message - Brother International PEDESIGN PLUS | Users Manual - English - Page 55
outputting data." appears, indicating that the transfer is finished. Click OK. b Memo: • For details on transferring designs with this method, refer to the Operation Manual provided with your embroidery machine. • If multiple machines are connected, specify where the data is to be transferred in the - Brother International PEDESIGN PLUS | Users Manual - English - Page 56
option to print the design at actual size and the sewing information (dimensions of the embroidery pattern, sewing color order, stitch count and hoop Setup dialog box and when the Design Page is set to the larger hoop sizes. This setting is not available if a User Hoop size is selected.) With this - Brother International PEDESIGN PLUS | Users Manual - English - Page 57
. b Memo: The print image can also be displayed by clicking Print Preview in the Print Setup dialog box. 3. Click OK to begin printing. 4. Follow the instructions for the printer to finish printing. Arranging Embroidery Designs 55 - Brother International PEDESIGN PLUS | Users Manual - English - Page 58
Page size according to the size of hoop that you will be using with your embroidery machine. 1. Click , then . User Hoop Setting 2. Specify the settings for the Design Page, and then click OK. (1) (2) (6) (3) (4) (5) (1) Hoop Size: Select the desired hoop size from the selector. (2) Rotate - Brother International PEDESIGN PLUS | Users Manual - English - Page 59
Arranging Embroidery Designs Changing Application Settings Changing the grid settings System unit A grid of dotted lines or solid lines can be following operation. Click 1, then 2. 1 2 Click System Unit, and then select the desired measurement units (mm or inch). Arranging Embroidery Designs 57 - Brother International PEDESIGN PLUS | Users Manual - English - Page 60
Embroidery Designs Editing user thread color lists If you have a list of thread colors that are frequently used, they can be saved in a user thread chart. 1. Click , then . ■ Creating a new thread chart 1. Click New Chart (1). 2. Type in the name of the chart, and then click OK. 2. A user 10), - Brother International PEDESIGN PLUS | Users Manual - English - Page 61
Click New Item (4). 2. To create a new color, click Mix. Arranging Embroidery Designs ■ Editing an item An item registered in the list for a user thread chart can be edited to change the color or thread number. 1. From the list for the user thread chart (8), select the item to be edited, and then - Brother International PEDESIGN PLUS | Users Manual - English - Page 62
Files (x86))\Brother\PE-DESIGN PLUS\Color on the original computer to the Color folder at the same path on the destination computer. Specifying the number of jumps in embroidery design of the DST format With the DST format, you can specify whether or not the jump stitches are trimmed according - Brother International PEDESIGN PLUS | Users Manual - English - Page 63
Supplement Understanding Windows PE-DESIGN PLUS Window 3 45 1 2 Supplement 6 7 10 11 9 8 12 1 Application button settings for the Design Page and user thread chart. 5 Help button Click this button to display the Operation Manual and view information about the software. 6 Sewing Order - Brother International PEDESIGN PLUS | Users Manual - English - Page 64
be displayed as separate dialog boxes (Floating) or attached to the main window (Docking). • Position the pointer over a command to display a ScreenTip, the Quick Access Toolbar (A). : Wizard : Solid View : New : Open : Stitch View : Realistic View : Save : Undo : Zoom : Redo Click 1, then - Brother International PEDESIGN PLUS | Users Manual - English - Page 65
a tab out of the pane. Docking Each pane can be docked back to the window. • Double-click the title bar. • Right-click the pane, and then click click Auto Hide, or simply click in the title bar. b Memo: The Stitch Simulator pane cannot be temporarily hidden (Auto Hide). ■ Using access keys When the - Brother International PEDESIGN PLUS | Users Manual - English - Page 66
Supplement ■ Quick Access Toolbar 1. Click Customize. (1) (A) (2) (3) (5) (4) (6) (7) (8) 2. Repeat the following operations until the desired commands are displayed. (1) Choose commands from: selector Select a command category. (2) Commands: list Select the command to be added. (3) Add button - Brother International PEDESIGN PLUS | Users Manual - English - Page 67
Open Save Save As Design Property Print Wizard Export File Options Exit Supplement Reference p. 48 p. 48 p. 18 p. 18 p. 51 p. 54 p. 10 p. 18 p. 57, p. 60, p. 63 p. 19 Supplement (1) (2) No. Menu Select (1) Zoom Pan Photo Stitch 1 Photo Stitch 2 (2) Auto Punch Cross Stitch Text (3) Import - Brother International PEDESIGN PLUS | Users Manual - English - Page 68
Supplement ■ View tab (1) No. Menu Solid View (1) Stitch View Realistic View Sewing Order (2) Stitch Simulator Sewing Attributes (2) (3) Reference p. 41 p. 41 p. 41 p. 43 p. 42 p. 46 No. Menu Text Attributes (2) Color Palette Show Grid (3) Snap to Grid Grid Interval Reference p. 32, - Brother International PEDESIGN PLUS | Users Manual - English - Page 69
Tips and Techniques This software allows you to create a wide variety of embroidery patterns and supports wider ranges for the setting of the sewing attributes (thread density, sewing pitch, etc.). However, the final result also depends on your particular embroidery machine model. We recommend that - Brother International PEDESIGN PLUS | Users Manual - English - Page 70
attributes for each sew type are first set to their default settings; however, by changing the settings of the sewing attributes, you can create custom stitching. c For more details, refer to "Line sewing attributes" on page 68 and "Region sewing attributes" on page 69. Line sew types Zigzag - Brother International PEDESIGN PLUS | Users Manual - English - Page 71
■ Region sewing attributes The available attributes differ depending on the selected sew type. Satin stitch/Fill stitch/Programmable fill stitch Sets underlay stitching on or off. To specify underlay stitching, select the check box. Off On With text patterns Under sewing With other patterns - Brother International PEDESIGN PLUS | Users Manual - English - Page 72
Supplement Font List Text 013 001 014 002 015 003 016 004 017 005 018 006 019 020 007 021 008 022 023 009 024 010 025 026 011 027 012 028 70 - Brother International PEDESIGN PLUS | Users Manual - English - Page 73
Text 029 030 031 032 033 034 035 b Memo: Uppercase letters of the English alphabet Lowercase letters of the English alphabet Numerals Punctuation marks, brackets and other symbols Uppercase and lowercase accented letters Supplement 71 Supplement - Brother International PEDESIGN PLUS | Users Manual - English - Page 74
PES-Writer Writing Multiple Embroidery Files to an Original Card Starting up PES-Writer Click , then All Programs, then PE-DESIGN PLUS, and then click PES-Writer. a Note: • The original card is inserted correctly when you hear it snap into place. • It is not necessary to turn off the computer - Brother International PEDESIGN PLUS | Users Manual - English - Page 75
that comes with the software so that you can easily recover the files that were on the card. c "From an embroidery card" on page 50 • To check the contents of the original card, open the Browse dialog box, and then click , which appears at the top of the list in the Browse window. The patterns saved - Brother International PEDESIGN PLUS | Users Manual - English - Page 76
Select System Unit from the menu bar. 2. Select the appropriate units (mm or inch) and then click OK. Help menu ■ Operation Manual Displays the Operation Manual. Click Help, then Operation Manual from the menu bar. ■ About PES-Writer Displays version and copyright information. Click Help, then About - Brother International PEDESIGN PLUS | Users Manual - English - Page 77
Troubleshooting If a problem occurs, click Customer Support on the menu of PE-DESIGN PLUS to visit the following Web site, where you can find causes and solutions to various problems and answers to frequently asked questions. If you have a problem, check the following solutions. If the solutions - Brother International PEDESIGN PLUS | Users Manual - English - Page 78
45 line sewing attributes 68 M Manual Select 20 Max. Density 23 Max. Number of Colors 20, 26, 28 measurement units 57 Memory 5 Monitor 5 N New 48 NOT DEFINED 47 number of jumps 60 O Online Registration 9 opening .pes file 48 new Design Page 48 PE-DESIGN PLUS file 48 Operating system - Brother International PEDESIGN PLUS | Users Manual - English - Page 79
Index P .pen files 72 .pes files 72 Pan 40 pattern information 51 adding comments 51 Photo Stitch 1 11, 19 Photo Stitch 2 21 Port 5 previewing 41 Printer 5 printing embroidery patterns 55 preview 55 settings 54 Processor 5 Programmable fill stitch 69 Property 51 Q Quick Access - Brother International PEDESIGN PLUS | Users Manual - English - Page 80
XF0606-001 English Printed in China
-
 1
1 -
 2
2 -
 3
3 -
 4
4 -
 5
5 -
 6
6 -
 7
7 -
8
-
9
-
10
-
11
-
12
-
13
-
14
-
15
-
16
-
17
-
18
-
19
-
20
-
21
-
22
-
23
-
24
-
25
-
26
-
27
-
28
-
29
-
30
-
31
-
32
-
33
-
34
-
35
-
36
-
37
-
38
-
39
-
40
-
41
-
42
-
43
-
44
-
45
-
46
-
47
-
48
-
49
-
50
-
51
-
52
-
53
-
54
-
55
-
56
-
57
-
58
-
59
-
60
-
61
-
62
-
63
-
64
-
65
-
66
-
67
-
68
-
69
-
70
-
71
-
72
-
73
-
74
-
75
-
76
-
77
-
78
-
79
-
80
 |
 |

Operation Manual
PERSONAL EMBROIDERY DESIGN SOFTWARE SYSTEM
Please visit us at
where you can get product
support and answers to frequently asked questions (FAQs).