Brother International PS-1000 Operation Manual
Brother International PS-1000 Manual
 |
View all Brother International PS-1000 manuals
Add to My Manuals
Save this manual to your list of manuals |
Brother International PS-1000 manual content summary:
- Brother International PS-1000 | Operation Manual - Page 1
\I/ • 0.. \I/ • \I/ • O;1 / I\ /I\ /I\ /I\ / I\ / I\ / I\ / I* //lI\\ \I/ \I/ /I\ / I\ /I\ /l• \I/ .11\ /I\ /I\ /I\ /I• \I/ /I\ OPERATION MANUAL -'-I•s- /i' /I\ MANUAL DE INSTRUCCIONES 'I, /I\ /I\ /I\ ENGLISH ESPANOL 194348-011 Printed in Taiwan -\I0, - /I• brother - Brother International PS-1000 | Operation Manual - Page 2
, threading bobbin, or changing the presser foot, and the like. 15. Always unplug the sewing machine from the electrical outlet when removing covers, lubricating, or when making any of the user service adjustments mentioned in the instruction manual. "SAVE THESE INSTRUCTIONS" "This sewing machine is - Brother International PS-1000 | Operation Manual - Page 3
manual de instrucciones. "CONSERVE ESTE MANUAL DE INSTRUCCIONES" "Esta maquina de coser es para uso domestico" FOR USERS IN UK, EIRE, MALTA AND CYPRUS ONLY. If your sewing machine off - When servicing the sewing machine, or when removing covers or changing lamps, the machine or the electrical set - Brother International PS-1000 | Operation Manual - Page 4
Width Dial 12 Reverse Sewing Button 13 Drop Feed Lever 14 Converting to Free-arm Style 15 THREADING THE MACHINE 15 Winding the Bobbin 15 Lower Threading with Quick-set Needle Plate 17 Lower Threading without Quick-set Needle Plate 18 Upper Threading 19 Using Needle Threader - Brother International PS-1000 | Operation Manual - Page 5
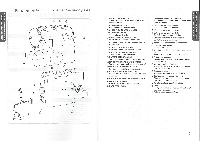
for operation. C) HOLE FOR VERTICAL SPOOL PIN Used to hold a second spool of thread for twin needle sewing. C) BUTTONHOLE FINE ADJUSTMENT SCREW C) FOOT CONTROLLER Used to control sewing speed start and stop. © DROP FEED LEVER C) Dispositivo de bobinado de la canilla Hace bobina para la canilla que - Brother International PS-1000 | Operation Manual - Page 6
Connect the three-prong plug into the machine. It is located between the foot controller and. the power supply plug on the cord. 2. Connect the power supply plug into a wall outlet. CAUTION: 1. When changing the needle, bobbin or light bulb or when the sewing machine is not in use, it is recommended - Brother International PS-1000 | Operation Manual - Page 7
facing the back. 6. con la parte redonda cara Foot Controller When the foot controller is depressed lightly, the machine will run at a low speed. When the pressure on the foot controller is increased, the machine's speed will increase. When pressure on the foot controller is released, the machine - Brother International PS-1000 | Operation Manual - Page 8
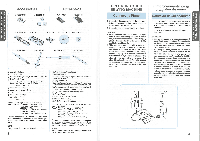
the lever located at the palanca delprensatelas. back of the holder. 2. Suelte elprensatelas levantando la palanca que 12 34 5 67 3. Place a different presser foot on the needle plate so that the bar on the presser foot is in line with the hay en la parte trasera del soporte. 3. Coloque otro - Brother International PS-1000 | Operation Manual - Page 9
SEWING M CHINE CONOZCA SU MAQUINA DE COSER RECOMMENDED WIDTHS AND LENGTHS FOR STITCHES PATTERN STITCH NAME RECOMMENDED WIDTH RECOMMENDED PAGE IN [mm(inch)] LENGTH [mm(inch)] INSTRUCTIONS ii b t=, ac - d Id .0' Ii 2,5 (3/32) Fija 2,5 (3/32) PAGINA DEL MANUAL 40 42 27 30 31 32 33 31 34 34 35 35 36 - Brother International PS-1000 | Operation Manual - Page 10
THE STITCH. The "0" setting does not feed the material. This is used for sewing on a button. The "F" area is used for making a Satin Stitch (a close needed for making the Satin Stitch varies according to the material and thread being used. To determine the exact dial position, you should first - Brother International PS-1000 | Operation Manual - Page 11
foot pedal. To sew forward, release the Reverse Sewing Button. The machine will then sew forward. Reverse sewing is used for back Drop Feed Lever immediately after they are raised, turn the balance wheel toward you once and after the feed dogs are raised, lower them using the Drop Feed Lever. C) Drop - Brother International PS-1000 | Operation Manual - Page 12
NOTE: The machine stops automatically when the bobbin is full. 5. Cut the thread, push the shaft to the left and remove the full bobbin from the shaft. NOTE: After winding the bobbin, it is normal to hear the sound of the clutch engaging before sewing or turning the balance wheel by hand. NOTA: La - Brother International PS-1000 | Operation Manual - Page 13
Threading with Quick-set Needle Plate 1. Raise the needle to its highest position by turning the balance wheel toward you (counterclockwise) and raise the presser foot lever. 2. Slide the button and open the cover. () Slide button 0 Cover the bobbin into the shuttle and deliver the thread through - Brother International PS-1000 | Operation Manual - Page 14
3NIHOVLAI ONINGS anoA ONIMONN KNOWING YOUR 'SEWING MACHINE CONOZCA SU MAQUINA DE COSER Upper Thvead ngj 1. Raise the presser foot using the Presser Foot Lever. 2. Raise the needle to its highest position by turning the balance wheel toward you (counterclockwise). Enhebrado ouperllor 1. Levante - Brother International PS-1000 | Operation Manual - Page 15
thread will come up from the bobbin in a large loop. 4. Pull out about 15 cm (6") of both threads and place them between the toes of the presser foot to the right toward the back of the machine and pull toward the back of the machine straight behind the presser foot. C) Upper thread ® Lower thread - Brother International PS-1000 | Operation Manual - Page 16
3s• O31 r , * rwnsrnz•N•3 - fl • A JNIM • Twin Needle Sewing Your sewing machine is designed for twin needle sewing, which allows you to sew with two top threads. You can use the same color or two different colors of thread for making decorative stitches. Any of the patterns, except the buttonhole - Brother International PS-1000 | Operation Manual - Page 17
CHART OF SEWING FABRICS, NEEDLES AND THREADS SEWING FABRICS NEEDLE SIZE THREAD SIZES VERY Muslin 9 11 14 (Supplied with your machine) Cotton: 80 Synthetic Fine Mercerized Cotton Cotton thread size from the above chart. 2. Use the same size thread for the upper and lower threads (spool and bobbin - Brother International PS-1000 | Operation Manual - Page 18
thread toward the back of the presser foot. 4. Place the fabric under the presser foot and position the needle 1 cm (3/8") from the edge of the fabric. 5. Lower the presser foot. 6. To backtack, push down the Reverse Sewing superior hacia la parte de atras del Sewing Direction 1. Stop the machine - Brother International PS-1000 | Operation Manual - Page 19
threads with the thread cutter located on the left side of the machine. C) Thread cutter 5. To prepare the machine for the next seam, pull about 10 cm (4") of thread through the toes of the presser foot toward the back of the machine cortador ubicado en la parte izquierda de la maquina to sew using - Brother International PS-1000 | Operation Manual - Page 20
foot so that the straight stitches are sewn on the seamline and the zigzag stitches are sewn slightly over the folded edge. 3. This stitch requires a tighter thread tension than normal. 4. Sew INCORPORADAS 1. Both the threads should be the same color as the fabric. 2. Fold back the fabric to the - Brother International PS-1000 | Operation Manual - Page 21
sewing knitted fabrics. When nylon thread is used, the stitch will not be visible. 1. Place the edge of the two pieces of fabric together and center them under the presser foot. 2. Sew Stitch) Stitch Length Stitch Width F-1.5 3-5 This machine automatically produces a Scallop Stitch which may be - Brother International PS-1000 | Operation Manual - Page 22
slightly when beginning to sew. • Use thicker than normal threads for sewing. 4. After sewing, remove the basting and the paper. Finish by tying knots on the reverse side at the beginning and the end of the seams. 0 First needle drop Patchwork Modelo de puntada 1 (Puntada de union) (Puntada - Brother International PS-1000 | Operation Manual - Page 23
sewing stretch materials. 1. Set the Pattern Selection Dial to Comb Stitch, Arrowhead Stitch, Slant Overlock Stitch or Elastic Overlock Stitch. 2. Position the fabric under the presser foot de unos 6 mm (1/4') dado que asf permite a la parte derecha (zigzag) de la puntada enganchar la orilla cortada - Brother International PS-1000 | Operation Manual - Page 24
sew foot with the marks on the fabric as shown in fig. A. The front bar tack will be sewn first. 5. Open the button plate and insert the button. See fig. B. 6. Lower the buttonhole lever and push it back slightly as in fig. C. 7. While gently holding the upper thread, start the machine parte - Brother International PS-1000 | Operation Manual - Page 25
the foot ® Botton plate C) Alinee lasmarcas delprensatelas conlas del tejido. © Marca de inicio en el tejido. ® Marcas en el prensatelas. ® Placa para botones. A 2 3 B 4 C D Making a Buttonhole (For 4-step BH Type) Pattern Stitch Length Stitch Width Foot Ii] .0' HI F-1.5 3-5 Buttonhole foot - Brother International PS-1000 | Operation Manual - Page 26
a Step b b (Left side) Pattern anc c a LI b El I Step c -.-- a (Back end of buttonhole) ac irc a LI Step d (Right side) d = d How to Sew 1. Set the Pattern Selection Dial to a. 2. Lower the presser foot and sew 5 to 6 stitches. 3. Stop the machine when the needle is at the left side of - Brother International PS-1000 | Operation Manual - Page 27
button between the foot and the fabric and make sure that the needle enters the holes without hitting the button. If it hits see step 1. 5. At a slow speed, sew approximately 10 stitches. 6. Remove the material from the machine. Cut the upper and lower threads and tie both threads at the back of the - Brother International PS-1000 | Operation Manual - Page 28
situado en su parte posterior, instale la by setting the Drop Feed Lever to foot together with a fabric underlay for reinforcement. 4. Lower the presser foot. 5. Begin sewing alternating between gently drawing the work away from you and pulling it toward you. With the darning plate on the machine - Brother International PS-1000 | Operation Manual - Page 29
sew around foot removed. 6. Pull the lower thread up through the work at the starting position by turning the balance wheel and make a few holding stitches. 7. Grip the hoop with the thumb and forefingers of both hands while pressing the fabric with the middle and third fingers and supporting - Brother International PS-1000 | Operation Manual - Page 30
from the outlet. 2. Loosen the face plate screw as shown in fig. A. 3. Remove the face plate from the machine as illustrated in fig. B. Cambio de final del dibujo. 4. Replace the sewing light bulb. See fig. C. • Bulb • Loosen ® Tighten 5. Reattach the face plate and fasten the screw as shown in - Brother International PS-1000 | Operation Manual - Page 31
Muelle 0 O 0 0 0 O 0 5 4 Performance Checklist Whenever sewing difficulties are encountered, review the section in this instruction manual that details the operation you are performing to make sure you are correctly using the machine. If the problem continues, the following check list may help - Brother International PS-1000 | Operation Manual - Page 32
thread is not correctly installed. 4 Page 19 Upper thread is tangled. 4 Page 19 iNo Lower thread is tangled. Page 22 No ♦ Bobbin is not threaded of needle size/ thread size/fabric is incorrect. Threading is not correct. 4 Page 19 No Page 25 No CONTACT YOUR LOCAL SERVICE CENTER 55 LISTADO - Brother International PS-1000 | Operation Manual - Page 33
fabric. Page 19 No No Drop feed lever is in down position. 4 Page 14 No Page 4 No Main power switch is turned off. 4 Page 5 iNo The bobbin winder shaft is slid to the right. Page 15 No Foot controller is not used correctly. Page 5 CONTACT YOUR LOCAL SERVICE CENTER 57 LISTADO DE POSIBLES - Brother International PS-1000 | Operation Manual - Page 34
maquina. 59 Accessories Applique Arrowhead Stitch Bead Stitch Blind Hem Stitch Buttonhole Buttonhole Fine Adjustment Button Sewing Changing Presser Foot Changing the Bulb Changing the Needle Cleaning Comb Stitch Connecting Plugs Darning Double Action Stitch Drawing Up Lower Thread Drop Feed Lever - Brother International PS-1000 | Operation Manual - Page 35
Parts 1 Relative Chart of Sewing Fabrics, Needles and Threads 25 Repacking 59 Reverse Sewing Button 13 Scallop Stitch 34 Sewing Stitch 27 Stretch Blind Stitch 31 Thread Tension Triple Stretch Stitch Triple Zigzag Stretch Stitch Troubleshooting Twin Needle Sewing 24 27 39 55, 57 23
-
 1
1 -
 2
2 -
 3
3 -
 4
4 -
 5
5 -
 6
6 -
 7
7 -
8
-
9
-
10
-
11
-
12
-
13
-
14
-
15
-
16
-
17
-
18
-
19
-
20
-
21
-
22
-
23
-
24
-
25
-
26
-
27
-
28
-
29
-
30
-
31
-
32
-
33
-
34
-
35
 |
 |

.
.el/
‘i,-
•
Nte•
‘1
.?
\i/
\I/
\I/
\I/
\I/
\I/
O;1
•
/I\
•
/I\
•
/I\
•
/I\
•
/I\
• +
0
.
/I\
•
/
I\
•
/
I\
•
••••
/I\
•
•••••
/I\
•
0..
/I\
•
/ I\
•
----..---
/
I\
•
/I\
/
I*
/l\
/I\
ENGLISH
ESPANOL
194348-011
Printed
in
Taiwan
\I/
\I/
/I\
/I\
/I\
\I/
.
1
1\
/I\
/I•
\I/
/I\
/I\
/I\
/I\
/I\
\I/
\I/
\I/
\I/
\I/
\I/
\I/
\I/
\I/
\I/
\I/
\I/
\I/
\I/
OPERATION
MANUAL
MANUAL
DE
INSTRUCCIONES
brother®
/l•
/I\
/I\
‘Is
--•—
/i‘
'I,
/I\
\I,
—0—
/I•
• -
•
•
- •
- •
•
•
•
•
•
-
/I\
/
I\
/I\
/I\
/I\
/ I \
/
I\
/I\
/I\
L.
-
/i•
/,‘
/I\
•
•
•
/I\
/I\
-
/I\