Brother International PS-1000 Operation Manual - Page 8
Various, Controls
 |
View all Brother International PS-1000 manuals
Add to My Manuals
Save this manual to your list of manuals |
Page 8 highlights
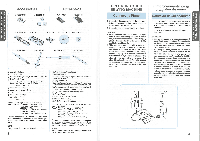
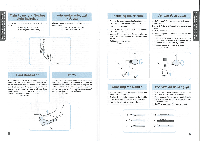
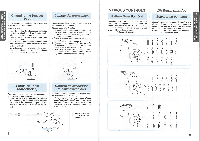
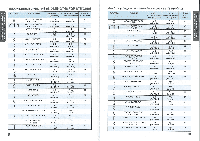
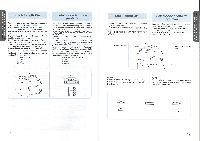
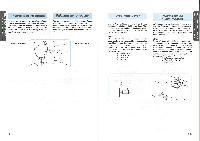
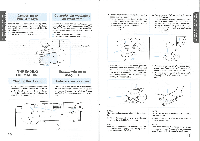
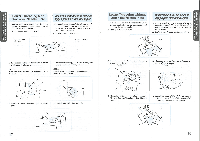
KNOWING YOUR SEWING MACHINE CONOZCA SU MAQUINA DE COSER , IN JNIM3S . fl • A JNIMi NCI • rW nS r3Z.N.O 1 r VARIOUS CONTROLS Distintos mandos Changing the Presser Foot Cambio del prensatelas Pattern Selection Dial Selector de puntadas It may be necessary to change the presser foot according to your sewing needs. Segunsusnecesidades de costura,puedesernecesario cambiar elprensatelas. To select a stitch, simply turn the Pattern Selection Dial, located on the right side of the machine: The Pattern Selection Dial may be turned in either direc- Para seleccionar una puntada, solo hace falta girar el selector de puntadas, situado en la derecha de la maquina. Este selector se puede girar en cualquier SNAP-ON TYPE 1. Raise the needle to its highest position by turning Tipo de enganche de golpe 1. Levante la aguja a su posiciOn mas alta, girando tion. The following page shows the recommended range of stitch lengths and widths. sentido. En la pagina siguiente, se indican las zonas recomendadas de largos y anchos de puntadas. the balance wheel toward you (counter clock- la ruedecilla hacia usted (en el sentido contrario ti CD Pattern selection dial 0) Selector de puntadas wise) and raise the presser foot lever. al de las manecillas de un reloj) y levante la 2. Release the foot by raising the lever located at the palanca delprensatelas. back of the holder. 2. Suelte elprensatelas levantando la palanca que 12 34 5 67 3. Place a different presser foot on the needle plate so that the bar on the presser foot is in line with the hay en la parte trasera del soporte. 3. Coloque otro prensatelas en la placa de agujas l J slot on the shank. de tal forma que la barra del prensatelas quede /:° 4. Lower the presser foot lever and fix the presser alineada con la ranura del soporte. 8 9 10 11 12 13 14 foot onto the shank. If the presser foot is in the correct location, the bar should snap in. 4. Bajelapalanca delprensatelasyfifeelprensatelas en elsoporte. Sielprensatelas esta bien colocado, la barra debe engancharse de golpe. C' C, 0 15 16 17 18 19 20 21 . • 0 0 Extension Table (Accessories) The accessories are stored in the compartment behind the extension table cover. * Since the cover may be slightly difficult to remove in the beginning, pull it forward from the right side as shown in the illustration. To put back the extension table cover, push it in on the left side first. Soporte de accesorios (mesita extensible) Los accesorios estan metidos en el compartimento situado detras de la tapa del soporte. *Como la tapa puede parecer bastante dificil de abriralprincipio, tirela hacia adelanteporlaparte derecha, tal como indica la ilustracion. Para volvera colocarla, vuelva a empujarla primeroporla parte izquierda. ® Extension table ® Extension table cover 2 I C) Soporte de accesorios Tapa del soporte de accesorios 7 4 5 6 7 10 11 12 13 14 15 0 ncac d El all_ 2 3 5 6 lJ 0 7 8 9 10 11 12 C.' 8
-
 1
1 -
2
-
 3
3 -
 4
4 -
 5
5 -
 6
6 -
 7
7 -
 8
8 -
 9
9 -
 10
10 -
 11
11 -
 12
12 -
 13
13 -
14
-
15
-
16
-
17
-
18
-
19
-
20
-
21
-
22
-
23
-
24
-
25
-
26
-
27
-
28
-
29
-
30
-
31
-
32
-
33
-
34
-
35
 |
 |
