Brother International RH-9820 Basic Instruction Manual - English - Page 23
Installing the treadle unit (when using the treadle)
 |
View all Brother International RH-9820 manuals
Add to My Manuals
Save this manual to your list of manuals |
Page 23 highlights
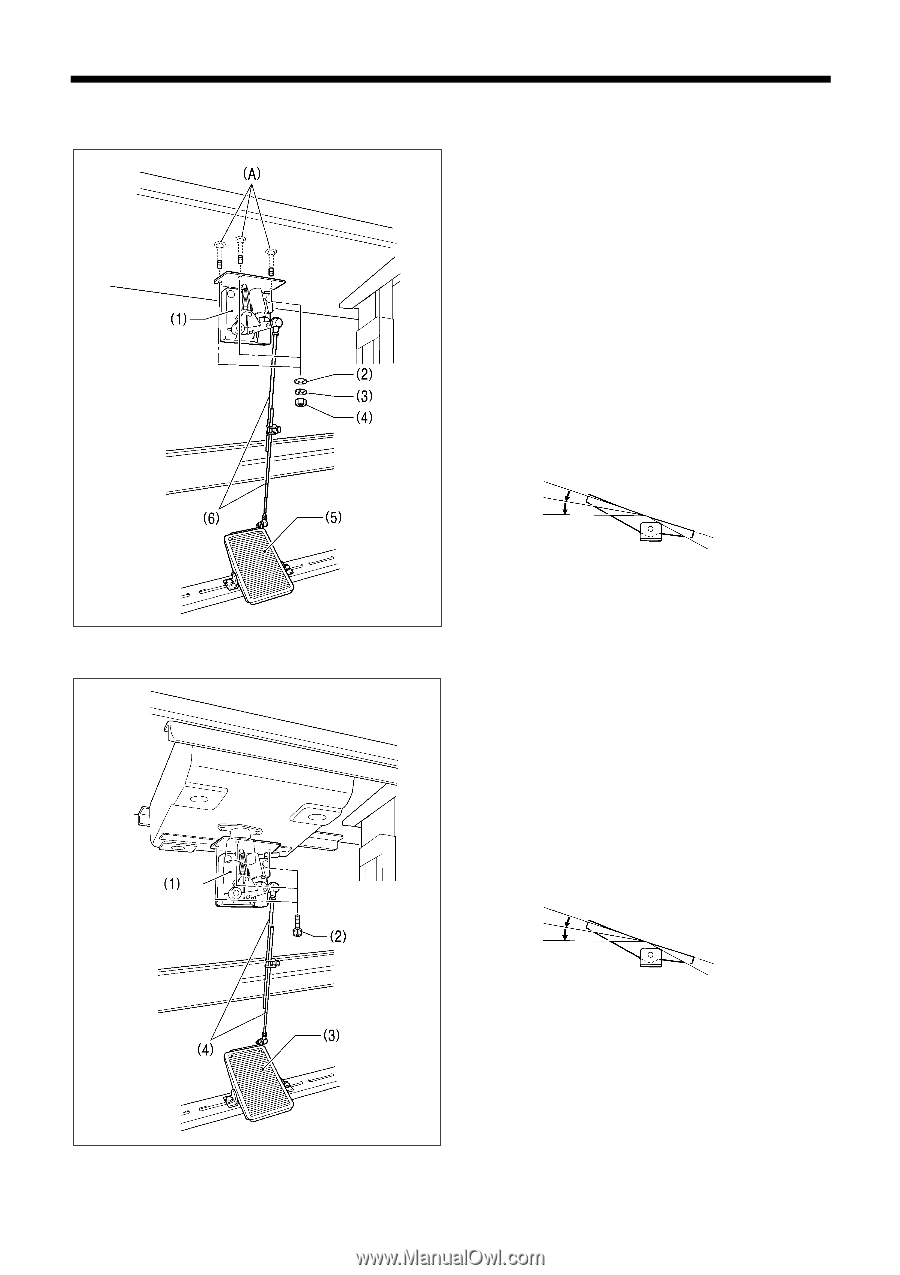
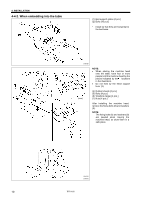
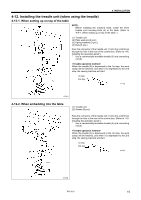
4. INSTALLATION 4-12. Installing the treadle unit (when using the treadle) 4-12-1. When setting up on top of the table NOTE: Before installing the machine head, install the three treadle unit mounting bolts (A) to the table. (Refer to "4-4-1. When setting up on top of the table".) (1) Treadle unit (2) Plain washers [3 pcs.] (3) Spring washers [3 pcs.] (4) Nuts [3 pcs.] Pass the connector of the treadle unit (1) into the control box through the hole in the rear of the control box. (Refer to "4-8. Installing the operation panel".) * Use a commercially-available treadle (5) and connecting rod (6). When the treadle (5) is depressed to the 1st step, the work clamp will be lowered, and when it is depressed to the 2nd step, the sewing machine will start. 1st step 2nd step 4441Q 0359B 4-12-2. When embedding into the table (1) Treadle unit (2) Screws [3 pcs.] Pass the connector of the treadle unit (1) into the control box through the hole in the rear of the control box. (Refer to "4-8. Installing the operation panel".) * Use a commercially-available treadle (3) and connecting rod (4). When the treadle (3) is depressed to the 1st step, the work clamp will be lowered, and when it is depressed to the 2nd step, the sewing machine will start. 1st step 2nd step 4441Q 0360B RH-9820 15
-
 1
1 -
2
-
3
-
4
-
5
-
6
-
7
-
8
-
9
-
10
-
11
-
12
-
13
-
14
-
15
-
16
-
17
-
 18
18 -
 19
19 -
 20
20 -
 21
21 -
 22
22 -
 23
23 -
 24
24 -
 25
25 -
 26
26 -
 27
27 -
 28
28 -
29
-
30
-
31
-
32
-
33
-
34
-
35
-
36
-
37
-
38
-
39
-
40
-
41
-
42
-
43
-
44
-
45
-
46
-
47
-
48
-
49
-
50
-
51
-
52
-
53
-
54
-
55
-
56
-
57
-
58
-
59
-
60
-
61
-
62
 |
 |