Brother International SC9500 Quick Setup Guide - Multi - Page 1
Brother International SC9500 Manual
 |
View all Brother International SC9500 manuals
Add to My Manuals
Save this manual to your list of manuals |
Page 1 highlights
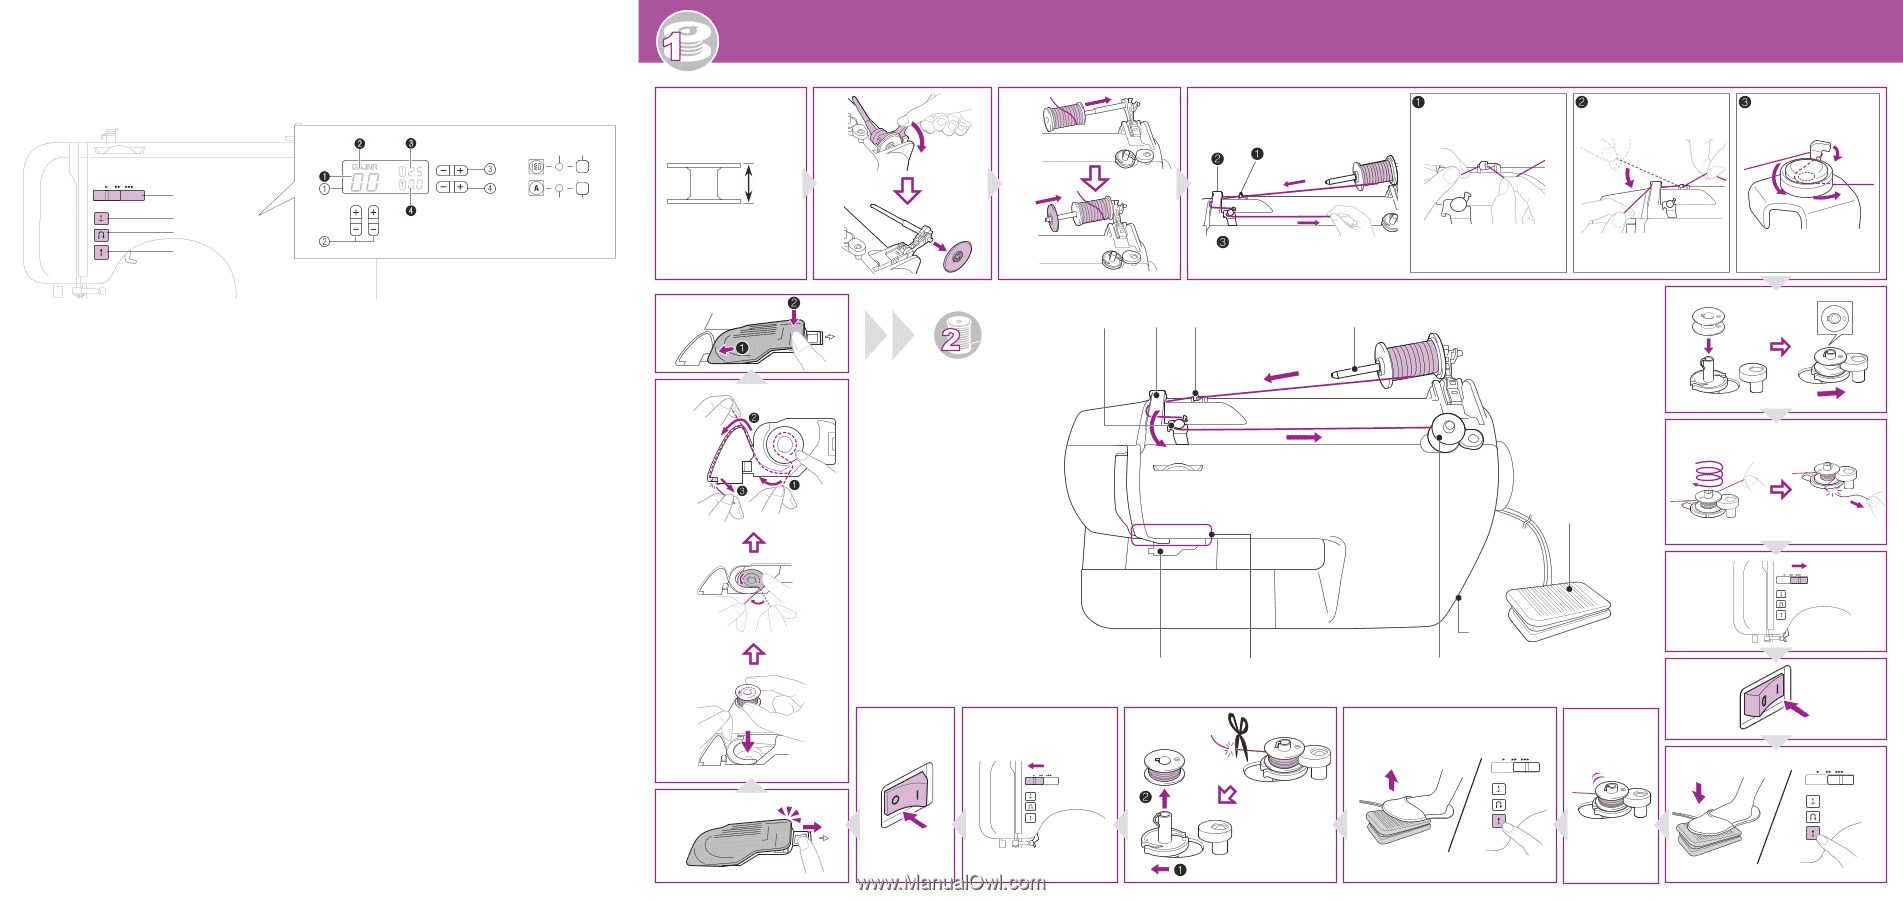
■ Operation keys and LCD Bedieningstoetsen en LCD-display Bedientasten und LCD-Feld Tasti di funzionamento e display LCD Touches de fonctionnement et affichage à cristaux liquids Teclas de operación y pantalla de LCD 1 56 9 78 0 A B 1 LCD (liquid crystal display) 1 Number of the selected stitch 2 Presser foot to be used 3 Stitch length (mm) 4 Stitch width (mm) 2 Stitch selection keys 3 Stitch length adjustment key 4 Stitch width adjustment key 5 Utility stitch indicator 6 Utility stitch key 7 Character stitch indicator 8 Character stitch key 9 Sewing speed controller 0 Needle position button A Reverse/reinforcement stitch button B Start/stop button 1 LCD-Feld (Flüssigkristallanzeige) 1 Nummer des ausgewählten Stiches 2 Erforderlicher Nähfuß 3 Stichlänge (mm) 4 Stichbreite (mm) 2 Stichauswahltasten 3 Stichlängeneinstelltaste 4 Stichbreiteneinstelltaste 5 Nutzstichanzeige 6 Nutzstichtaste 7 Buchstabenstichanzeige 8 Buchstabenstichtaste 9 Nähgeschwindigkeitsregler 0 Taste „Nadelposition" A Taste „Rückwärts/Vernähen" B Taste "Start/Stopp" 1 LCD (liquid crystal display) 1 Nummer van de geselecteerde steek 2 Te gebruiken persvoet 3 Steeklengte (mm) 4 Steekbreedte (mm) 2 Steekselectietoetsen 3 Steeklengtetoets 4 Steekbreedtetoets 5 Naaistekenindicator 6 Naaistekentoets 7 Letterstekenindicator 8 Letterstekentoets 9 Schuifknop voor snelheidsregeling 0 Naaldstandtoets A Achteruit/verstevigingssteektoets B Start/stoptoets 1 LCD (display a cristalli liquidi) 1 Numero corrispondente al punto selezionato 2 Piedino premistoffa da utilizzare 3 Lunghezza del punto (mm) 4 Larghezza del punto (mm) 2 Tasti di selezione del punto 3 Tasto di regolazione della lunghezza del punto 4 Tasto di regolazione della larghezza del punto 5 Indicatore Punti utili 6 Tasto Punti utili 7 Indicatore Punto caratteri 8 Tasto Punto caratteri 9 Regolatore della velocità di cucitura 0 Pulsante "Posizione ago" A Pulsante "Punti di fermatura/rinforzo" B Pulsante "Avvio/stop" 1 1 2 3 6 7 4 8 2 9 3 0 4 A 5 B 1 Affichage à cristaux liquides 1 Numéro du point sélectionné 2 Pied-de-biche à utiliser 3 Longueur du point (mm) 4 Largeur du point (mm) 2 Touches de sélection de point 3 Touche de réglage de la longueur du point 4 Touche de réglage de la largeur du point 5 Témoin de point utilitaire 6 Touche de point utilitaire 7 Témoin de point de caractère 8 Touche de point de caractère 9 Commande de vitesse de couture 0 Touche Positionnement aiguille A Touche Point inverse/renfort B Touche Marche/arrêt 1 LCD (pantalla de cristal líquido) 1 Número de la puntada seleccionada 2 Pie prensatela que se va a utilizar 3 Longitud de la puntada (mm) 4 Anchura de la puntada (mm) 2 Teclas de selección de puntada 3 Tecla de ajuste de longitud de la puntada 4 Tecla de ajuste de anchura de la puntada 5 Tecla de puntada con aplicaciones 6 Indicador de puntada con aplicaciones 7 Tecla de puntada con caracteres 8 Indicador de puntada con caracteres 9 Control de velocidad manual 0 Botón de Posición de aguja A Botón de Costura en reversa/remate B Botón de Inicio/parar g f e Preparing the bobbin thread Preparazione della spolina Vorbereitung des Spulenfadens Preparación del hilo de la bobina Préparation du fil de la canette De onderdraad voorbereiden 2 3 4 11.5 mm (7/16 inch) 4 44 23 5 d c 6 9a _ eg 79ac 8d 560b b a 0 7 8 9
-
 1
1 -
 2
2
 |
 |