Canon 1211B002 Easy Start Guide - Page 1
Canon 1211B002 - DR 1210C Manual
 |
UPC - 013803063721
View all Canon 1211B002 manuals
Add to My Manuals
Save this manual to your list of manuals |
Page 1 highlights
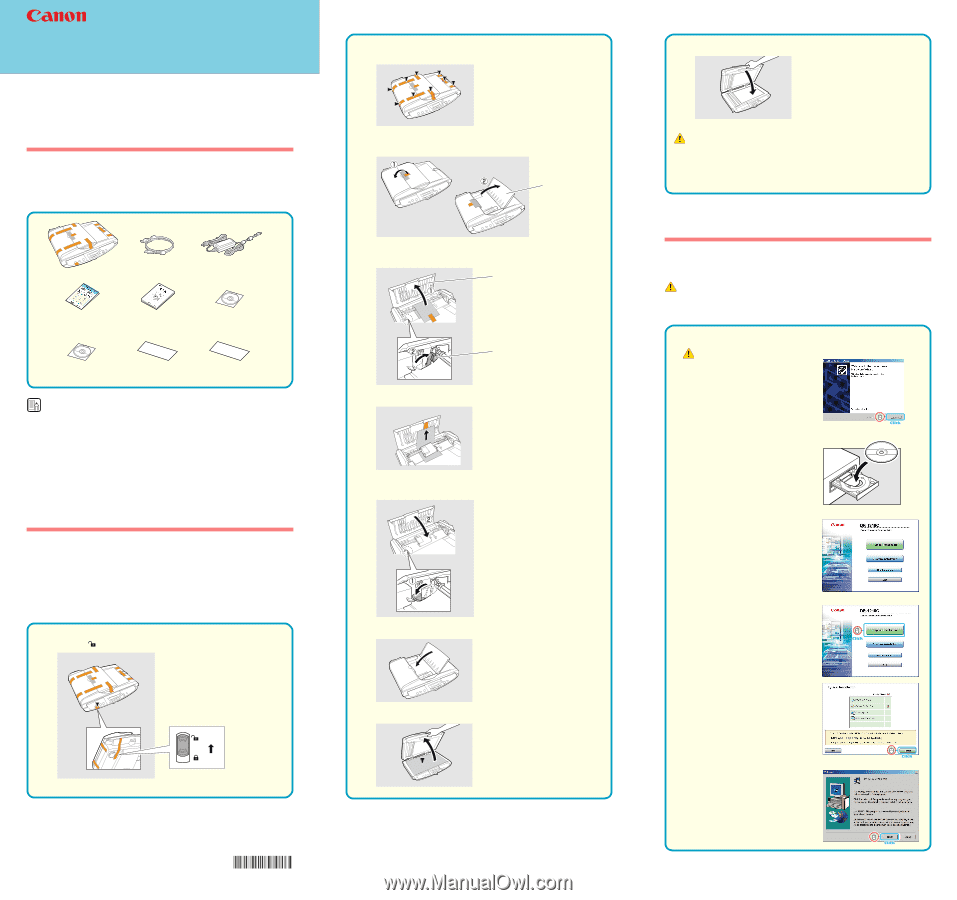
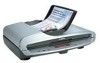
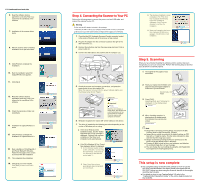
Document Scanner DR-1210C Easy Start Guide Thank you for purchasing the Canon DR-1210C Document Scanner. This Easy Start Guide describes the procedure for setting up the scanner for use. Follow the procedures outlined in this Easy Start Guide to set up the scanner. Details on using the scanner are described in the User's Guide packaged with the scanner. Before you use the scanner, make sure to thoroughly read the User's Guide. Step 1. Checking the Packing List When you unpack your scanner, make sure that it contains all of the following accessories. If any of the items listed below are missing or damaged, contact your local authorized Canon dealer or service representative. DR-1210C scanner USB cable Easy Start Guide (this document) User's Guide AC adapter DR-1210C Setup Disc Adobe Acrobat Setup Disc Warranty Card (U.S.A. and Canada only) Registration Card (U.S.A. and Canada only) Note ● The DR-1210C Setup Disc contains the "DR-1210C Scanner Driver", "CapturePerfect 3.0", and "OmniPage SE 4", made by Nuance Communications Inc., and "Presto! BizCard 5 SE", made by NewSoft Technology Corp. ☞User's Guide p.17 "About the Setup Disc" ● Items included in this package are subject to change without notice. ● You must keep the machine's packaging and packing materials for storing or transporting the machine. Step 2. Removing the Packing Materials and Removing the Transport Locks Remove the scanner from the box, take it out of the plastic bag and release the lock switch on the bottom of the unit. Remove the orange tape and protective sheets from the scanner. 1. Peel off the orange tape on the operation panel and press the lock switch to (Unlock) position. Unlock Lock Lock Switch ■ Trademarks • Canon and the Canon logo are registered trademarks of Canon Inc. in the United States and may also be trademarks or registered trademarks in other countries. • Microsoft Windows® is a registered trademark of Microsoft USA in the United States and other countries. • Other brands and product names used in this manual may be trademarks or registered trademarks of their respective companies. PUB. CE-IE-489 ©2006 CANON ELECTRONICS INC. *CE-IE-489* 2. Peel off the tape holding the center of the document feed tray and then remove all of the tape (indicated by ▼). 3. Peel off the orange tape fastening the document feed tray (1) and open the document feed tray. Document Feed Tray 4. Open the feeder cover (1), and move the paper release lever in the direction indicated by the arrow on the lever (2). Feeder Cover Paper Release Lever 5. Remove the protective sheet. 6. Return the paper release lever to its original position (1), and gently close the feeder cover until it clicks into place (2). 7. Carefully close the document feed tray. 8. Open the feeder and remove the protective sheet (indicated by ▼). 9. Carefully close the feeder. CAUTION ● Close the feeder gently to avoid catching your fingers, as this may result in personal injury. ● Do not use excessive force when closing the feeder, as this may damage or break the glass, and may result in personal injury. Step 3. Installing the Software Install the software before connecting the scanner to the computer. Warning ❏ Be sure to log on with administrator privileges when logging on to Windows. ❏ Close all other applications before installing the software. 1. Turn ON your computer. Warning Do not connect the scanner to the computer before installing the software. If you connect the scanner and turn it ON before you install the software, the wizard screen on the right will appear. If this wizard is displayed, click the [Cancel] button to exit the screen, and turn the scanner OFF. Wizard screen (Windows 2000) 2. Insert the DR-1210C Setup Disc into the PC's CD-ROM drive. The setup wizard automatically starts up when you insert the CD-ROM into the CD-ROM drive. If the setup wizard does not start up, execute setup.exe in the CD-ROM. 3. Click [Typical Installation]. If you click [Typical Installation], all of the software is installed. If you want to select which parts of the software to install, click [Custom Installation]. 4. Click [Install]. All of the currently displayed software is installed. To install only selected software, click [Back] and select [Custom Installation]. 5. Click [Next]. ☞Continued on back side
-
 1
1 -
 2
2
 |
 |